Creating data using factories is useful for generating a starting point for an application or for setting up a test case for automated testing. And the cool thing is it supports Eloquent relationships too!
In Laravel, you can use a factory to create a model with related models. Create a single instance with a relation: Category::factory()->has(Post::factory())->create();, or generate multiple instances: Category::factory()->count(3)->has(Post::factory()->count(5))->create();
This tutorial teaches how to define models, factories, and seeders to create data for a model and its relationships. The result will be a seeder that easily fills the database with categories and related posts.
Let’s get started!
Step 1: Create and Run Migrations
Begin by creating migrations for both of your models’ tables using the make:migration command:
php artisan make:migration create_posts_table
php artisan make:migration create_categories_table
Edit the generated migration files to define the structure of both tables.
For posts use:
<?php

use Illuminate\Database\Migrations\Migration;
use Illuminate\Database\Schema\Blueprint;
use Illuminate\Support\Facades\Schema;

return new class extends Migration
{
    /**
     * Run the migrations.
     */
    public function up(): void
    {
        Schema::create('posts', function (Blueprint $table) {
            $table->id();
            $table->string('title');
            $table->text('content');
            $table->foreignId('category_id')->constrained();
            $table->timestamps();
        });
    }

    /**
     * Reverse the migrations.
     */
    public function down(): void
    {
        Schema::dropIfExists('posts');
    }
};
For categories use:
<?php

use Illuminate\Database\Migrations\Migration;
use Illuminate\Database\Schema\Blueprint;
use Illuminate\Support\Facades\Schema;

return new class extends Migration
{
    /**
     * Run the migrations.
     */
    public function up(): void
    {
        Schema::create('categories', function (Blueprint $table) {
            $table->id();
            $table->string('name');
            $table->timestamps();
        });
    }
    /**
     * Reverse the migrations.
     */
    public function down(): void
    {
        Schema::dropIfExists('categories');
    }
};
Then, run the migrations to create the tables:
php artisan migrateStep 2: Create the Models
Generate Eloquent models for both tables by using the make:model command:
php artisan make:model Post
php artisan make:model Category
Step 3: Add the Model Code
Now you’ll need to define the relationships within your model classes.
For the Post model, use:
<?php
namespace App\Models;

use Illuminate\Database\Eloquent\Factories\HasFactory;
use Illuminate\Database\Eloquent\Model;

class Post extends Model
{
    use HasFactory;

    public function category()
    {
        return $this->belongsTo(Category::class);
    }
}
For the Category model, use:
<?php
namespace App\Models;

use Illuminate\Database\Eloquent\Factories\HasFactory;
use Illuminate\Database\Eloquent\Model;

class Category extends Model
{
    use HasFactory;

    public function posts()
    {
        return $this->hasMany(Post::class);
    }
}
Step 4: Creating Factories with Relations
Now we’ll create a factory for each model by running the following artisan commands:
php artisan make:factory PostFactory --model=Post
php artisan make:factory CategoryFactory --model=Category
Now, let’s add the factory code, which essentially defines how the column values of a model should be structured. I chose to use Faker to generate random content. This is useful for inserting arbitrary amounts of unique data into the database that resembles real information to some extent.
For the PostFactory, use:
<?php
namespace Database\Factories;

use Illuminate\Database\Eloquent\Factories\Factory;

class PostFactory extends Factory
{
    /**
     * Define the model's default state.
     *
     * @return <string, mixed>
     */
    public function definition(): array
    {
        return [
            'title' => $this->faker->sentence,
            'content' => $this->faker->paragraph,
        ];
    }
}
For the CategoryFactory, use:
<?php
namespace Database\Factories;

use Illuminate\Database\Eloquent\Factories\Factory;

class CategoryFactory extends Factory
{
    /**
     * Define the model's default state.
     *
     * @return array<string, mixed>
     */
    public function definition(): array
    {
        return [
            'name' => $this->faker->word,
        ];
    }
}
Step 5: Creating a Seeder
To generate seeders that will seed records for both models we’ll run make:seeder:
php artisan make:seeder PostsAndCategoriesTableSeederNow, edit the generated seeder file and add code to the run method. The run method of a seeder is typically where we use factories to create data, in this case, 3 categories, and for each of the categories 5 related posts:
<?php
namespace Database\Seeders;

use App\Models\Category;
use App\Models\Post;
use Illuminate\Database\Seeder;

class PostsAndCategoriesTableSeeder extends Seeder
{
    /**
     * Run the database seeds.
     */
    public function run(): void
    {
        Category::factory()
            ->has(Post::factory()->count(5))
            ->count(3)
            ->create();
    }
}
Step 6: Running the Seeder
Now let’s run the seeder to populate the tables with test data, including relationships between models, by running:
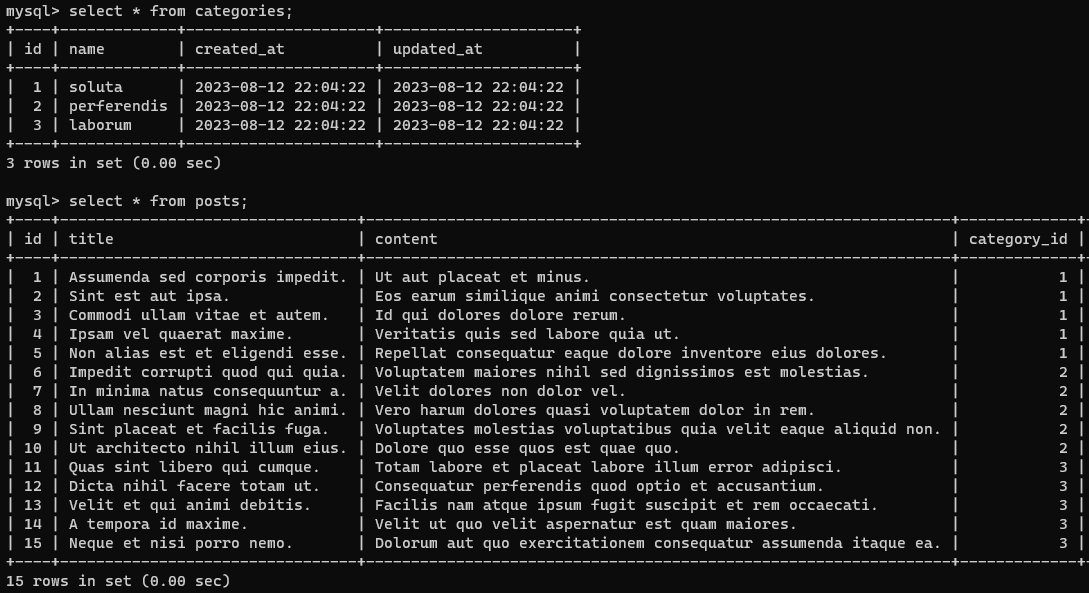
php artisan db:seed --class=PostsAndCategoriesTableSeederNow, if we check our database, we can observe the generated data. By running our seeder we’ve inserted 3 categories and 15 posts (3 x 5 = 15) into the database. We’ve used Faker to generate some mock data with random Latin text as shown in the image below.
That’s it! You’ve successfully generated test data in the categories and the related posts table!
Frequently Asked Questions
When to Use ->for and When to Use ->has on a Factory
Factories support both ->for and ->has when creating instances and relationships. Let’s clarify when to use each method:
Use ->has when:
You want to create multiple related models for each instance of the main model. This is useful when each “Category” has multiple associated “Posts”. For example:
// Create a category and one associated post
Category::factory()->has(Post::factory())->create();
// Create 3 categories, each with 5 associated posts
Category::factory()
    ->count(3)
    ->has(Post::factory()->count(5))
    ->create();
Use ->for when:
You want to associate a single related model with each instance of the main model. For instance, when each Post belongs to a single Category. For example:
// Create a category
$category = Category::factory()->create();
// Create a post and associate it with the category we made
$post = Post::factory()->for($category)->create();
// Create 5 posts and associate each with the category we made
$category = Post::factory()->count(5)->for($category)->create();
Conclusion
Laravel’s features for creating model relationships, combined with factories and seeders are useful tools for adding interconnected data to your database.
Using the techniques shown in this tutorial you’ll be able to generate data for any model and relationship, making testing and development more effective. Now give it a shot by applying it to your own models. Happy coding!
References:
- Eloquent Relationships (Official Documentation)
- Factories (Official Documentation)
- Seeders (Official Documentation)
