Laravel, combined with jQuery Datatables, a jQuery plugin that offers advanced interaction controls to HTML tables, makes it easy to create tables with user-friendly features to display, sort, and filter large datasets.
This guide walks you through adding Datatables to your Laravel application to render sortable, searchable, paginated tables that can handle large amounts of data. We will create an example application that populates a table with random Employee records to showcase how it handles even large datasets with high performance.
Let’s get started!
Step 1: Setting Up Your Laravel Project
First, ensure you have a Laravel project ready. If you’re beginning a new project, create it using the following command:
composer create-project --prefer-dist laravel/laravel laravelDatatablesAfterwards, navigate to your project directory:
cd laravelDatatablesStep 2: Configure Database
For simplicity I recommend using an SQLite Database on your local computer. If you’ve installed Laravel 11 or newer it will use SQLite out of the box. Otherwise you can use it by simply editing the .env file in your Laravel root folder to:
DB_CONNECTION=sqlite
# DB_HOST=127.0.0.1
# DB_PORT=3306
# DB_DATABASE=laravel
# DB_USERNAME=root
# DB_PASSWORD=
Step 3: Adding Datatables to Your Project
The easiest way to integrate Datatables into your Laravel project is by installing the Yajra Datatables package using composer. This package provides a Laravel-specific implementation of Datatables.
Install the package via Composer:
composer require yajra/laravel-datatables-oracleAfter installation, publish the package’s configuration:
php artisan vendor:publish --provider="Yajra\DataTables\DataTablesServiceProvider"Step 4: Create the Model and Migration
Generate the Employee model along with its migration by running:
php artisan make:model Employee -mThis command also generates a migration file where you can define your database schema. Open the created migration file in database/migrations and add some fields to your employees table:
<?php

use Illuminate\Database\Migrations\Migration;
use Illuminate\Database\Schema\Blueprint;
use Illuminate\Support\Facades\Schema;

return new class extends Migration
{
    public function up(): void
    {
        Schema::create('employees', function (Blueprint $table) {
            $table->id();
            $table->string('name');
            $table->string('position');
            $table->date('birth_date');
            $table->date('hired_on');
            $table->timestamps();
        });
    }

    public function down(): void
    {
        Schema::dropIfExists('employees');
    }
};
Run the migration to create the table:
php artisan migrateStep 5: Seeding Fake Data
To demonstrate Datatables effectively, we need some data. Create a seeder for the Employee model:
php artisan make:seeder EmployeeSeederOpen the seeder file and add the following code to use the Faker library to generate some testdata:
<?php

namespace Database\Seeders;

use App\Models\Employee;
use Faker\Factory as Faker;
use Illuminate\Database\Seeder;

class EmployeeSeeder extends Seeder
{
    public function run()
    {
        $faker = Faker::create();

        foreach (range(1, 1000) as $index) {
            Employee::create([
                'name' => $faker->name,
                'position' => $faker->jobTitle,
                'birth_date' => $faker->date('Y-m-d', '2000-01-01'),
                'hired_on' => $faker->date('Y-m-d', 'now'),
            ]);
        }
    }
}
Now run the seeder using the following artisan command:
php artisan db:seed --class=EmployeeSeederStep 6: Creating a Controller
Generate an controller EmployeeController by running the following artisan command:
php artisan make:controller EmployeeControllerStep 7: Add Controller code
Now open the generated controller at app/Controllers/EmployeeController.php and add the code below.
<?php

namespace App\Http\Controllers;

use App\Models\Employee;
use Exception;
use Yajra\DataTables\DataTables;

class EmployeeController extends Controller
{
    /**
     * @throws Exception
     */
    public function index()
    {
        if (request()->ajax()) {
            return DataTables::make(Employee::select('id', 'name', 'position', 'birth_date', 'hired_on'))->make(true);
        }

        return view('employees.index');
    }
}
In the index method, we first check if the request is an AJAX request. If it is, we use the Eloquent model Employee to fetch the necessary employee data from the database and pass it to the DataTables facade. We select specific fields (id, name, position, birth_date, hired_on) from the Employee model, which will be the columns that are displayed in our Datatable.
If the request is not made via AJAX, it means the user is accessing the ‘/employees’ route directly from their browser. In this case, we simply return the view ’employees.index’, which will render the page containing our DataTable.
Step 7: Adding the Route
We will add one route which either renders the Datatables page or returns the table data via Ajax. Open routes/web.php and add the following code:
<?php

use App\Http\Controllers\EmployeeController;
use Illuminate\Support\Facades\Route;

Route::get('/employees', [EmployeeController::class, 'index'])->name('employees.index');
Step 8: Setting Up the View
Create a view resources/views/employees/index.blade.php for your table and the code below to integrate Datatables.
<!DOCTYPE html>
<html>
<head>
    <title>Employee Directory</title>

    <!-- DataTables JavaScript & CSS -->
    <script src="https://cdn.datatables.net/2.0.7/js/dataTables.min.js"></script>
    <link rel="stylesheet" href="https://cdn.datatables.net/2.0.7/css/dataTables.dataTables.min.css">

    <!-- Add jQuery JavaScript -->
    <script src="https://code.jquery.com/jquery-3.7.1.min.js"></script>

    <!-- Our Employee table initialization code -->
    <script>
        $(document).ready(function() {
            $('#employeesTable').DataTable({
                processing: true,
                serverSide: true,
                ajax: '{{ route('employees.index') }}',
                columns: [
                    { data: 'id', name: 'id' },
                    { data: 'name', name: 'name' },
                    { data: 'position', name: 'position' },
                    { data: 'birth_date', name: 'birth_date' },
                    { data: 'hired_on', name: 'hired_on' }
                ],
                responsive: true
            });
        });
    </script>
</head>
<body>
<div class="container">
    <h1 class="mt-4">Employee Directory</h1>
    <table id="employeesTable" class="table table-striped nowrap" style="width:100%">
        <thead>
        <tr>
            <th>ID</th>
            <th>Name</th>
            <th>Position</th>
            <th>Birth Date</th>
            <th>Hired On</th>
        </tr>
        </thead>
    </table>
</div>
</body>
</html>
What this code does is:
- Add JavaScript for jQuery and Datatables
- Add a class `employeesTable` to the
<table>tag, this id is used in the call to.Datatable() - Add a call
$('#employeesTable').DataTable() to initializes Datatables on the <table>
Step 9: Run and Test the application
To run the application execute the following Artisan command:
php artisan serveThen open your browser and navigate to: http://127.0.0.1:8000/employees which will look like this:
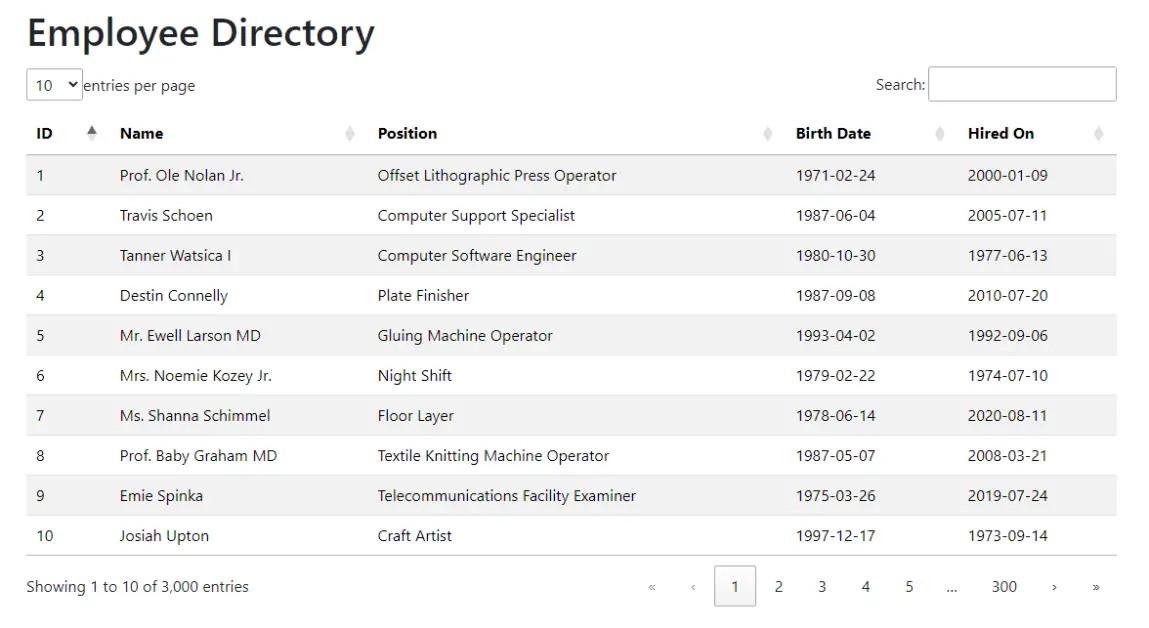
Note your table now automatically has all the Datatables features applied to it:
- Entering a search term in the search box autoloads results from the controller using ajax
- Browsing through pages and changing “entries per page” auto refreshes using ajax too
- Clicking columns sorts your data ascending / descending on the fly
That’s it! You’ve successfully added a functional Datatables powered table to your application!
Conclusion
In this post we’ve added jQuery Datatables to a Laravel application using the jQuery DataTables package by yajra. It allows you to present your data in an efficient and interactive way, enabling your users to search, sort, and browse your data conveniently using pagination.
Thank you for following along with this guide. I hope it helps you when adding tables to your own applications. If you’d like, please let me know how you are using it and if you have any questions or additions.
Happy coding!
References
- Laravel Documentation: https://laravel.com/docs
- Yajra Laravel Datatables Package: https://github.com/yajra/laravel-datatables
- Datatables Documentation: https://datatables.net/