If you are new to Laravel development, you may be wondering how to add your own or third-party CSS to your Laravel application. Fortunately, it’s easy to add CSS to your Laravel project, and there are different methods available to achieve this.
In this article, we’ll show you four ways to include a CSS file in your Laravel project, including direct inclusion from the public folder, CDN URL, using Vite, and using Laravel Mix.
Method 1: Loading CSS Directly From the /public Folder

/public FolderThis method should be used if you’ve written the CSS yourself or if it is third-party CSS that you wish to host on your own website.
To load your CSS file directly from the public folder in your Laravel project, follow these steps:
- Create or use an existing folder in the
publicdirectory and save your CSS file in it. For example, you might save it aspublic/css/styles.css - Add the following code to your blade template in the
headsection of your page’s blade file:
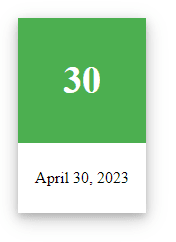
<link rel="stylesheet" href="{{ asset('css/styles.css') }}">As an example let’s make a card with a shadow that looks like this:
Consider the following blade code which shows the inclusion of a CSS file in the <head> section:
<!DOCTYPE html>
<html lang="{{ str_replace('_', '-', app()->getLocale()) }}">
<head>
    <meta charset="utf-8">
    <meta name="viewport" content="width=device-width, initial-scale=1">
    <title>Laracoding.com CSS example</title>
    <link rel="stylesheet" href="{{ asset('css/styles.css') }}">
</head>
<body>
<section class="section">
    <div class="container">
        <div class="columns">
            <div class="column">
                <div class="card">
                    <div class="header">
                        <h1>1</h1>
                    </div>
                    <div class="container">
                        <p>April 30, 2023</p>
                    </div>
                </div>
            </div>
        </div>
    </div>
</section>
</body>
</html>
The CSS file itself containing the styles for our card is as follows:
div.card {
  width: 128px;
  box-shadow: 0 4px 8px 0 rgba(0, 0, 0, 0.2), 0 6px 20px 0 rgba(0, 0, 0, 0.19);
  text-align: center;
}

div.header {
  background-color: #4CAF50;
  color: white;
  padding: 10px;
  font-size: 25px;
}

div.container {
  padding: 10px;
}
Finally we need the following route definition in web.php to view the result in the browser:
<?php

use Illuminate\Support\Facades\Route;

Route::get('/card', function () {
    return view('card');
});
When you load your page at http://localhost/card, you should see your styles applied correctly.
Method 2: Loading CSS From a CDN URL
In some cases the CSS you wish to use is already hosted on a content delivery network (CDN) URL. This is a URL that is often provided in the documentation of third-party libraries like for example Bootstrap.
If you load a CSS file from a CDN rather than serving it from your server it can help speed up your application’s loading time and reduce server load.
To load CSS using a CDN in Laravel follow these steps:
- Find a CDN URL where the CSS file you wish to use is hosted.
- Add the code below to your Laravel application’s blade template file:
<link href="https://cdn.jsdelivr.net/npm/bootstrap@5.2.3/dist/css/bootstrap.min.css" rel="stylesheet">Method 3: Loading CSS From the /resources Folder Using Vite (Laravel 9,10)
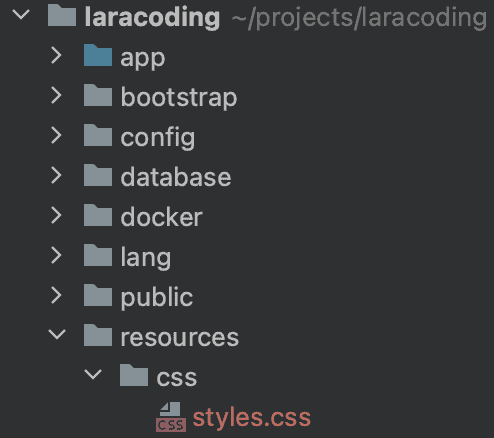
/resources FolderUsing Laravel 9 or 10 you can utilize Vite, a command-line tool for building CSS and JS assets from files in your resources folder. The resulting file(s) will automatically be saved into the public folder.
To build your CSS using Vite, follow these steps:
- Create or use an existing folder in the
resourcesresources/css/styles.css - Create or edit
vite.config.jsin the Laravel root folder and add the following code:
import { defineConfig } from 'vite';
import laravel from 'laravel-vite-plugin';

export default defineConfig({
    plugins: [
        laravel({
            input: ['resources/css/styles.css'],
            refresh: true,
        }),
    ],
});- Run the following npm command to generate a minified CSS file which will be stored in the public folder:
npm run buildShould you run into an error like “‘vite’ is not recognized as an internal or external command” you can fix it by first running the command: npm install
- Add the following @vite directive in your blade template to include the CSS:
@vite(['resources/css/styles.css'])- Now reload your page, and the CSS styling will be applied correctly.
Method 4: Loading CSS From the /resources Folder Using Laravel Mix (Laravel 5,6,7,8)
Laravel Mix is a powerful command-line tool that allows you to compile CSS (and JS) assets from files in the resources folder and save them to the public folder similar to how Vite does it. Note that building files using Laravel Mix is known to be a bit slower compared to Vite.
In order to build your CSS using Laravel Mix, follow these steps:
- Create a new folder in the
resourcesfolder. Name itcssfor example - Save a CSS file in the folder you created. For example, you might save it as
styles.css - Create or edit the file
webpack.config.jsin the Laravel root folder. In this file you can set the location of your CSS file:
const mix = require('laravel-mix');
mix.css('resources/css/styles.css', 'public/css');- Run the following
npmcommand to generate a minified CSS file and store it in the public folder:
npm run prodIf you run into an error like ‘mix’ is not recognized as an internal or external command,
operable program or batch file” you can fix it by first running the command npm install
- Add the following line to your
headsection:
<link href="{{ mix('/css/styles.css') }}" rel="stylesheet">- Now reload your page and the CSS styling will be applied correctly.
Laravel Mix is being phased out by the Laravel team in favor of Vite starting with Laravel 9 and later. It is included by default in Laravel 5, 6, 7, and 8, but not in Laravel 9, 10 and later versions. Should you prefer to use Laravel Mix, you can still manually install it.
To install Laravel Mix on Laravel 9 or later you’ll first need to change your package.json back to what it was in Laravel 8, as you can find here. Otherwise, the npm commands won’t find mix. After that, you can install Laravel Mix by running:
npm install laravel-mixConclusion
In this article, we have explored different methods to include CSS in your Laravel project. Each method has its own advantages and disadvantages, and you can choose the one that fits your project requirements.
Loading CSS directly from the public folder is the simplest approach. Also using a CDN URL is quite straightforward and may help you speed up your application’s loading time and reduce server load. Finally, building your assets with Vite or Mix helps applying code minification for faster page loads, supports SASS and LESS as well as regular CSS, and easily merges multiple files into one.
Now go ahead and add CSS defined styles to your Laravel application. Happy coding!
