In Laravel, all our HTML is defined in Blade templates, including forms and their various input elements and submit button.
This tutorial will illustrate how to use a text input and a textarea within Laravel Blade forms. We’ll walk through building a basic book application where users can input a book’s title and summary.
To ensure the form is user-friendly we will display validation errors when they occur while keeping user-entered values for easy correction.
Let’s get started!
Step 1: Set Up Laravel Environment
Start by creating a new Laravel project:
composer create-project --prefer-dist laravel/laravel bookAppNavigate into your project directory:
cd bookAppStep 2: Create Model and Migration
Generate a Book model along with its migration by running:
php artisan make:model Book -mStep 3: Add Model Code
Now, edit the generated model in app/Models/Book.php and define its fillable attributes. This allows us to easily assign values to these attributes in a single create or update command.
To achieve this, ensure it looks like the example shown below:
<?php

namespace App\Models;

use Illuminate\Database\Eloquent\Model;

class Book extends Model
{
    protected $fillable = [
        'title',
        'summary'
    ];
}
Step 4: Add Migration Code
Edit the generated migration file in database/migrations/ to include fields for title and summary. This step is necessary to define the structure of the books table in the database. Each field represents a column in the table:
id: An auto-incrementing primary key.title: A string field to store the book’s title.summary: A text field to store a summary of the book.timestamps: Two timestamp fields (created_atandupdated_at) to automatically track when records are created and updated.
Ensure the migration file looks like the code snippet below:
<?php

use Illuminate\Database\Migrations\Migration;
use Illuminate\Database\Schema\Blueprint;
use Illuminate\Support\Facades\Schema;

return new class extends Migration
{
    public function up(): void
    {
        Schema::create('books', function (Blueprint $table) {
            $table->id();
            $table->string('title');
            $table->text('summary');
            $table->timestamps();
        });
    }

    public function down(): void
    {
        Schema::dropIfExists('books');
    }
};
Step 5: Run Migration
Run the following command to apply the migration and create the books table:
php artisan migrateStep 6: Create Controller
Generate a controller for handling book operations by running:
php artisan make:controller BookControllerStep 7: Add Controller Code
Implement the following methods in the BookController.php file to handle creating, updating, and listing books:
<?php

namespace App\Http\Controllers;

use App\Models\Book;
use Illuminate\Contracts\View\View;
use Illuminate\Http\RedirectResponse;
use Illuminate\Http\Request;

class BookController extends Controller
{
    public function index(): View
    {
        $books = Book::all();
        return view('books.index', compact('books'));
    }

    public function create(): View
    {
        return view('books.form');
    }

    public function store(Request $request): RedirectResponse
    {
        $validatedData = $request->validate([
            'title' => 'required|max:255',
            'summary' => 'required',
        ]);
        Book::create($validatedData);

        return redirect()->route('books.index');
    }

    public function edit(Book $book): View
    {
        return view('books.form', compact('book'));
    }

    public function update(Request $request, Book $book): RedirectResponse
    {
        $validatedData = $request->validate([
            'title' => 'required|max:255',
            'summary' => 'required',
        ]);
        $book->update($validatedData);

        return redirect()->route('books.index');
    }
}
Step 8: Define Routes
In routes/web.php, set up routes for book-related operations:
<?php

use Illuminate\Support\Facades\Route;
use App\Http\Controllers\BookController;

// Define routes for index, create, store, edit, and update actions
Route::get('books', [BookController::class, 'index'])->name('books.index');
Route::get('books/create', [BookController::class, 'create'])->name('books.create');
Route::post('books', [BookController::class, 'store'])->name('books.store');
Route::get('books/{book}/edit', [BookController::class, 'edit'])->name('books.edit');
Route::put('books/{book}', [BookController::class, 'update'])->name('books.update');
Alternatively, you can use a more concise version to achieve the same result:
<?php

use Illuminate\Support\Facades\Route;
use App\Http\Controllers\BookController;

Route::resource('books', BookController::class)->except(['show', 'destroy']);
The shorthand version provides a convenient way to define resourceful routes for CRUD operations with minimal code. It automatically generates routes for common RESTful actions such as index, create, store, edit, and update, while excluding specific actions like show and destroy.
Step 9: Create Blade View With Form
Create a Blade template at resources/views/books/form.blade.php for adding new books:
<!DOCTYPE html>
<html>
<head>
    <title>{{ isset($book) ? 'Edit' : 'Add' }} Book</title>
    <!-- Bootstrap CSS -->
    <link href="https://cdn.jsdelivr.net/npm/bootstrap@5.3.3/dist/css/bootstrap.min.css" rel="stylesheet">
</head>
<body>
<div class="container mt-5">

    <h1>{{ isset($book) ? 'Edit' : 'Add' }} Book</h1>

    <form method="POST" action="{{ isset($book) ? route('books.update', $book) : route('books.store') }}">
        @csrf
        @if(isset($book)) @method('PUT') @endif

        <div class="mb-3">
            <label for="title" class="form-label">Title</label>
            <input type="text" name="title"
                   id="title" class="form-control"
                   value="{{ old('title', $book->title ?? '') }}"
            >
            @error('title')
                <div class="text-danger">{{ $message }}</div>
            @enderror
        </div>

        <div class="mb-3">
            <label for="summary" class="form-label">Summary</label>
            <textarea name="summary" id="summary"
                      class="form-control" rows="5"
            >{{ old('summary', $book->summary ?? '') }}</textarea>
            @error('summary')
                <div class="text-danger">{{ $message }}</div>
            @enderror
        </div>

        <button type="submit" class="btn btn-primary">{{ isset($book) ? 'Update' : 'Create' }}</button>
        <a href="{{ route('books.index') }}" class="btn btn-secondary">Cancel</a>
    </form>
</div>
</body>
</html>
A few notes on how this view is implemented:
- A
<form>element is used for submitting book data. Itsactionattribute is dynamically set to either thebooks.updateroute (if$bookis set) or thebooks.storeroute (if$bookis not set). The@csrfdirective generates a CSRF token, and the@method('PUT')directive is used if$bookis set to override the POST method with PUT for updating. - Inside the form, there are two form fields:
- A text input field for the book title, with a label and error message display.
- A textarea input field for the book summary, with a label and error message display.
- The
valueattribute of both form fields is set to display the old input values (if any) or the book’s current title and summary (if$bookis set). - The
<button>element changes its label to “Update” or “Create” based on whether$bookis set.
Step 10: Create Blade View for Index
Create a view file at resources/views/books/index.blade.php which displays tasks in a table by using the code below:
<!DOCTYPE html>
<html>
<head>
    <title>Book List</title>
    <!-- Bootstrap CSS -->
    <link href="https://cdn.jsdelivr.net/npm/bootstrap@5.3.3/dist/css/bootstrap.min.css" rel="stylesheet">
</head>
<body>
<div class="container mt-5">
    <h1>Books</h1>
    <a href="{{ route('books.create') }}" class="btn btn-primary mb-3">Add New Book</a>
    <table class="table">
        <thead>
            <tr>
                <th>Title</th>
                <th>Summary</th>
                <th>Action</th>
            </tr>
        </thead>
        <tbody>
            @forelse($books as $book)
                <tr>
                    <td>{{ $book->title }}</td>
                    <td>{{ Str::limit($book->summary, 50) }}</td>
                    <td>
                        <a href="{{ route('books.edit', $book->id) }}" class="btn btn-secondary">Edit</a>
                    </td>
                </tr>
            @empty
                <tr>
                    <td colspan="3">No books found.</td>
                </tr>
            @endforelse
        </tbody>
    </table>
</div>
</body>
</html>
Step 11: Run and Test the Application
Start application by running the following Arisan command:
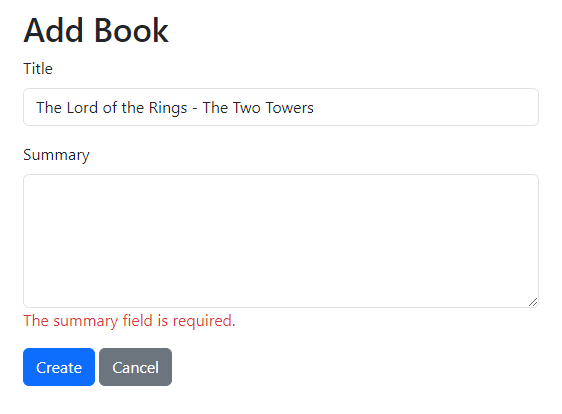
php artisan serveNavigate to http://localhost:8000/books and click “Add Bew Book” to see your form in action. Try adding a new book to test if the form captures the title and summary correctly.
Notice how the form will keep input values when validation error(s) occurred. This way the user can correct only missing fields or fields with errors and resubmit the form.
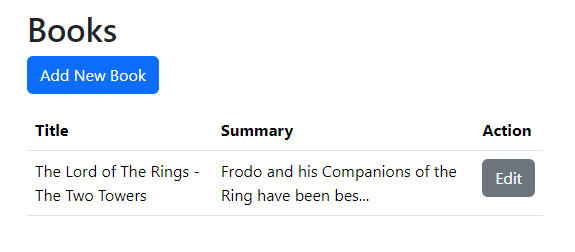
After adding the book it will show on the index page:
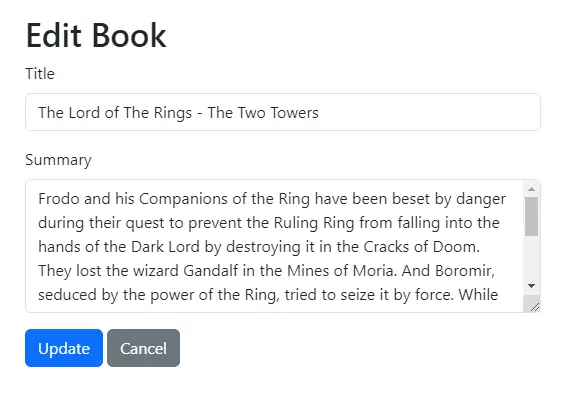
Also try the Edit button to update existing book and see it correctly populates the form based on the book record previously saved in the database:
Frequently Asked Questions
How Can I Disable Autocomplete on a Text Input in Blade?
Sometimes a form will suggest previously entered texts and lists a with autocomplete suggestions. This is not always desirable. You can disable autocomplete on a text input field by setting the autocomplete attribute to off in your input tag. For example:
<input type="text" name="user_name" autocomplete="off">How Can I Add a Placeholder to a Text Input or Textarea in Blade?
To add a placeholder to a text input or textarea, use the placeholder attribute within the <input> or <textarea> tag. This attribute specifies a hint that describes the expected value of the input field when it is empty.
Text Input Example:
<input type="text" name="username" class="form-control" placeholder="Enter username">Adds a light gray text indicating the text input’s purpose which looks like this:

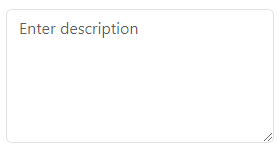
Textarea Example:
<textarea name="message" placeholder="Write your message here"></textarea>Adds a light gray text indicating the textarea’s purpose which looks like this:
How Can I Turn a Text Input into a Datepicker in Blade?
To turn a text input into a datepicker, you can use the type="date" attribute in the <input> tag. Modern browsers support this attribute by displaying a built-in datepicker when the input field is focused.
<input type="date" name="birthday" placeholder="Select a date">This code will render a text input that, when clicked, shows a calendar-style datepicker, allowing users to select a date. Note that the appearance and functionality of the datepicker can vary between browsers.
How Can I Limit the Number of Characters in an Input Field or Textarea in Blade?
To limit the number of characters in an input field or textarea you can use the maxlength attribute. This attribute specifies the maximum number of characters (as UTF-16 code units) the user can enter into the field.
Text Input Example:
<input type="text" name="username" maxlength="20" placeholder="Maximum 20 characters">Textarea Example:
<textarea name="bio" maxlength="200" placeholder="Maximum 200 characters"></textarea>Note: Your Laravel application should still apply validation rules to enforce a maximum as well, since it may be circumvented by the user’s browser.
Can I auto-resize a textarea in Blade based on the content?
You can auto-resize a textarea based on its content in a Laravel Blade file by using JavaScript or CSS. Here’s a simple JavaScript approach that adjusts the textarea height automatically as the user types:
<textarea id="autoresizing" class="form-control" style="overflow-y:hidden;"
          oninput="this.style.height = '';this.style.height = this.scrollHeight + 'px'"
></textarea>

<script>
document.addEventListener('DOMContentLoaded', function() {
    const textarea = document.getElementById('autoresizing');
    textarea.style.height = ''; // Reset height - optional
    textarea.style.height = textarea.scrollHeight + 'px';
});
</script>
This code sets the textarea’s height property based on its scrollHeight every time the user inputs text, effectively resizing the textarea to fit its content.
Conclusion
In this guide, we’ve covered how to handle text and textarea inputs in Laravel Blade forms. We’ve demonstrated their usage in a simple application for creating books and listing them on an index page.
You’ve learned how to set up the environment, create models, migrations, controllers, and views, and handle form validation.
I hope this guide is helpful when implementing forms in your own applications. If you’d like to share how you are using forms in Laravel or if you have any questions, feel free to let me know in the comments below.
Happy coding!
References
- Blade Templates Documentation (Official Laravel Documentation)
- Validation – Writing the Validation Logic (Official Laravel Documentation)
- Using
<input type="text">(MDN Web Docs) - Using
<textarea>(MDN Web Docs)
This entry is part 9 of 9 in the series Working With Forms
- Sending a Form to a PUT Route in Laravel (With Example)
- Sending a Form to a DELETE Route in Laravel (With Example)
- Why Use Laravel Form Request and How? (BIG Code improvement)
- Making a File Upload Form in Laravel: a Step-by-Step Guide
- How to Insert Form Array Values Into the Database in Laravel
- Using Form Checkboxes in Laravel Blade (keep old value)
- Using Form Select in Laravel Blade (keep old value)
- Using Form Radio Buttons in Laravel Blade (keep old value)
- Using Text and Textarea in Laravel Blade (keep old value)