In this tutorial, I’ll demonstrate how to properly use radio buttons in Blade forms. We’ll be building an example application that stores a task’s name and priority, as set by a radio button.
We’ll cover displaying a list of tasks, handling form submissions for storing or updating tasks, implementing proper radio button validation, and effectively handling error messages.
Let’s get started!
Step 1: Set Up Laravel Environment
First, ensure you have Laravel installed. If not, install it using Composer:
composer create-project --prefer-dist laravel/laravel laravel-radio-demoAfterwards, navigate into your project directory:
cd laravel-radio-demoStep 2: Configure Database
Set up your .env file for database connection. For simplicity, I suggest you SQLite be setting:
DB_CONNECTION=sqlite
# DB_HOST=127.0.0.1
# DB_PORT=3306
# DB_DATABASE=laravel
# DB_USERNAME=root
# DB_PASSWORD=
Remember to create the SQLite database file. You can use your editor to create a blank file at database/database.sqlite, or if you are on Mac or Linux, you can simply run:
touch database/database.sqliteStep 3: Create Model and Migration
Generate a Task model along with its migration:
php artisan make:model Task -mStep 4: Add Model Code
Open app/Models/Task.php and prepare your model:
<?php

namespace App\Models;

use Illuminate\Database\Eloquent\Model;

class Task extends Model
{
    protected $fillable = [
        'name',
        'priority'
    ];
}
Step 5: Add Migration Code
Update your migration file in database/migrations/YYYY_MM_DD_HHMMSS_create_tasks_table.php to include a string field for priority like show below:
<?php

use Illuminate\Database\Migrations\Migration;
use Illuminate\Database\Schema\Blueprint;
use Illuminate\Support\Facades\Schema;

return new class extends Migration
{
    public function up()
    {
        Schema::create('tasks', function (Blueprint $table) {
            $table->id();
            $table->string('name');
            $table->string('priority');
            $table->timestamps();
        });
    }

    public function down()
    {
        Schema::dropIfExists('tasks');
    }
};
Step 6: Run Migration
Execute your migration to create the tasks table by running:
php artisan migrateStep 7: Create Controller
Now generate a controller for handling our task operations by running:
php artisan make:controller TaskControllerStep 8: Add Controller Code
Edit app/Http/Controllers/TaskController.php to manage tasks, focusing on creating and editing functionalities:
<?php

namespace App\Http\Controllers;

use App\Models\Task;
use Illuminate\Http\RedirectResponse;
use Illuminate\Http\Request;
use Illuminate\View\View;

class TaskController extends Controller
{
    // Display tasks
    public function index(): View
    {
        $tasks = Task::all();

        return view('tasks.index', compact('tasks'));
    }

    // Show form for new task
    public function create(): View
    {
        return view('tasks.form', [
            'task' => new Task
        ]);
    }

    // Store new task
    public function store(Request $request): RedirectResponse
    {
        $request->validate([
            'name' => 'required',
            'priority' => 'required|in:Low,Medium,High'
        ]);
        Task::create($request->all());

        return redirect()->route('tasks.index');
    }

    // Show form for editing task
    public function edit(Task $task): View
    {
        return view('tasks.form', compact('task'));
    }

    // Update task
    public function update(Request $request, Task $task): RedirectResponse
    {
        $request->validate([
            'name' => 'required',
            'priority' => 'required|in:Low,Medium,High'
        ]);
        $task->update($request->all());

        return redirect()->route('tasks.index');
    }
}
Step 9: Define Routes
In your routes/web.php, define routes for task operations:
<?php

use App\Http\Controllers\TaskController;
use Illuminate\Support\Facades\Route;

Route::get('/', [TaskController::class, 'index']);
Route::resource('tasks', TaskController::class)->except(['show', 'destroy']);
Step 10: Create Blade View With Form
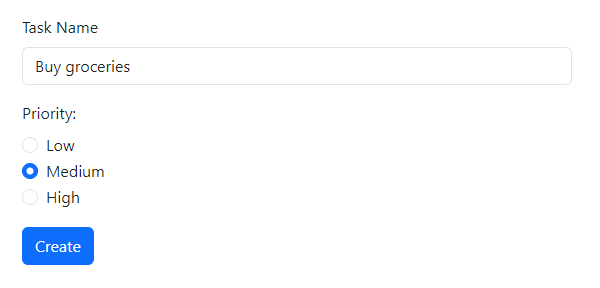
Create a Blade view resources/views/tasks/form.blade.php for task creation and editing. This form uses radio buttons for setting task priority:
<!DOCTYPE html>
<html>
<head>
    <title>Task Form</title>
    <!-- Bootstrap 5 CSS -->
    <link href="https://cdn.jsdelivr.net/npm/bootstrap@5.3.0/dist/css/bootstrap.min.css" rel="stylesheet">
</head>
<body>
<div class="container mt-5">
    <form action="{{ isset($task->id) ? route('tasks.update', $task->id) : route('tasks.store') }}" method="POST" class="row g-3">
        @csrf
        @if(isset($task->id)) @method('PUT') @endif

        <div class="col-md-6">
            <label for="name" class="form-label">Task Name</label>
            <input type="text" class="form-control"
                   id="name"
                   name="name"
                   value="{{ old('name', isset($task) ? $task->name : '') }}"
            >
            @error('name')
            <div class="text-danger">{{ $message }}</div>
            @enderror
        </div>


        <div class="col-12">
            <label class="form-label">Priority:</label>
            <div class="form-check">
                <input type="radio" class="form-check-input"
                       name="priority"
                       value="Low" {{ old('priority', $task->priority) == 'Low' ? 'checked' : '' }}
                >
                <label class="form-check-label" for="priorityLow">
                    Low
                </label>
            </div>
            <div class="form-check">
                <input type="radio" class="form-check-input"
                       name="priority"
                       value="Medium" {{ old('priority', $task->priority) == 'Medium' ? 'checked' : '' }}
                >
                <label class="form-check-label" for="priorityMedium">
                    Medium
                </label>
            </div>
            <div class="form-check">
                <input type="radio" class="form-check-input"
                       name="priority"
                       value="High" {{ old('priority', $task->priority) == 'High' ? 'checked' : '' }}
                >
                <label class="form-check-label" for="priorityHigh">
                    High
                </label>
            </div>
            @error('priority')
            <div class="text-danger">{{ $message }}</div>
            @enderror
        </div>

        <div class="col-12">
            <button type="submit" class="btn btn-primary">
                {{ isset($task->id) ? 'Update' : 'Create' }}
            </button>
        </div>
    </form>
</div>

</body>
</html>
A few notes on how this view is implemented:
- We set
@method PUTin case we are updating an existing task
This will ensure it uses the PUT route that leads to the Controller update method while for store it will use the default, which is POST - We add
@csrfin the form
This will make sure Laravel can verify the form submission originated from your application - We use the helper function
old()
This ensures we read and repopulate the value that the user picked in case the form is shown a second time - We read and use the value in $task->name and $task->priority in case there is no value from a previous submission found with
old() - For both the task name input and the priority input we use blade directive @error to retrieve and display validation error messages, should they be set
Step 11: Create Blade View For Index
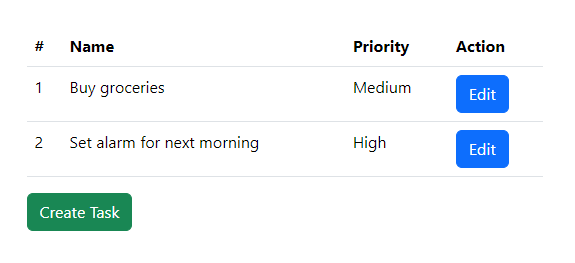
Create a view file at resources/views/tasks/index.blade.php which displays tasks in a table by using the code below:
<!DOCTYPE html>
<html lang="en">
<head>
    <meta charset="UTF-8">
    <meta name="viewport" content="width=device-width, initial-scale=1.0">
    <title>Todo App</title>
    <!-- Bootstrap CSS -->
    <link href="https://cdn.jsdelivr.net/npm/bootstrap@5.3.3/dist/css/bootstrap.min.css" rel="stylesheet">
</head>
<body>
<div class="container mt-5">

    <table class="table">
        <thead>
        <tr>
            <th>#</th>
            <th>Name</th>
            <th>Priority</th>
            <th>Action</th>
        </tr>
        </thead>
        <tbody>
        @forelse($tasks as $task)
            <tr>
                <td>{{ $task->id }}</td>
                <td>{{ $task->name }}</td>
                <td>{{ $task->priority }}</td>
                <td>
                    <a href="{{ route('tasks.edit', $task->id) }}" class="btn btn-primary">Edit</a>
                </td>
            </tr>
        @empty
            <tr>
                <td colspan="4" class="text-center">No tasks found.</td>
            </tr>
        @endforelse
        </tbody>
    </table>

    <a href="{{ route('tasks.create') }}" class="btn btn-success">Create Task</a>
</div>

</body>
</html>
Step 12: Run and Test the Application
To start the application run the following Artisan command:
php artisan serveNavigate to http://localhost:8000 to view the task list and add a new task or edit existing ones, using radio buttons to set priorities.
Conclusion
By following these steps, you’ve created a Laravel application that uses radio buttons in a form, validates and stores the values that were picked by the user. We’ve also covered how to properly use the old() helper function to repopulate the value in case of redisplaying the form with errors.
Now go ahead and try it out in your own application. Let me know in the comments below if you have any questions or if you’d like to share how you are using radio buttons with Laravel.
Happy coding!
References
- Requests – Retrieving Old Input (Laravel Documentation)
- CSRF Protection (Laravel Documentation)
This entry is part 8 of 9 in the series Working With Forms
- Sending a Form to a PUT Route in Laravel (With Example)
- Sending a Form to a DELETE Route in Laravel (With Example)
- Why Use Laravel Form Request and How? (BIG Code improvement)
- Making a File Upload Form in Laravel: a Step-by-Step Guide
- How to Insert Form Array Values Into the Database in Laravel
- Using Form Checkboxes in Laravel Blade (keep old value)
- Using Form Select in Laravel Blade (keep old value)
- Using Form Radio Buttons in Laravel Blade (keep old value)
- Using Text and Textarea in Laravel Blade (keep old value)