Laravel provides several methods to validate user input sent as arrays, enabling you to validate complex data structures without reinventing the wheel yourself.
This article will explore a range of array validation techniques supported by Laravel, along with practical examples. By the end, you’ll have a solid understanding of array validation in Laravel and be able to handle various array validation scenarios in your own projects.
Let’s get started!
Validating Array Keys Using Validation Rules
In some cases, you may need to validate a simple non-nested array, where the array itself contains a set of key-value pairs. Laravel provides a convenient way to validate such input using the array validation rule.
To validate an array in Laravel, use the built-in array rule within your validation rules. This rule verifies that the input being validated is indeed an array. You may additionally specify the valid key names that are allowed within the array as a comma-separated list following the colon (:).
Consider this example:
$input = [
    'user' => [
        'name' => 'Taylor Otwell',
        'username' => 'taylorotwell',
        'admin' => true,
    ],
];

$validator = Validator::make($input, [
    'user' => 'array:name,username', // allow keys 'name' and 'username' but not 'admin'
]);

if (!$validator->valid()) {
    dd($validator->errors());
}
In this example, we have an array named 'user' with three key-value pairs: 'name', 'username', and 'admin'. Our validation should ensure that the array may contain only the 'name' and ' keys and disallow the use of any other.username'
Should the input array not provide any of the specified keys or contain additional keys, the validation will fail. In other words, the example above will fail unless we remove the key 'admin' which is not allowed by our rule.
Validating Array Values using Validation Rules With Wildcard
Let’s consider an example where a user can tick checkboxes with their favorite activities and send them using a form. And let’s say we also want to require at least 2 activities to be checked by the user.
To apply a validation rule to each value within arrays, use an asterisk (*) in the rule’s keys. For example, you can use items.*.id => required to require a non-empty ID for each item or items.*.quantity => min:1 to require the values to be greater than or equal to one.
To validate the array of selected hobbies, we can use the following validation rule:
$validatedData = $request->validate([
    'activities' => 'required|array|min:2',
    'activities.*' => 'string|in:code,netflix,games,sports,reading'
]);Therequired rule ensures that at least one hobby is selected. Additionally, the in rule validates that the selected hobbies match the specified values (‘code’, ‘netflix’, ‘games’, ‘sports’ or ‘reading’), while the min rule validates that at least 2 boxes must be checked.
Here’s an example of how an example form could look like in a blade view:
<form method="post" action="{{ route('activities.store') }}">
    @csrf
    <p>Select your favorite activities</p>

    <label class="checkbox">
        <input type="checkbox" name="activities[]" value="code"> Write code
    </label>
    <label class="checkbox">
        <input type="checkbox" name="activities[]" value="netflix"> Watching Netflix
    </label>
    <label class="checkbox">
        <input type="checkbox" name="activities[]" value="games"> Computer games
    </label>
    <label class="checkbox">
        <input type="checkbox" name="activities[]" value="sports"> Playing sports
    </label>
    <label class="checkbox">
        <input type="checkbox" name="activities[]" value="reading"> Reading
    </label>
    <div class="control">
        <button type="submit" class="button is-link">Submit</button>
    </div>
</form>
Showing and styling form validation errors on your page
By default, Laravel will respond to a failed validation by redirecting back and providing the validation errors for your code to display in a variable `$errors`. In order for your users to actually see the validation errors you should include suitable code to access them using $errors->all() in your blade template.
@if ($errors->any())
<div class="notification is-danger is-light">
<ul>
@foreach ($errors->all() as $error)
<li>{{ $error }}</li>
@endforeach
</ul>
</div>
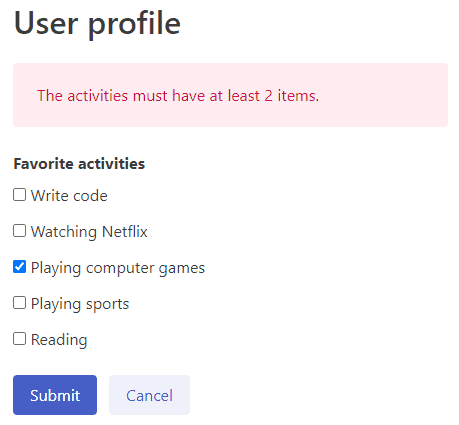
@endifUnstyled this list of errors looks rather plain and not user-friendly. You can easily achieve better styling as shown in the image below, where I’ve used the CSS framework Bulma.
A side effect of the redirect is that your checkboxes will be unticked. Using the Laravel helper function old() we can access the values as originally entered by the user into the form. To re-apply all checks on the checkboxes we must use the following code.
<div class="field">
    <label class="checkbox">
        <input type="checkbox" name="activities[]" value="code" {{ (is_array(old('activities')) and in_array('code', old('activities'))) ? ' checked' : '' }})> Write code
    </label>
</div>
Applying the tips above results in the following user-friendly output:
Validating Nested Array Values Using Rules With a Wildcard
Suppose we have a form where we collect information about multiple people, like their names and email address. We’ll need an array for the people indices and in it an associative array that holds the values for name and email. Luckily nested arrays are supported in HTML and Laravel provides a flexible syntax to define rules to properly validate them
To validate values within a nested array use the asterisk * notation, followed by a dot and a key name. This indicates that there can be multiple items in the array, where each needs to satisfy specific validation rules. For example, 'person.*.name' => 'required' allows you to validate multiple persons in the input, where each person must have a non-empty name.
Consider the following example:
$validatedData = $request->validate([
    'person.*.name' => 'required',
    'person.*.email' => 'required|email',
]);
The rule above will validate any number of people as input and make sure they have both a name and email value filled in their nested array and that the email is in the correct format.
The rule person.*.name ensures that the name field for each person is required, while the rule person.*.email validates the email field for each person as required, and with a valid email format.
The blade code to make a form for 3 people could look like this:
<form method="post" action="{{ route('activities.store') }}">
@csrf
@for ($i = 1; $i <= 3; $i++)
<div class="field">
<label class="label">Person {{ $i }}</label>
<div class="control">
<input type="text" name="person[{{ $i }}][name]" placeholder="Name">
<input type="text" name="person[{{ $i }}][email]" placeholder="Email">
</div>
</div>
@endfor
<div class="control">
<button type="submit" class="button is-link">Submit</button>
</div>
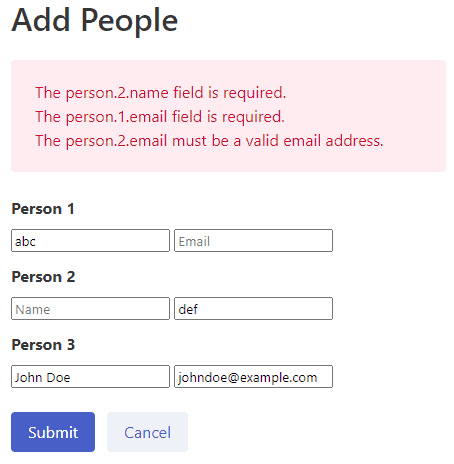
</form>By adding some CSS and blade code to show the actual validation errors we can now achieve the following result:
Move Array Validation to Form Request to Minimize Controller
A clean way to add your validation code using Laravel is to include validation rules in a separate request class. This way the controller code will remain short and bloat-free.
To start, generate the Form Request class using the following Artisan command:
php artisan make:request StorePeopleRequestThis will generate a new file in app/Http/Requests/StorePeopleRequest.php. Open the generated StorePeopleRequest class and modify it as follows:
namespace App\Http\Requests;

use Illuminate\Foundation\Http\FormRequest;

class StorePeopleRequest extends FormRequest
{
    public function rules()
    {
        return [
            'person.*.name' => 'required',
            'person.*.email' => 'required|email',
        ];
    }
}
Next, update your controller’s store method signature to include the StorePeopleRequest class as a type hint for the $request parameter:
<?php

namespace App\Http\Controllers;

use App\Http\Requests\StorePeopleRequest;

class PeopleController extends Controller
{
    public function store(StorePeopleRequest $request)
    {
        // The array validation has already been performed
        // Access the validated data using $request->validated()
    }
}
This change will lead Laravel to automatically apply all validation rules provided in the StorePeopleRequest
For a full example of using Form Requests to improve your code, read my detailed guide: Why Use Laravel Form Request and How? (BIG Code improvement)
Conclusion
Throughout this article, we explored various techniques for array validation, including validating array keys, validating array values using the asterisk (*) notation, validating nested array values, and using form request classes for handling array validation.
Apply these methods to easily enforce validation rules on array data, whether it’s simple non-nested arrays or complex nested structures. Laravel’s built-in validation capabilities provide flexibility and convenience, allowing you to create clean and concise code. Happy coding!

I was curious if you ever considered changing the structure of your site? Its very well written; I love what youve got to say. But maybe you could a little more in the way of content so people could connect with it better. Youve got an awful lot of text for only having 1 or two images. Maybe you could space it out better?
Thank you for your feedback! Your input is greatly appreciated. I understand your point about the need for more visual elements and improved readability. I’m continuously working to enhance my content, and your suggestions are incredibly valuable.
If you have any more thoughts or suggestions in the future, please feel free to share them. Thanks again for taking the time to reach out!
Thanks for sharing
You’re most welcome, I’m glad you’ve found the post useful 🙂