When creating applications that receive user input, validating form data is crucial for security and data quality. Laravel can apply validation rules either inline in the controller or by applying rules defined in a Form Request class.
In this article, we’ll learn how to apply our validation rules using a FormRequest class instead of relying on inline validation inside a controller.
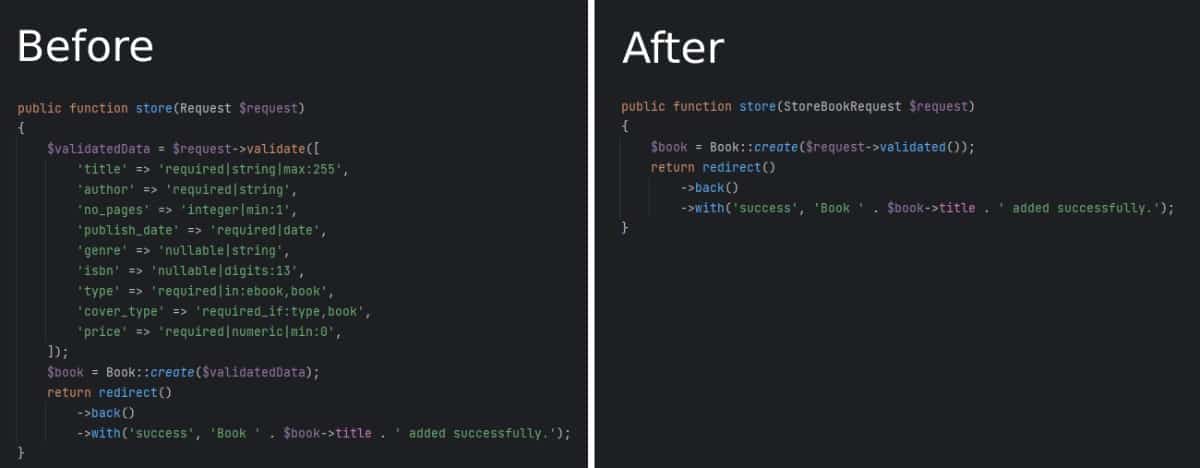
The main advantage of using a Form Request class is that it helps minimize the code in the Controller. Additionally, the validation rules defined in the Form Request class can be easily reused not only for validating browser forms but also for API calls and even input from a custom artisan command.
The difference in code is easy to see, especially when using many validation rules as shown in the image below:
Let’s dive in and explore how exactly we can achieve this improvement.
Step 1: Create Model and Migration
First, create the Book model and migration. Open your terminal and run the following commands:
php artisan make:model Book --migrationThis will generate a Book model in the app/Models directory and a corresponding migration file in the database/migrations directory. Open the migration file and define the table schema according to your needs. For example, the migration file may look like this:
<?php

use Illuminate\Database\Migrations\Migration;
use Illuminate\Database\Schema\Blueprint;
use Illuminate\Support\Facades\Schema;

return new class extends Migration
{
    public function up(): void
    {
        Schema::create('books', function (Blueprint $table) {
            $table->id();
            $table->string('title');
            $table->string('author');
            $table->integer('no_pages')->nullable();
            $table->date('publish_date');
            $table->string('genre')->nullable();
            $table->string('isbn')->nullable();
            $table->string('type');
            $table->string('cover_type')->nullable();
            $table->decimal('price', 4, 2);
            $table->timestamps();
        });
    }

    public function down(): void
    {
        Schema::dropIfExists('books');
    }
};
Now run the migration using:
php artisan migrateStep 2: Enable Mass Assignment
To enable mass assignment for the Book model, open the Book.php file in the app/Models directory. Add the $fillable property and specify the attributes that are allowed to be mass assigned. For our example, it may look like this:
namespace App\Models;

use Illuminate\Database\Eloquent\Factories\HasFactory;
use Illuminate\Database\Eloquent\Model;

class Book extends Model
{
    use HasFactory;

    protected $fillable = [
        'title',
        'author',
        'no_pages',
        'publish_date',
        'genre',
        'isbn',
        'type',
        'cover_type',
        'price',
    ];
}
Step 3: Creating the Form Request Class
To create the Form Request class for book validation, use the make:request Artisan command. Open your terminal and run the following command:
php artisan make:request StoreBookRequestThis will generate a StoreBookRequest.php file in the app/Http/Requests directory. Open the StoreBookRequest.php file and update the rules() method to define the validation rules for the book attributes.
Open the newly created StoreBookRequest class and define the validation rules as follows:
namespace App\Http\Requests;

use Illuminate\Foundation\Http\FormRequest;

class StoreBookRequest extends FormRequest
{
    public function rules()
    {
        return [
            'title' => 'required|string|max:255',
            'author' => 'required|string',
            'no_pages' => 'integer|min:1',
            'publish_date' => 'required|date',
            'genre' => 'nullable|string',
            'isbn' => 'nullable|digits:13',
            'type' => 'required|in:ebook,book',
            'cover_type' => 'required_if:type,book',
            'price' => 'required|numeric|min:0',
        ];
    }
}
Step 4: Create the Controller
Now, let’s create the BookController and add its store method. Run the command below to generate the controller:
php artisan make:controller BookControllerNow, add the store() method to your controller using our Form Request class StoreBookRequest as shown in the code below:
<?php

namespace App\Http\Controllers;

use App\Http\Requests\StoreBookRequest;
use App\Models\Book;

class BookController extends Controller
{
    public function store(StoreBookRequest $request)
    {
        // .. when our code reached this far, the validation was succesful

        Book::create($request->validated());

        // Redirect or perform additional actions as needed
        return redirect()->route('books.index');
    }
}
It’s important to note that the store function in our Controller accepts the $request object of type StoreBookRequest. This object is automatically instantiated by Laravel’s Dependency Injection mechanism. When a Form Request is injected in this manner, Laravel automatically applies the validation rules defined in the rules() method of the corresponding class. As a result, the Controller does not require any additional code to trigger the validation process.
In the following steps, we will create a form to test our code in the browser.
Step 5: Create a Form to Store a Book
Now, let’s create the form view for storing a book. Open a view file located at resources/views/books/create.blade.php and add the following form code:
<h1 class="title">Add a Book</h1>

@if(session()->has('success'))
    <p>
        {{ session()->get('success') }}
    </p>
@endif

@if ($errors->any())
    <ul>
        @foreach ($errors->all() as $error)
            <li>{{ $error }}</li>
        @endforeach
    </ul>
@endif

<form method="POST" action="{{ route('books.store') }}">
    @csrf

    <table>
        <tr>
            <td>Title</td>
            <td><input type="text" name="title" value=""></td>
        </tr>
        <tr>
            <td>Author</td>
            <td><input type="text" name="author" value=""></td>
        </tr>
        <tr>
            <td>No. pages</td>
            <td><input type="text" name="no_pages" value=""></td>
        </tr>
        <tr>
            <td>Publish date</td>
            <td><input type="date" name="publish_date" value=""></td>
        </tr>
        <tr>
            <td>Genre</td>
            <td><input type="text" name="genre" value=""></td>
        </tr>
        <tr>
            <td>ISBN</td>
            <td><input type="text" name="isbn" type="number" value=""></td>
        </tr>
        <tr>
            <td>Type</td>
            <td>
                <select name="type">
                    <option value="">- Please select -</option>
                    <option value="ebook">eBook</option>
                    <option value="book">Book</option>
                </select>
            </td>
        </tr>
        <tr>
            <td>Cover type</td>
            <td>
                <select name="cover_type">
                    <option value="">- Please select -</option>
                    <option value="ebook">Hardcover</option>
                    <option value="book">Paperback</option>
                </select>
            </td>
        </tr>
        <tr>
            <td>Price</td>
            <td><input type="text" name="price" value=""></td>
        </tr>
    </table>

    <button type="submit">Save Book</button>
</form>
Step 6: Display the Book Creation Form
To display the book creation form, add a route and a corresponding method in your BookController.php file:
<?php

namespace App\Http\Controllers;

use App\Http\Requests\StoreBookRequest;
use App\Models\Book;

class BookController extends Controller
{
    // .. other functions

    public function create()
    {
        return view('books.create');
    }
}
Update your routes/web.php file with the following route definition:
<?php
use App\Http\Controllers\BookController;
use Illuminate\Support\Facades\Route;
Route::get('/books/create', [BookController::class, 'create'])->name('books.create');
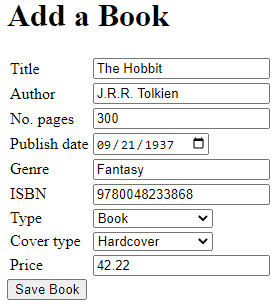
Route::post('/books/store', [BookController::class, 'store'])->name('books.store');We can now view our form:
And, when validation passes, save it:
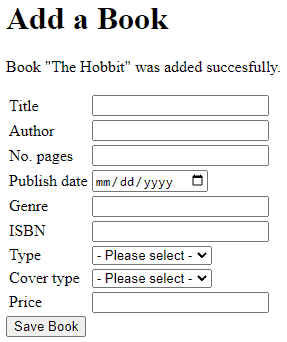
That’s it! You’ve successfully implemented Laravel Form Request classes for validating and storing a book in your application.
Conclusion
Using Laravel Form Request classes helps a great deal to improve code organization, reusability, and maintainability. By centralizing your validation rules and separating them from your controller logic, you can create cleaner, more readable code and ensure consistent data validation across different contexts, like browser forms, API calls, and custom artisan commands.
By using Laravel’s features, such as mass assignment and FormRequest classes, you can improve the quality of your applications while reducing lines of code and avoiding duplication.
Hopefully, you’ve gained some new insights along the way which will help you develop excellent applications. Happy coding!
This entry is part 3 of 9 in the series Working With Forms
- Sending a Form to a PUT Route in Laravel (With Example)
- Sending a Form to a DELETE Route in Laravel (With Example)
- Why Use Laravel Form Request and How? (BIG Code improvement)
- Making a File Upload Form in Laravel: a Step-by-Step Guide
- How to Insert Form Array Values Into the Database in Laravel
- Using Form Checkboxes in Laravel Blade (keep old value)
- Using Form Select in Laravel Blade (keep old value)
- Using Form Radio Buttons in Laravel Blade (keep old value)
- Using Text and Textarea in Laravel Blade (keep old value)