As often seen in applications you might wish to spread your data across several pages. Luckily we can easily achieve this using Laravel’s built-in pagination features.
Now right off the bat let me tell you Laravel will assume Tailwind CSS is used and create a pagination links layout that will break with Bootstrap. The key to apply bootstrap pagination styling properly in Laravel is to change the boot method in app/Providers/AppServiceProvider.php like follows:
public function boot(): void
{
	Paginator::useBootstrap(); // For Bootstrap 5
	// Paginator::useBootstrapFour(); // For Bootstrap 4
	// Paginator::useBootstrapThree(); // For Bootstrap 3
}
In this tutorial, we’ll build an app that seeds 10,000 movies and shows them in a paginated list using Bootstrap and Laravel Blade.
Why ten thousand records you say? We seed this many movies so that the application will create plenty of pages and can verify that the performance holds up properly!
Let’s get started!
Step 1: Installing Laravel
Begin by creating a new Laravel project if you haven’t done so already.
To do this, open your terminal and run:
composer create-project laravel/laravel bootstrap-pagination-demo
cd bootstrap-pagination-demo
Step 2: Creating the Model and Migration
Now, generate a Movies Model along with a migration file to define the movie database schema by running:
php artisan make:model Movie -mAfterwards, edit the migration file to define the ‘movies’ table schema and add:
<?php

use Illuminate\Database\Migrations\Migration;
use Illuminate\Database\Schema\Blueprint;
use Illuminate\Support\Facades\Schema;

return new class extends Migration
{
    public function up(): void
    {
        Schema::create('movies', function (Blueprint $table) {
            $table->id();
            $table->string('title');
            $table->string('country');
            $table->date('release_date');
            $table->timestamps();
        });
    }

    public function down(): void
    {
        Schema::dropIfExists('movies');
    }
};
Step 3: Running the Migration
Run the migration to create the ‘movies’ table in the database:
php artisan migrateStep 4: Creating the Factory
Generate a factory that defines how Movie data looks like by running:
php artisan make:factory MovieFactory --model=MovieNow, add the following code to define the structure and data of our fake movies:
<?php

namespace Database\Factories;

use Illuminate\Database\Eloquent\Factories\Factory;

class MovieFactory extends Factory
{
    public function definition(): array
    {
        return [
            'title' => $this->faker->sentence,
            'country' => $this->faker->country,
            'release_date' => $this->faker->dateTimeBetween('-40 years', 'now'),
        ];
    }
}
Step 5: Creating the Seeder
Create a seeder to populate the ‘movies’ table by running:
php artisan make:seeder MovieSeederIn this example we’ll fill it with 1000 records of random data:
<?php

namespace Database\Seeders;

use App\Models\Movie;
use Illuminate\Database\Seeder;

class MovieSeeder extends Seeder
{
    public function run(): void
    {
        Movie::factory()->count(10000)->create();
    }
}
Now let’s run the seeder to insert all our fake movie data:
php artisan db:seed --class=MovieSeederStep 6: Creating the Controller
Generate a controller named MovieController:
php artisan make:controller MovieControllerIn the MovieController.php file, load movies from the database and pass them to the view:
<?php

namespace App\Http\Controllers;

use App\Models\Movie;

class MovieController extends Controller
{
    public function index()
    {
        $movies = Movie::paginate(10); // Change 10 to desired items per page
        return view('movies.index', compact('movies'));
    }
}
Note: You can define the number of items per page here by changing ’10’ to your desired value.
Step 7: Creating a View
Create a Blade view file (index.blade.php) in resources/views/movies/:
<!DOCTYPE html>
<html>
<head>
    <!-- Include Bootstrap CSS -->
    <link href="https://cdn.jsdelivr.net/npm/bootstrap@5.3.2/dist/css/bootstrap.min.css" rel="stylesheet">
</head>
<body>

<div class="container">
    <h1>Movies List</h1>

    <!-- Movies List -->
    <table class="table">
        <thead>
            <tr>
                <th>Title</th>
                <th>Country</th>
                <th>Release Date</th>
            </tr>
        </thead>
        <tbody>
            @foreach($movies as $movie)
                <tr>
                    <td>{{ $movie->title }}</td>
                    <td>{{ $movie->country }}</td>
                    <td>{{ $movie->release_date }}</td>
                </tr>
            @endforeach
        </tbody>
    </table>

    <!-- Pagination Links -->
    {{ $movies->links() }}

    <!-- Footer -->
    <footer class="mt-5 text-center">
        <p>Created with ♥ by Laracoding</p>
    </footer>
</div>

</body>
</html>
Step 8: Adding the Route
To define the route to MovieController edit routes/web.php and add:
use App\Http\Controllers\MovieController;

Route::get('/movies', [MovieController::class, 'index']);
Step 9: Fixing Bootstrap Pagination Style
By default, Laravel assumes that you need the pagination links in Tailwind style. This will look wrong since we wish to use Bootstrap in our example. To fix this edit app/Providers/AppServiceProvider.php as follows:
<?php

namespace App\Providers;

use Illuminate\Pagination\Paginator;
use Illuminate\Support\ServiceProvider;

class AppServiceProvider extends ServiceProvider
{
    /**
     * Register any application services.
     */
    public function register(): void
    {
        //
    }

    /**
     * Bootstrap any application services.
     */
    public function boot(): void
    {
        Paginator::useBootstrap(); // For Bootstrap 5
        // Paginator::useBootstrapFour(); // For Bootstrap 4
        // Paginator::useBootstrapThree(); // For Bootstrap 3
    }
}
Step 10: Testing the Application
Now let’s launch the Laravel development server so we can test it:
php artisan serveOpen your browser and visit http://localhost:8000/movies to view the paginated movie list.
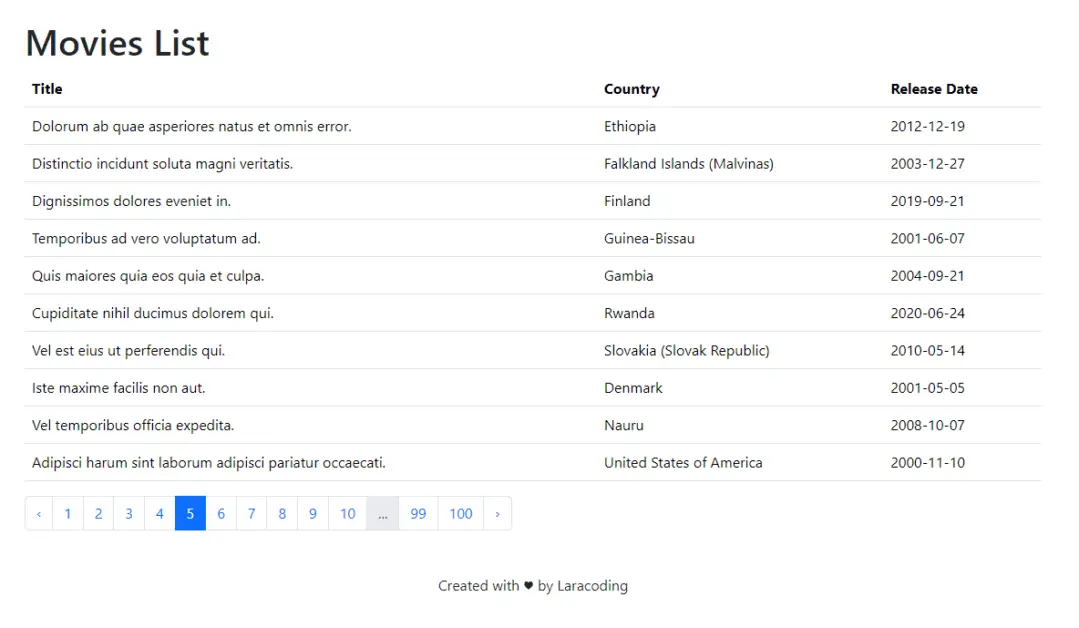
That’s it! We’ve successfully added a bootstrap based pagination view to our Laravel application!
Conclusion
Using Laravel’s built-in in features we generated a big dataset and displayed it with a user friendly paginated blade view. We learned how to override Laravel’s default Tailwind styling in favor of using Bootstrap.
We used factories and seeders to generate a large amount of data. Using a sufficiently large dataset is recommended when developing to detect styling or performance issues early on, before your application ships to your production environment.
Now go ahead and a paginated view with your own data to your application. Happy coding!
References
- Database: Pagination (Laravel Documentation)
- Bootstrap Pagination (Bootstrap 5 Documentation)
- Laravel Blade Documentation (Laravel Documentation)

thanks
You’re welcome 🙂