The Laravel routing system is incredibly flexible, allowing you to define routes that lead to controllers and support parameters. In this article, we’ll learn the steps needed to create a route to a controller with optional parameter(s).
Optional route parameters in Laravel are defined using curly braces and an added question mark, for example: Route::get('/posts/{year?}', function() {}); We can also define multiple like: '/posts/{year?}/{month?}' This accepts URI’s like: /posts or /posts/2023 or /posts/2023/july
Let’s walk through building an example application. Imagine an e-commerce website with many products, spread out over multiple categories. We’d want to allow users to be able to browse through all products, products in a specific or products of a specific brand. With Laravel’s elegant routing system, we can achieve this using just one route with optional parameters for category and brand.
Let’s get started!
Step 1: Create and Run the Migration
First, create the migration for the models:
php artisan make:migration create_products_tableEdit the migration as follows:
<?php

use Illuminate\Database\Migrations\Migration;
use Illuminate\Database\Schema\Blueprint;
use Illuminate\Support\Facades\Schema;

return new class extends Migration
{
    /**
     * Run the migrations.
     */
    public function up(): void
    {
        Schema::create('products', function (Blueprint $table) {
            $table->id();
            $table->string('name');
            $table->string('category')->nullable();
            $table->string('brand')->nullable();
            // Add other columns for product details as needed
            $table->timestamps();
        });
    }

    /**
     * Reverse the migrations.
     */
    public function down(): void
    {
        Schema::dropIfExists('products');
    }
};
Run the migration using the following command:
php artisan migrateStep 2: Create the Model
Create the models for Project by running the following Artisan command:
php artisan make:model ProductFor the Project model, use the following code:
<?php

namespace App\Models;

use Illuminate\Database\Eloquent\Model;

class Product extends Model
{
    /**
     * The attributes that are mass assignable.
     *
     * @var array
     */
    protected $fillable = [
        'name', 'category', 'brand',
    ];
}
Step 3: Define the Route
Open your routes/web.php file and define a route using the Route::get or Route::post method. For two optional parameters, enclose placeholders in curly braces {}.
<?php

use Illuminate\Support\Facades\Route;
use App\Http\Controllers\ProductController;

Route::get('/products/{category?}/{brand?}', [ProductController::class, 'index']);
By making use of optional parameters, this definition will accept each of the following route examples:
| Example Route | Purpose |
| /products | List all products |
| /products/Clothing | List all products in “Clothing” |
| /products/Clothing/Nike | List all products in “Clothing” where the brand is “Nike” |
routes/web.phpStep 4: Create the Controller
Generate a controller named ProductController to manage the logic for displaying product details based on the optional parameters.
php artisan make:controller ProductControllerStep 5: Add Controller Code
In the ProductController.php file, define a method for the route, and include parameters for the two optional segments: $category and $brand.
<?php

namespace App\Http\Controllers;

use App\Models\Product;

class ProductController extends Controller
{
    public function index($category = null, $brand = null)
    {
        $query = Product::query();

        if ($category) {
            $query->where('category', $category);
        }

        if ($brand) {
            $query->where('brand', $brand);
        }

        $products = $query->get();

        return view('products.index', compact('products'));
    }
}
Understanding the Logic
In this controller method, we begin by constructing a query for the Product model. If a category is provided, the query narrows down the products to that category. Similarly, if a brand is specified, the query refines the results to products from that brand. When neither parameter is given, the query fetches all products.
Step 6: Create a View
As defined in the ProductController queried products are passed to the view products.index, where they are displayed in your preferred format.
For the sake of this example, I used a plain table. To follow along, create a file /resources/views/products/index.blade.php and add the following code:
<table>
    <tr>
        <th></th>
        <th>Product</th>
    </tr>
    @forelse ($products as $product)
    <tr>
        <td>
            {{ $loop->iteration }}
        </td>
        <td>
            {{ $product->name }}
        </td>
    </tr>
    @empty
        <tr>
            <td colspan="2">
                No products were found.
            </td>
        </tr>
    @endforelse
</table>
Step 7: Create Test Data
We will now use Laravel Tinker to add some data which we can use to test the cloning later on. Laravel Tinker is an interactive shell for Laravel that allows you to interact with your application’s code and data.
To start Laravel Tinker run the following command:
php artisan tinkerIn the Laravel Tinker prompt you can now copy/paste the following code:
use App\Models\Product;

// Add products with different categories and brands
Product::create([
    'name' => 'Laptop',
    'category' => 'Electronics',
    'brand' => 'Dell',
]);

Product::create([
    'name' => 'Smartphone',
    'category' => 'Electronics',
    'brand' => 'Samsung',
]);

Product::create([
    'name' => 'T-Shirt',
    'category' => 'Clothing',
    'brand' => 'Nike',
]);

Product::create([
    'name' => 'Jeans',
    'category' => 'Clothing',
    'brand' => 'Wrangler',
]);
You should now see the following data in your database:
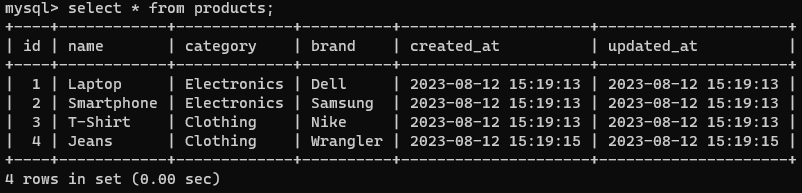
products After Creating Records Using artisan tinkerStep 8: View Results
Run the following command to launch Laravel’s built-in webserver:
php artisan serveNow when opening each of the URL’s below we can see the correct products are being filtered based on the optional route parameters being filled:
| Url | Results in Browser |
| http://127.0.0.1:8000/products | 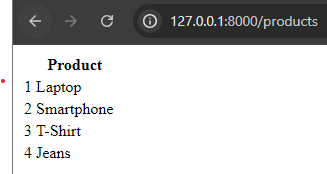 |
| http://127.0.0.1:8000/products/Clothing | 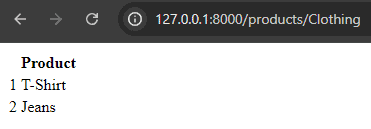 |
| http://127.0.0.1:8000/products/Clothing/Nike |
Further Examples
Optional route parameters can be useful in many cases for browsing various types of data. Consider the following real-world examples:
<?php

use Illuminate\Support\Facades\Route;

// Browsing events
Route::get('/events/{year?}/{month?}', [EventController::class, 'index']);

// Browsing movies
Route::get('/movies/{genre?}/{rating?}', [MovieController::class, 'index']);

// Browsing courses
Route::get('/courses/{subject?}/{level?}', [CourseController::class, 'index']);

// Browsing posts
Route::get('/posts/{year?}/{month?}', [PostController::class, 'index']);

// Browsing products
Route::get('/products/{category?}/{brand?}', [ProductController::class, 'index']);

// Browsing albums
Route::get('/albums/{artist?}/{year?}', [AlbumController::class, 'index']);
Conclusion
We’ve seen how to define routes with optional parameters using curly braces, like normal route parameters, or with an added question mark. This enables you to add routes like “/products/{year?}/{month?}” which support multiple use cases – from exploring all products to narrowing down by category and brand.
Using these techniques you’ll be able to add flexible navigation links to your own applications. Happy coding!
References
- Laravel Documentation on Routing: https://laravel.com/docs/routing
- Laravel Documentation on Controllers: https://laravel.com/docs/controllers
Thanks you, the tutorial is very helpful
You’re welcome, I’m glad it helped you