In Laravel Blade, the @switch directive provides a clean and efficient way to implement switch logic directly in your Blade views. The syntax is clean and simple, consider the code below that colors a task depending on it’s status value:
@switch($task->status)
    @case('pending')
        <span class="text-warning">Pending</span>
        @break

    @case('in_progress')
        <span class="text-info">In Progress</span>
        @break

    @case('completed')
        <span class="text-success">Completed</span>
        @break

    @default
        <span class="text-muted">Unknown</span>
@endswitch
Building upon this quick example, this blog post will guide you through constructing a full application using @switch, @case, and @default logic. We’ll start by creating a fresh Laravel project, defining a model, migration, controller, view, and route.
Additionally, to facilitate testing, we’ll create a factory and a seeder to generate random task data. This follows best practices for data generation in Laravel. If you’ve already populated your database manually or through other means, feel free to skip steps 9 and 10.
Let’s get started!
Step 1: Create a Laravel Project
Begin by creating a new Laravel project using the following commands in your terminal:
composer create-project laravel/laravel switch-example
cd switch-example
Step 2: Create Migration and Model
Generate the migration and model files for the entity you want to switch on. For this example, let’s consider a “Task” entity:
php artisan make:migration create_tasks_table --create=tasks
php artisan make:model Task
Step 3: Add Migration Code
Open the generated migration file and in the up() method define the columns needed for the tasks table:
<?php

use Illuminate\Database\Migrations\Migration;
use Illuminate\Database\Schema\Blueprint;
use Illuminate\Support\Facades\Schema;

return new class extends Migration
{
    public function up(): void
    {
        Schema::create('tasks', function (Blueprint $table) {
            $table->id();
            $table->string('name');
            $table->enum('status', ['pending', 'in_progress', 'completed'])->nullable();
            $table->timestamps();
        });
    }

    public function down(): void
    {
        Schema::dropIfExists('tasks');
    }
};
Step 4: Run the Migrations
Create the table in the database by running the migration command:
php artisan migrateStep 5: Add Model Code
Open Task.php and add the following code:
<?php

namespace App\Models;

use Illuminate\Database\Eloquent\Factories\HasFactory;
use Illuminate\Database\Eloquent\Model;

class Task extends Model
{
    use HasFactory;

    protected $fillable = ['name', 'status'];
}
This step enables mass assignment of values for both the ‘name’ and ‘status’ attributes, and it also allows us to add and associate a factory class later on.
Step 6: Create a Controller
Generate a controller to handle the logic for displaying tasks:
php artisan make:controller TaskControllerStep 7: Add Controller code
Open TaskController.php and add an index() function, which displays all tasks:
<?php

namespace App\Http\Controllers;

use App\Models\Task;

class TaskController extends Controller
{
    public function index()
    {
        $tasks = Task::get();
        return view('tasks.index', compact('tasks'));
    }
}
Step 8: Create a View With a @switch
Create a Blade view to display the tasks using the code below. This is the part where we utilize @switch + @case directives to display a task in a unique way depending on its status:
<!DOCTYPE html>
<html>
<head>
    <!-- Include Bootstrap CSS -->
    <link href="https://cdn.jsdelivr.net/npm/bootstrap@5.3.2/dist/css/bootstrap.min.css" rel="stylesheet">
</head>
<body>

<div class="container">
    <h1>Task List</h1>

    <table class="table">

        <thead>
        <tr>
            <th>Task Name</th>
            <th>Task Status</th>
        </tr>
        </thead>

        <tbody>
        @foreach($tasks as $task)
            <tr>
                <td>{{ $task->name }}</td>
                @switch($task->status)
                    @case('pending')
                        <span class="text-warning">Pending</span>
                        @break

                    @case('in_progress')
                        <span class="text-info">In Progress</span>
                        @break

                    @case('completed')
                        <span class="text-success">Completed</span>
                        @break

                    @default
                        <span class="text-muted">Unknown Status</span>
                @endswitch
            </tr>
        @endforeach
        </tbody>

    </table>

    <!-- Footer -->
    <footer class="mt-5 text-center">
        <p>Created with ♥ by Laracoding</p>
    </footer>

</div>

</body>
</html>
Step 9: Create a Factory
In this step we’ll create a factory by running:
php artisan make:factory TaskFactoryAdd the following code to define how a Task data should be filled:
<?php

namespace Database\Factories;

use App\Models\Task;
use Illuminate\Database\Eloquent\Factories\Factory;

class TaskFactory extends Factory
{
    protected $model = Task::class;

    public function definition(): array
    {
        return [
            'name' => $this->faker->sentence,
            'status' => $this->faker->randomElement(['pending', 'in_progress', 'completed', null]),
        ];
    }
}
Step 10: Create And Run a Seeder
Create a seeder by running:
php artisan make:seeder TaskSeederNow modify the seeder to use the factory to add some sample tasks with different random statuses:
<?php

namespace Database\Seeders;

use App\Models\Task;
use Illuminate\Database\Seeder;

class TaskSeeder extends Seeder
{
    public function run(): void
    {
        Task::factory()->count(50)->create();
    }
}
Now run the seeder using:
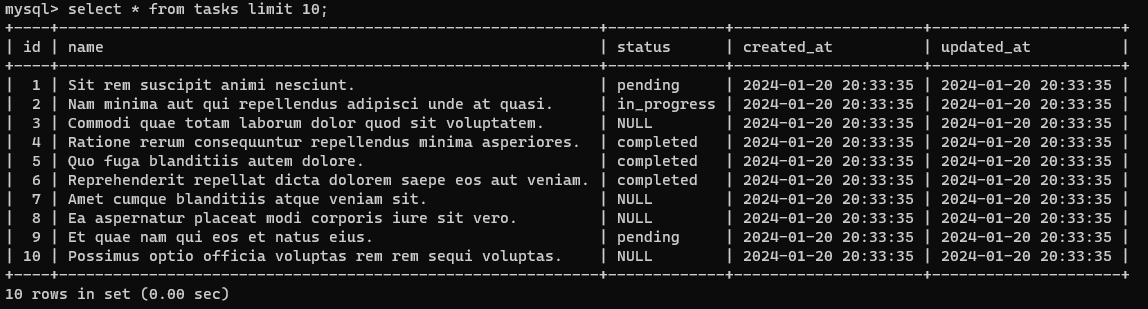
php artisan db:seed --class=TaskSeederYour database should now be filled with 50 tasks. It should look somewhat like the screenshot below:
Step 11: Add a Route
<?php

use App\Http\Controllers\TaskController;
use Illuminate\Support\Facades\Route;

Route::get('/tasks', [TaskController::class, 'index'])->name('tasks.index');
Step 12: Run the Application
Run the Laravel development server:
php artisan serveVisit http://127.0.0.1:8000/tasks in your browser to see the task list with switch logic in action. It should format the Task status with the correct coloring according to the switch case definitions, which looks as follows:
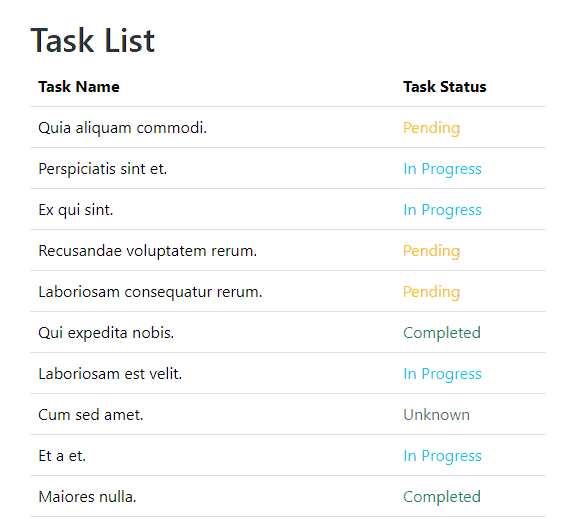
@switch and @case and @defaultConclusion
In this post we’ve explored using the @switch directive in Laravel Blade to implement concise and readable switch logic directly within our views. The provided example demonstrated how to color-code tasks based on their status.
By following the steps in this post, you can easily integrate switch logic into your Blade templates for a more organized and expressive presentation of data.
Now go ahead, add a @switch to your own views, and apply some custom conditional formatting for your users. Happy coding!
References
- Blade Templates: Switch Statements (Laravel Documentation)
- Creating Models Using Factories (Laravel Documentation)
- Seeding: Using Model Factories (Laravel Documentation)