Enhancing user experience and security by integrating Google login into your Laravel application is a game-changer. In this step-by-step guide, I’ll show you how to seamlessly add ‘Login With Google’ functionality to your Laravel application using the powerful Laravel Socialite Package.
We’ll be using Laravel Jetstream’s built-in authentication scaffolding to kickstart the process, allowing you to set up a functional login form quickly. But don’t worry if you’re not using Jetstream – these steps can be easily adapted for any Laravel application.
Let’s get started!
Step 1: Install Laravel
If you haven’t already, create a new Laravel project using Composer:
composer create-project --prefer-dist laravel/laravel google-login-appThen, navigate to your project directory:
cd google-login-appStep 2: Install Jetstream
First, let’s install Laravel Jetstream so we can use its scaffolding to generate a starting point to which we can add the Google login feature.
To install Jetstream, run the following artisan command:
composer require laravel/jetstreamPublish Jetstream’s assets and run its installation by running the command:
php artisan jetstream:install livewireFollow the prompts to set up Jetstream according to your preferences.
Step 3: Install Socialite
Next, we’ll install Laravel Socialite using composer and migrate the database tables needed by Socialite by running the following commands:
composer require laravel/socialite
php artisan migrate
Step 4: Create Google Client Credentials
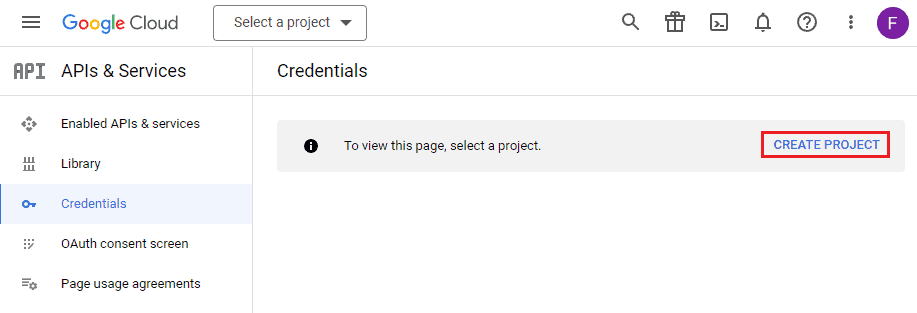
To add a Google login to your Laravel site, you’ll need to create OAUTH credentials in the Google Developer Console. Follow these steps:
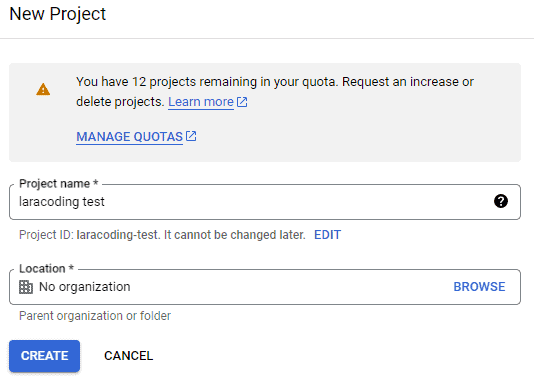
- Create a project
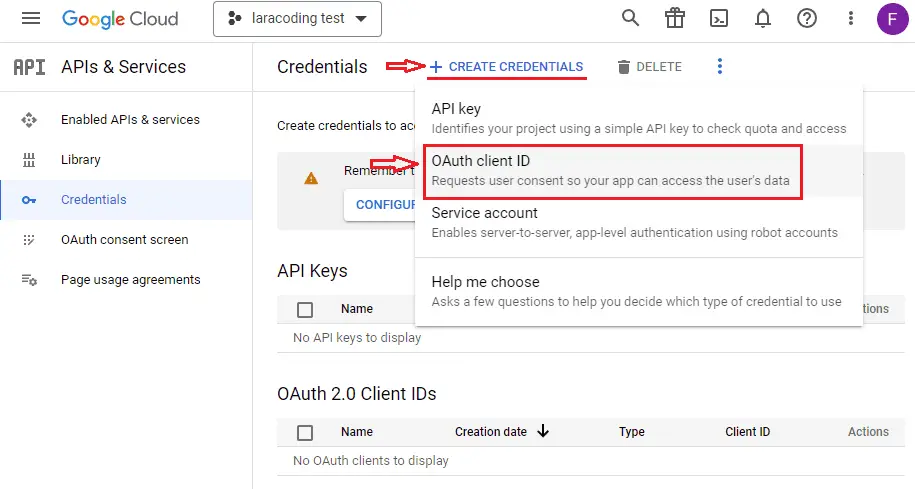
- Go to ‘Credentials’ -> ‘Create Credentials’ -> ‘OAuth Client ID’.
- Fill in all the required fields.
- For ‘Application Type’, select: ‘Web Application’.
- In the ‘Name’ field, provide a name for your application.
- Leave ‘Authorized JavaScripts Origin’ empty.
- In the list of ‘Authorized redirect URIs’, add: http://127.0.0.1:8000/login/google/callback
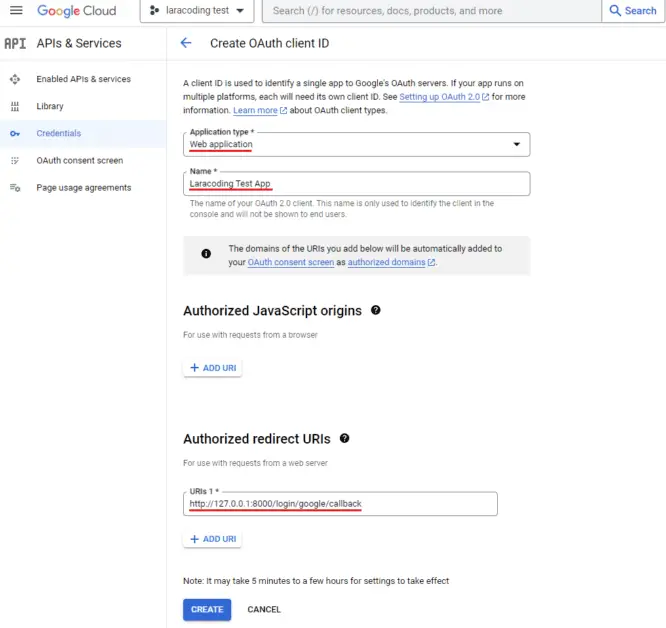
Note: ‘Authorized redirect URIs’ contain the URL of your application where Google redirects the user after logging in using Google. This URL is crucial because it ensures a secure connection between your application and Google’s authentication services. Without this correctly set URI, Google won’t know where to send the user after login, and the login process will fail. Remember the URI you enter here, we’ll need it later when we edit the .env file of our Laravel application.
The wizard may also ask you to set up the “OAuth consent screen”, which is a normal part of the process. This information will be used on the Google OAuth form. Fill in all the required data and continue.
Step 5: Add Google App Credentials to the Config
In your Laravel application, open the config/services.php file. Add the Google OAuth credentials you obtained in the previous step:
<?php

return [

    // Other services ..

    'google' => [
        'client_id' => env('GOOGLE_CLIENT_ID'),
        'client_secret' => env('GOOGLE_CLIENT_SECRET'),
        'redirect' => env('GOOGLE_REDIRECT_URI'),
    ],
];
Make sure to set these values in your .env file:
GOOGLE_CLIENT_ID=YOUR_CLIENT_ID
GOOGLE_CLIENT_SECRET=YOUR_CLIENT_SECRET
GOOGLE_REDIRECT_URI=http://127.0.0.1:8000/login/google/callback
Step 6: Add Database Column to Store google_id
Extend your user database by creating a migration to add a google_id column:
php artisan make:migration add_google_id_to_usersIn the generated migration file, modify the up and down methods as follows:
<?php

use Illuminate\Database\Migrations\Migration;
use Illuminate\Database\Schema\Blueprint;
use Illuminate\Support\Facades\Schema;

return new class extends Migration
{
    public function up()
    {
        Schema::table('users', function (Blueprint $table) {
            $table->string('google_id')->after('remember_token')->nullable()->unique();
        });
    }

    public function down()
    {
        Schema::table('users', function (Blueprint $table) {
            $table->dropColumn('google_id');
        });
    }
};
Explanation: The ‘google_id’ column is added to your user database to uniquely associate users with their Google accounts. When a user logs in with Google, their Google-provided ‘google_id’ will be stored in this column, allowing your application to recognize and authenticate them in the future.
Now run the migration to update your database accordingly:
php artisan migrateStep 7: Modify the User Model
In your User model (typically located at app/Models/User.php), make the google_id column fillable for mass assignment by adding it to the $fillable array like so:
<?php

namespace App\Models;

use Illuminate\Contracts\Auth\MustVerifyEmail;
use Illuminate\Database\Eloquent\Factories\HasFactory;
use Illuminate\Foundation\Auth\User as Authenticatable;
use Illuminate\Notifications\Notifiable;
use Laravel\Fortify\TwoFactorAuthenticatable;
use Laravel\Jetstream\HasProfilePhoto;
use Laravel\Sanctum\HasApiTokens;

class User extends Authenticatable
{
    use HasApiTokens;
    use HasFactory;
    use HasProfilePhoto;
    use Notifiable;
    use TwoFactorAuthenticatable;

    /**
     * The attributes that are mass assignable.
     *
     * @var array<int, string>
     */
    protected $fillable = [
        'name',
        'email',
        'password',
        'google_id', // Add 'google_id' to the fillable array.
    ];

    /**
     * The attributes that should be hidden for serialization.
     *
     * @var array<int, string>
     */
    protected $hidden = [
        'password',
        'remember_token',
        'two_factor_recovery_codes',
        'two_factor_secret',
    ];

    /**
     * The attributes that should be cast.
     *
     * @var array<string, string>
     */
    protected $casts = [
        'email_verified_at' => 'datetime',
    ];

    /**
     * The accessors to append to the model's array form.
     *
     * @var array<int, string>
     */
    protected $appends = [
        'profile_photo_url',
    ];
}
Step 8: Create GoogleLoginController
Before we dive into the code, let’s briefly explain the purpose of the GoogleLoginController. This controller will handle the interactions between our Laravel application and Google’s authentication services. It contains methods to redirect users to Google for login and to handle the callback from Google once the user authorizes access.
Now, let’s proceed and generate the controller using Laravel Artisan:
php artisan make:controller GoogleLoginControllerIn GoogleLoginController.php, add the methods redirectToGoogle and handleGoogleCallback which will handle Google login and callback:
<?php

namespace App\Http\Controllers;

use App\Models\User;
use Illuminate\Http\RedirectResponse;
use Illuminate\Support\Str;
use Laravel\Socialite\Facades\Socialite;

class GoogleLoginController extends Controller
{
    public function redirectToGoogle(): RedirectResponse
    {
        return Socialite::driver('google')->redirect();
    }

    public function handleGoogleCallback(): RedirectResponse
    {
        $user = Socialite::driver('google')->user();

        $existingUser = User::where('google_id', $user->id)->first();

        if ($existingUser) {
            // Log in the existing user.
            auth()->login($existingUser, true);
        } else {
            // Create a new user.
            $newUser = new User();
            $newUser->name = $user->name;
            $newUser->email = $user->email;
            $newUser->google_id = $user->id;
            $newUser->password = bcrypt(request(Str::random())); // Set some random password
            $newUser->save();

            // Log in the new user.
            auth()->login($newUser, true);
        }

         // Redirect to url as requested by user, if empty use /dashboard page as generated by Jetstream
        return redirect()->intended('/dashboard');
    }
}
Step 9: Add Routes
Add routes to define Google login and callback endpoints in your routes/web.php file as shown below:
<?php

use App\Http\Controllers\GoogleLoginController;
use Illuminate\Support\Facades\Route;

/*
|--------------------------------------------------------------------------
| Web Routes
|--------------------------------------------------------------------------
|
| Here is where you can register web routes for your application. These
| routes are loaded by the RouteServiceProvider and all of them will
| be assigned to the "web" middleware group. Make something great!
|
*/

Route::middleware([
    'auth:sanctum',
    config('jetstream.auth_session'),
    'verified'
])->group(function () {
    Route::get('/dashboard', function () {
        return view('dashboard');
    })->name('dashboard');
});

// GoogleLoginController redirect and callback urls
Route::get('/login/google', [GoogleLoginController::class, 'redirectToGoogle'])->name('auth.google');
Route::get('/login/google/callback', [GoogleLoginController::class, 'handleGoogleCallback']);
Step 10: Update Login Blade File
Now we edit resources/views/auth/login.blade.php and add our code to show a button for signing in with Google, right below the existing form submit button like shown in the following code sample:
<x-guest-layout>
    <x-authentication-card>
        <x-slot name="logo">
            <x-authentication-card-logo />
        </x-slot>

        <x-validation-errors class="mb-4" />

        @if (session('status'))
            <div class="mb-4 font-medium text-sm text-green-600">
                {{ session('status') }}
            </div>
        @endif

        <form method="POST" action="{{ route('login') }}">
            @csrf

            <div>
                <x-label for="email" value="{{ __('Email') }}" />
                <x-input id="email" class="block mt-1 w-full" type="email" name="email" :value="old('email')" required autofocus autocomplete="username" />
            </div>

            <div class="mt-4">
                <x-label for="password" value="{{ __('Password') }}" />
                <x-input id="password" class="block mt-1 w-full" type="password" name="password" required autocomplete="current-password" />
            </div>

            <div class="block mt-4">
                <label for="remember_me" class="flex items-center">
                    <x-checkbox id="remember_me" name="remember" />
                    <span class="ml-2 text-sm text-gray-600">{{ __('Remember me') }}</span>
                </label>
            </div>

            <div class="flex items-center justify-end mt-4">
                @if (Route::has('password.request'))
                    <a class="underline text-sm text-gray-600 hover:text-gray-900 rounded-md focus:outline-none focus:ring-2 focus:ring-offset-2 focus:ring-indigo-500" href="{{ route('password.request') }}">
                        {{ __('Forgot your password?') }}
                    </a>
                @endif

                <x-button class="ml-4">
                    {{ __('Log in') }}
                </x-button>
            </div>
            {{-- Laracoding Login with Google Demo--}}
            <div class="block mt-4">
                <div class="flex items-center justify-end mt-4">
                    <a href="{{ url('auth/google') }}">
                        <img src="https://developers.google.com/identity/images/btn_google_signin_dark_normal_web.png">
                    </a>
                </div>
            </div>
        </form>
    </x-authentication-card>
</x-guest-layout>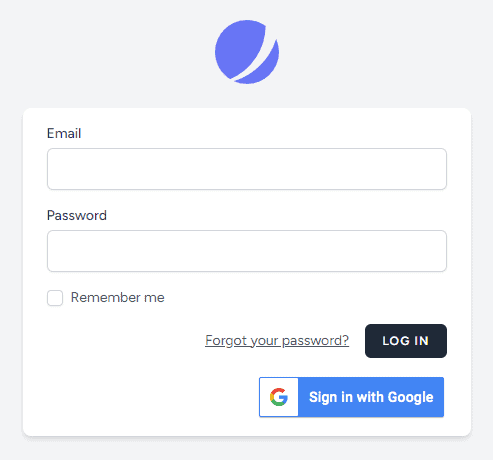
Step 11: Starting the Application
Run the following command to launch the application:
php artisan serveStep 12: Testing Logging in With Google
Go to http://127.0.0.1:8000/dashboard and you will be forwarded to our login form.
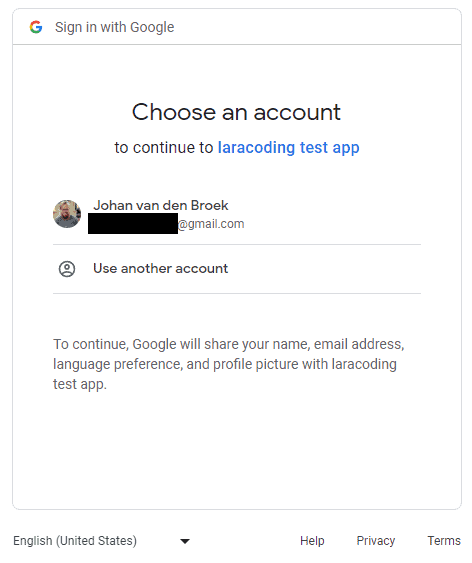
Click on the link “Sign in with Google”. You will be asked to select your Google account and to authorize logging into the Laravel application. It should look like this:
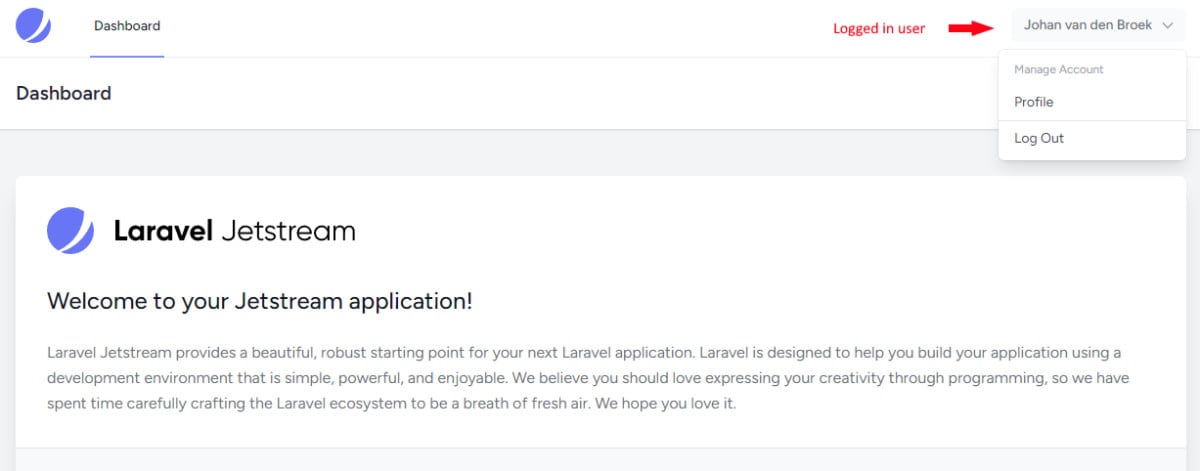
After selecting your account, you will be logged in automatically and you will be forwarded to your Laravel application dashboard:
Now, our GoogleLoginController will receive the callback and first add or update the google_id to the user record in the database. Right after that, it will redirect you to the dashboard as intended. The user menu in the top right corner will indicate that your user is currently logged in.
Conclusion
Congratulations! By following this step-by-step guide, you’ve learned how to integrate a feature to login using Google in a Laravel application, allowing your users to choose between using a native Laravel account or their Google credentials for login.
Now go ahead and add it to your own app. Happy coding!
References
This entry is part 1 of 4 in the series Authenticating With Laravel Socialite
- Adding Login With Google to Your Laravel App Using Socialite
- Login to Your Laravel App With Facebook Using Socialite
- Login to Your Laravel App With Twitter / X Using Socialite
- Login to Your Laravel App With GitHub Using Socialite
Thank you for this helpful tutorial.
I have several things to add for anyone attempting to follow:
First, there was one bug in the code. The routes mentioned are “login/google” but the link added to the login view uses /auth/google. In my case I decided to use /auth/google for everything.
Second, the OAuth image used does not look good on retina screens. Here is a link to where you can find many different options: https://developers.google.com/identity/branding-guidelines
Third, don’t forget there is the option to add OAuth login to your register route too.
Lastly, you will run into an issue if a user has already registered with email and password. To resolve this, I modified the code to use an upsert. I also avoid updating the password in this case, so that the user can simply use either method from now on. Here is the code: https://capture.dropbox.com/cbLARHTV1cZetNQL
I’m glad you found the tutorial helpful. I’d like to thank you for the additions you provided in your comment, making this resource as useful as possible for future readers!
Good job! I had a problem finding a solution to my issue for 3 days. Thanks to your tutorial, I sorted it out. Thank you!