Model scopes in Eloquent provide a way to encapsulate commonly used query constraints, making your code more organized and efficient.
Note: “Model Scopes” are also known as “Local Scopes,” and these terms are used interchangeably.
In this guide, we’ll explore how to create and use model scopes to a model in Laravel Eloquent, using a practical example of filtering published and draft posts.
Let’s get started!
Step 1: Create a Laravel Project
If you haven’t already, start by creating a new Laravel project. Open your terminal and run the following command:
composer create-project laravel/laravel eloquent-scopes
cd eloquent-scopes
Step 2: Create the Migration
Let’s start by creating a migration for the posts table.
Open your terminal and run:
php artisan make:migration create_posts_tableEdit the generated migration file to define the “posts” table. Add columns for “title”, “content”, “status” and the timestamps:
<?php

use Illuminate\Database\Migrations\Migration;
use Illuminate\Database\Schema\Blueprint;
use Illuminate\Support\Facades\Schema;

return new class extends Migration
{
    /**
     * Run the migrations.
     */
    public function up(): void
    {
        Schema::create('posts', function (Blueprint $table) {
            $table->id();
            $table->string('title');
            $table->text('content');
            $table->tinyInteger('status')->unsigned()->default(1);
            $table->timestamps();
        });
    }

    /**
     * Reverse the migrations.
     */
    public function down(): void
    {
        Schema::dropIfExists('posts');
    }
};
Run the migration to create the “posts” table:
php artisan migrateStep 3: Create the Model
Now, generate a Post model with Artisan:
php artisan make:model PostStep 4: Define Model Scopes
Edit the “Post” model to define the model scopes that allow filtering of posts by status. Add constants for statuses as well:
<?php

namespace App\Models;

use Illuminate\Database\Eloquent\Model;

class Post extends Model
{
    const STATUS_PUBLISHED = 1;
    const STATUS_DRAFT = 2;

    public function scopePublished($query)
    {
        return $query->where('status', self::STATUS_PUBLISHED);
    }

    public function scopeDraft($query)
    {
        return $query->where('status', self::STATUS_DRAFT);
    }
}
Why Constants for Statuses?
By using constants like STATUS_PUBLISHED and STATUS_DRAFT, we’re making it clear what status values can be associated with posts. This helps you and your fellow developers to look up the supported values and makes it easy to add new statuses in the future.
Step 5: Create a PostController for Managing Posts
Generate a PostController using Artisan:
php artisan make:controller PostControllerStep 6: Add Scope Filtering Logic to the Controller
Now, we’ll add an index function that gets all posts and a function published() and draft() which will use scopes to filter by the status value accordingly.
Open the app/Http/Controllers/PostController.php file and add:
<?php

namespace App\Http\Controllers;

use App\Models\Post;

class PostController extends Controller
{
    // Retrieves and shows all posts, regardless of their status
    public function index()
    {
        $allPosts = Post::get();

        return view('admin.posts', ['posts' => $allPosts, 'status' => 'All']);
    }

    // Retrieves and shows all posts that have been published
    public function published()
    {
        $publishedPosts = Post::published()->get();

        return view('admin.posts', ['posts' => $publishedPosts, 'status' => 'Published']);
    }

    // Retrieves and shows all posts that are in draft
    public function draft()
    {
        $draftPosts = Post::draft()->get();

        return view('admin.posts', ['posts' => $draftPosts, 'status' => 'Draft']);
    }
}
Step 7: Seed the Database with Demo Posts
Create a seeder to add demo posts to the “posts” table with different statuses:
- Create a new seeder using Artisan:
php artisan make:seeder PostSeeder- Edit the generated
PostSeederfile and add code to create demo posts:
<?php

namespace Database\Seeders;

use App\Models\Post;
use Illuminate\Database\Seeder;

class PostSeeder extends Seeder
{
    /**
     * Run the database seeds.
     */
    public function run(): void
    {
        // Create and insert some published posts
        Post::create([
            'title' => 'Published Post 1',
            'content' => 'This is the content of published post 1.',
            'status' => Post::STATUS_PUBLISHED,
        ]);

        Post::create([
            'title' => 'Published Post 2',
            'content' => 'This is the content of published post 2.',
            'status' => Post::STATUS_PUBLISHED,
        ]);

        // Create and insert some draft posts
        Post::create([
            'title' => 'Draft Post 1',
            'content' => 'This is the content of draft post 1.',
            'status' => Post::STATUS_DRAFT,
        ]);

        Post::create([
            'title' => 'Draft Post 2',
            'content' => 'This is the content of draft post 2.',
            'status' => Post::STATUS_DRAFT,
        ]);
    }
}- Run the seeder to populate the posts table:
php artisan db:seed --class=PostSeederStep 8: Create a View to Display Posts
Create a view in resources/views/admin/posts.blade.php and add:
<h1>{{$status}} Posts</h1>
<ul>
    @foreach($posts as $post)
        <li>{{ $post->title }}</li>
    @endforeach
</ul>
Step 9: Define Routes
Define routes to access the controller functions in routes/web.php:
<?php

use Illuminate\Support\Facades\Route;
use App\Http\Controllers\PostController;

Route::get('/posts', [PostController::class, 'index']);
Route::get('/posts/published', [PostController::class, 'published']);
Route::get('/posts/draft', [PostController::class, 'draft']);
Step 10: Test the Application
To launch the application run the following artisan command:
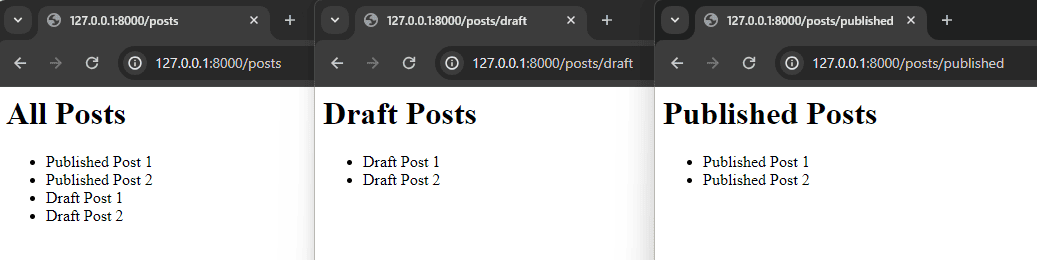
php artisan serveYou can now test the application by visiting the URLs:
http://localhost:8000/poststo view all posts, regardless of statushttp://localhost:8000/posts/publishedto view posts that are published.http://localhost:8000/posts/draftto view posts that are in draft.
You can see that the Controller effectively shows the correct posts based.
Conclusion
Local scopes allow you to encapsulate commonly used query constraints, making your code cleaner and more efficient.
In this guide, we’ve created a “posts” table, defined a “Post” model, and implemented model scopes to filter posts based on their status. This way we’ve enabled a convenient way to retrieve a specific type of post, by using: Post::published()->get() and Post::draft()->get().
Now go ahead and make the most of this powerful Laravel feature in your projects. Happy coding!
References
- Local Scopes (Laravel Documentation)
This entry is part 1 of 4 in the series Query Scopes in Laravel Eloquent
- How to Use Model Scopes With Laravel Eloquent
- Using a Model Scope With Parameters in Laravel Eloquent
- Using a Model Scope With a Relationship in Laravel
- Using Global Scope in Laravel (With Practical Examples)
