Model scopes in Eloquent provide a way to encapsulate commonly used query constraints, making your code more organized and efficient. Model Scopes also support parameters to take it one step further.
Note: “Model Scopes” are also known as “Local Scopes,” and these terms are used interchangeably.
In this tutorial, we’ll explore how to add an Eloquent Model Scope with parameters to filter products by their price range and retrieve them from the database.
Let’s get started!
Step 1: Set Up a Laravel Project
Begin by creating a new Laravel project if you haven’t already. Open your terminal and run:
composer create-project laravel/laravel scopes-parameter
cd scopes-parameter
Step 2: Create a Migration for Products
Let’s start by creating a migration for the “products” table. Open your terminal and run the following Artisan command:
php artisan make:migration create_products_tableEdit the generated migration file to define the “products” table with columns like “name,” “price,” and “category.”
<?php

use Illuminate\Database\Migrations\Migration;
use Illuminate\Database\Schema\Blueprint;
use Illuminate\Support\Facades\Schema;

return new class extends Migration
{
    /**
     * Run the migrations.
     */
    public function up(): void
    {
        Schema::create('products', function (Blueprint $table) {
            $table->id();
            $table->string('name');
            $table->decimal('price', 8, 2); // Example: a decimal field for the price
            $table->string('category');
            $table->timestamps();
        });
    }

    /**
     * Reverse the migrations.
     */
    public function down(): void
    {
        Schema::dropIfExists('products');
    }
};
Execute the migration to create the “products” table:
php artisan migrateStep 3: Create the Product Model
Generate a “Product” model using Artisan:
php artisan make:model ProductStep 4: Define a Dynamic Scope With Parameters
In the “Product” model, create a dynamic scope with parameters. In our example, we’ll define a “scopeByPriceRange” method to filter products within a specified price range:
<?php

namespace App\Models;

use Illuminate\Database\Eloquent\Model;

class Product extends Model
{
    public function scopeByPriceRange($query, $minPrice, $maxPrice)
    {
        return $query->whereBetween('price', [$minPrice, $maxPrice]);
    }
}
Step 5: Create a ProductController
Generate a ProductController using Artisan:
php artisan make:controller ProductControllerStep 6: Add Scope Logic to ProductController
Now we’ll open app/Http/Controllers/ProductController.php file and add a function index, which shows all products and a function filter, which shows products that satisfy a price range given by the user:
<?php

namespace App\Http\Controllers;

use App\Models\Product;
use Illuminate\Http\Request;

class ProductController extends Controller
{
    public function index(Request $request)
    {
        // Retrieve all products
        $products = Product::all();

        return view('products.index', compact('products'));
    }

    public function filter(Request $request)
    {
        $minPrice = $request->input('min_price');
        $maxPrice = $request->input('max_price');

        // Validate minimum and maximum prices
        $request->validate([
            'min_price' => 'nullable|numeric|min:0',
            'max_price' => 'nullable|numeric|min:' . ($minPrice ?? 0),
        ]);

        // Build the filtered product list
        $products = Product::byPriceRange($minPrice, $maxPrice)->get();

        return view('products.index', compact('products'));
    }
}
Step 7: Seed the Database with Demo Products
In this step, we’ll create a seeder that adds demo products to the database with different prices we then filter by.
- First, create a new seeder using Artisan:
php artisan make:seeder ProductSeeder- Open the generated
ProductSeeder.phpfile located in thedatabase/seedersdirectory. - In the
runmethod, you can define the logic to create and insert demo products with different prices. Here’s an example:
<?php

namespace Database\Seeders;

use App\Models\Product;
use Illuminate\Database\Seeder;

class ProductSeeder extends Seeder
{
    /**
     * Run the database seeds.
     */
    public function run(): void
    {
        Product::create([
            'name' => 'Iron Man',
            'price' => 12.99,
            'category' => 'Superhero Movies',
        ]);

        Product::create([
            'name' => 'Black Panther',
            'price' => 14.99,
            'category' => 'Superhero Movies',
        ]);

        Product::create([
            'name' => 'Guardians of the Galaxy Vol 3',
            'price' => 14.99,
            'category' => 'Superhero Movies',
        ]);

        Product::create([
            'name' => 'Thor: Ragnarok',
            'price' => 13.99,
            'category' => 'Superhero Movies',
        ]);
    }
}- Save the seeder file.
- Run the seeder to populate your database with demo products:
php artisan db:seed --class=ProductSeederNow, you have seeded your database with demo products that you can use to filter based on their prices using the scope you defined earlier.
Your database should now contain these test records:
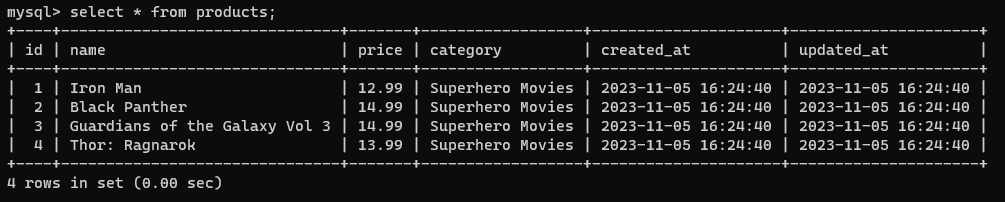
products TableStep 8: Create a View to Display Products
Create resources/views/products/index.blade.php and add:
<html>
<head>
    <!-- Include Bootstrap to make it the example look better -->
    <link href="https://cdn.jsdelivr.net/npm/bootstrap@5.3.2/dist/css/bootstrap.min.css" rel="stylesheet"
          integrity="sha384-T3c6CoIi6uLrA9TneNEoa7RxnatzjcDSCmG1MXxSR1GAsXEV/Dwwykc2MPK8M2HN" crossorigin="anonymous">
    <script src="https://cdn.jsdelivr.net/npm/bootstrap@5.3.2/dist/js/bootstrap.bundle.min.js"
            integrity="sha384-C6RzsynM9kWDrMNeT87bh95OGNyZPhcTNXj1NW7RuBCsyN/o0jlpcV8Qyq46cDfL"
            crossorigin="anonymous"></script>
</head>
<body>
<div class="container">
    <h1>Product List</h1>

    <!-- Filter Form -->
    <form action="{{ route('products.filter') }}" method="post">
        @csrf
        <div class="row">
            <div class="form-group col-4">
                <label for="minPrice">Minimum Price:</label>
                <input type="text" name="min_price" id="minPrice" class="form-control" value="{{ request("min_price") }}" required>
            </div>

            <div class="form-group col-4">
                <label for="maxPrice">Maximum Price:</label>
                <input type="text" name="max_price" id="maxPrice" class="form-control" value="{{ request("max_price") }}"  required>
            </div>

        </div>
        <div class="row mt-3">
            <div class="form-group  col-6">
                <button type="submit" class="btn btn-primary">Apply Filter</button>
                <a href="/products" class="btn btn-secondary">Reset Filter</a>
            </div>
        </div>
    </form>

    <!-- Product List -->
    <div class="row">
        @foreach($products as $product)
            <div class="col-md-4 mb-3">
                <div class="card">
                    <div class="card-body">
                        <h5 class="card-title">{{ $product->name }}</h5>
                        <p class="card-text">
                            Price: ${{ $product->price }}<br>
                            Category: {{ $product->category }}
                        </p>
                    </div>
                </div>
            </div>
        @endforeach
    </div>

    <!-- Footer -->
    <footer class="mt-5 text-center">
        <p>Created with ♥ by Laracoding</p>
    </footer>
</div>
</body>
</html>
Step 9: Define Routes
Define routes to access the controller functions in routes/web.php:
<?php

use Illuminate\Support\Facades\Route;
use App\Http\Controllers\ProductController;

Route::get('/products', [ProductController::class, 'index'])->name('products.index');
Route::get('/products/filter', [ProductController::class, 'filter'])->name('products.filter');
Step 10: Test the Application
To launch the application run the following artisan command:
php artisan serveYou can now test the application by visiting:
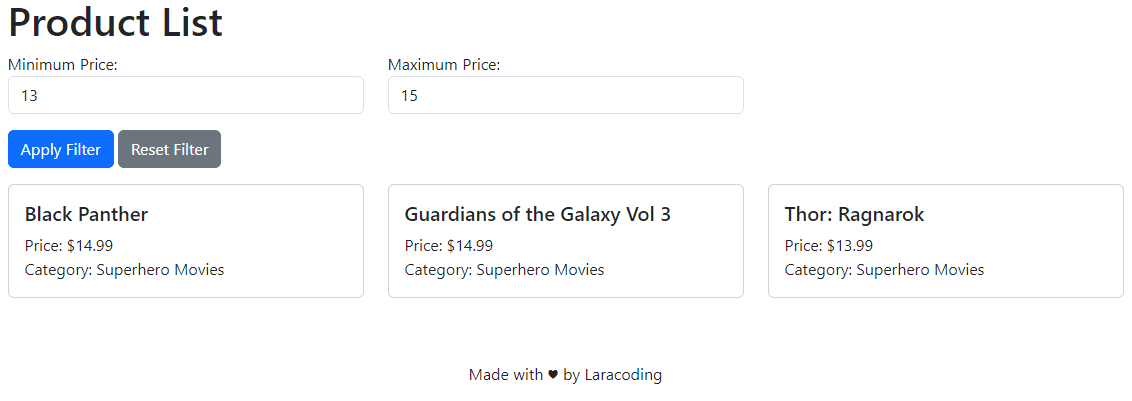
http://127.0.0.1:8000/products
You should now be able to filter by a minimum and maximum price using the form:
Further Examples of Model Scope With Parameters
You could add lots of handy scopes to better access your data. Of course, this depends on the columns your models have available.
Consider the following examples where one might use a model scope:
// Filtering by category
public function scopeByCategory($query, $category)
{
    return $query->where('category', $category);
}

// Filtering by a rating range
public function scopeByRating($query, $minRating, $maxRating)
{
    return $query->whereBetween('rating', [$minRating, $maxRating]);
}

// Filtering by a date range
public function scopeByDateRange($query, $startDate, $endDate)
{
    return $query->whereBetween('date', [$startDate, $endDate]);
}

// Filtering by a color
public function scopeByColor($query, $color)
{
    return $query->where('color', $color);
}

// Filtering by a discount percentage
public function scopeByDiscountPercentage($query, $discountPercentage)
{
    return $query->where('discount_percentage', '>', $discountPercentage);
}

// Filtering by a keyword
public function scopeByKeyword($query, $keyword)
{
    return $query->where('description', 'like', '%' . $keyword . '%');
}

// Filtering by a `featured` value
public function scopeByFeatured($query, $isFeatured)
{
    return $query->where('featured', $isFeatured);
}
Conclusion
In this guide, we’ve explored how to use a scope with parameters in Laravel Eloquent, which provides you with the tools to filter and retrieve data from your database while keeping the code concise.
I’ve also provided some examples where scopes might be useful. Now it’s time to get creative and apply scopes with parameters to your own application!
Happy coding!
References
- Dynamic Scopes (Laravel Documentation)
This entry is part 2 of 4 in the series Query Scopes in Laravel Eloquent
- How to Use Model Scopes With Laravel Eloquent
- Using a Model Scope With Parameters in Laravel Eloquent
- Using a Model Scope With a Relationship in Laravel
- Using Global Scope in Laravel (With Practical Examples)