If you want to integrate Google Analytics 4 tracking into your Laravel application, without relying on a package, this guide is for you.
Follow these seven straightforward steps to set up Google Analytics version 4 for your Laravel project. Let’s get started!
Step 1: Obtain Google Analytics 4 Measurement ID
To integrate Google Analytics into your Laravel application, you will need to obtain the Measurement ID. Follow these steps:
- Sign in to your Google Analytics account. If you don’t have an account, create a new one.
- Create a new property specifically for your Laravel application. This will generate a unique Measurement ID for tracking.
- To locate the Measurement ID, follow these steps:
- Click on “Admin” (or the cogs icon) located at the bottom left of the page
- Select or create the property associated with your Laravel application.
- Navigate to the data streams section.
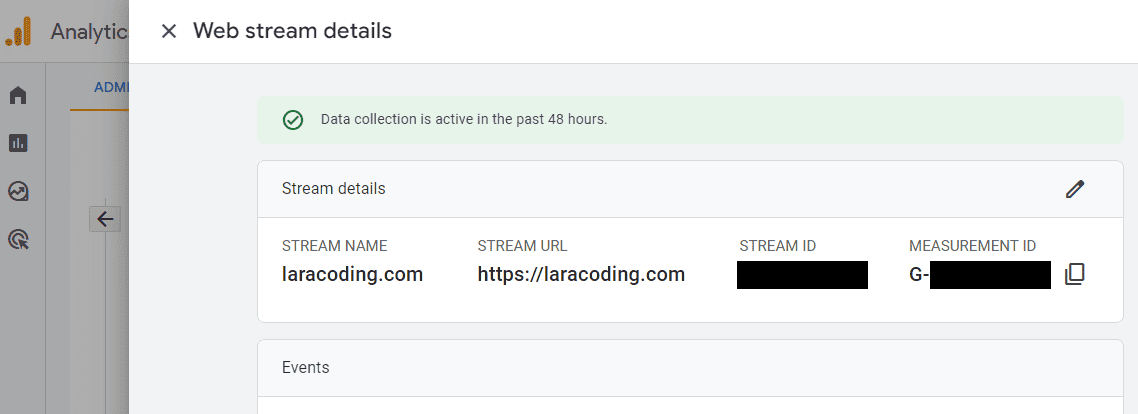
- Click on “Stream Details.” You will find the Measurement ID, which typically starts with “G-” followed by a series of alphanumeric characters (e.g., G-XXXXXXXXXX).
Step 2: Add Measurement ID to .env
Open the .env file located in the root directory of your Laravel project and insert the following line:
GA_MEASUREMENT_ID=G-XXXXXXXXXXReplace 'G-XXXXXXXXXX' with your actual measurement ID, as obtained in Step 1.
Step 3: Add Variable to the Laravel Configuration
Open config/services.php and add your key and secret to the array, as shown below:
<?php

return [

    // .. Other services ..

    // Configure Google Analytics 4 (GA4) measurement_id
    'ga4' => [
        'measurementId' => env('GA_MEASUREMENT_ID'),
    ]
];
We include these variables here so that we can access them later on in our code using config('services.ga4.measurementId').
While you could also use env('GA_MEASUREMENT_ID'), it is not recommended as it can potentially break your application when config caching is enabled. To learn more about this, please refer to the article: The Safe Way to Use env Variables in Laravel.
Step 4: Add Google Analytics Tracking Code
Open your Laravel project and locate or create the main layout file, typically located at resources/views/layouts/app.blade.php.
As a starting point you could use the example below. Notice in the <head> section of the layout file, we add the Google Analytics tracking code from the config file using config('services.ga4.measurementId'):
<!DOCTYPE html>
<html lang="{{ str_replace('_', '-', app()->getLocale()) }}">
<head>
    <script async src="https://www.googletagmanager.com/gtag/js?id={{ config('services.ga4.measurementId') }}"></script>
    <script>
        window.dataLayer = window.dataLayer || [];
        function gtag(){dataLayer.push(arguments);}
        gtag('js', new Date());
        gtag('config', '{{ config('services.ga4.measurementId') }}');
    </script>
</head>
<body>
    @yield('content')
</body>
</html>
Step 5: Include Layout File in Views
Make sure that your views extend the main layout file (app.blade.php) or include it if you are using a different layout.
This can typically be done by adding @extends('layouts.app') at the top of your view files. For example:
@extends('layouts.app')

@section('content')
    <h1>
        Example Page
    </h1>
    <p>
        This is just some dummy content to demo how a page could look.
    </p>
@stop
This way you can easily add the tracking to any page of your Laravel application.
Step 6: Add Routes
For the sake of demonstration you could add one route to allow you to view the page. This could look like this:
<?php

use Illuminate\Support\Facades\Route;

Route::get('/', function () {
    return view('home');
});
Step 7: Test Google Analytics Tracking
Once you have added the tracking code and included the layout file in your views, you can test if Google Analytics tracking is working correctly.
Unfortunately Google Analytics doesn’t allow to add Analytics to a http://localhost or http://127.0.0.1:8000 (like used by php artisan serve). You will have to use your live site to check that it’s working properly.
That said, to verify the tracking is working on your live site, open your site in one tab and Google Analytics in another tab. In Google Analytics “Realtime” section you should be able to see your session as one active user that is viewing the index page.
That’s it! You’ve successfully added Google Analytics 4 tracking to your Laravel site.
Conclusion
By following these steps, you can add Google Analytics tracking to your Laravel application using Google Analytics version 4. Remember to replace “G-XXXXXXXXXX” with your actual Measurement ID.
Feel free to use this in your own applications. Happy tracking!
Note that following the given steps allows you to collect data and send it to your analytics environment to view and analyze on analytics.google.com. If you need to retrieve and process data within your Laravel application, consider exploring the Laravel Analytics package by Spatie. This package provides functionality to integrate and work with Google Analytics data in your Laravel application.
References
- Find Your Measurement ID (Google Documentation)
This entry is part 3 of 4 in the series Google Integration
- How to Send Email With Laravel Using Gmail
- How to Add Google reCAPTCHA v3 to Your Laravel Form
- How to Add Google Analytics 4 (GA4) Tracking Code to Laravel
- How to Use Google Authenticator 2FA in Laravel
Thanks Johan you’re the man!
Thanks for the praise, I’m glad the post was helpful!
Hi there, Johan! It is a great and very simple guide to use. Thank you!
How can I put details to tracking of data from my E-Commerce? If i need to catch transaction amount and transaction Id, goods id’s in the order?
Thank you for your kind words! It’s an interesting use case. So far I haven’t set up GA-4’s more advanced tracking features like that. Have you succeeded yet? If not maybe this Google Analytics Documentation page can help you: https://developers.google.com/analytics/devguides/collection/ga4/ecommerce. I hope this helps you setting it up effectively!
Hi there, Jonan. This is a very great guide and pretty straightforward.
A minor review, the quote marks in script tags prove to be a syntax error, that is:
gtag(‘config’, ‘{{ config(‘services.ga4.measurementId’) }}’);
You might want to change that to:
gtag(‘config’, ‘{{ config(“services.ga4.measurementId”) }}’);
to avoid any syntax error that could happen.
Thank you so much!!
Thank you for your feedback! The code snippet you mentioned shouldn’t cause any issues within Blade templates. Since it’s enclosed within {{ }}, it operates within its own scope. You can use double quotes but it is not required.
This was so helpful. As a new Laravel developer, it’s the helpful community and sites like Laracoding that make Laravel so great to work with. THANK YOU!
You’re welcome Andrew, I’m happy to help. Enjoy your time with Laravel, I believe it will continue to flourish for a long time 🙂