Laravel offers a built-in method for sending emails from your application using the Mail facade. This method requires an external mail server to connect with, such as the Gmail SMTP server, which we’ll use in this tutorial.
To start sending emails using Gmail in Laravel, you need to enable app access in your Gmail account and add your Gmail SMTP credentials to Laravel’s .env file. Afterward, you can use Laravel’s built-in Mail facade to send emails within your application.
In the following step-by-step guide, I’ll walk you through the process. Let’s dive in!
Step 1: Configure Gmail Account (Prerequisite)
Before you begin sending emails from your Laravel application, you need to configure your Gmail account to allow third-party applications to access it.
It is often suggested in tutorials to check the box “Less secure app access” which used to work. However, this option has been removed from Gmail.
To enable Laravel access you must enable 2-Step Verification on your Google account page:
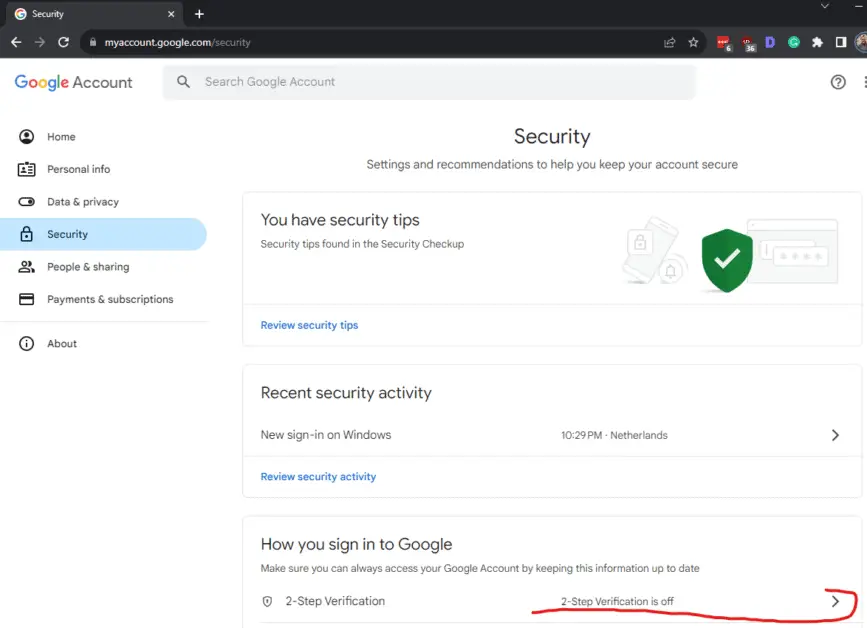
If it says “2-Step Verification is off” you need to walk through the steps to provide your phone number. This adds security to your account by enabling sending a code by SMS for all your sign-ins.
After you’ve enabled 2-step Verification it shows a green check and you can click it again to configure app access:

After clicking “2-Step Verification” scroll down to the bottom part for App passwords. Add one as shown in the animation below and copy and paste it into your .env file later on in Step 3.

Step 2: Install Laravel
If you haven’t already set up a Laravel project, create one using Composer:
composer create-project laravel/laravel EmailDemoStep 3: Configure Mail Settings in .env
Open the .env file in your Laravel project root and set up the mail configuration:
MAIL_MAILER=smtp
MAIL_HOST=smtp.gmail.com
MAIL_PORT=465
MAIL_USERNAME=your@gmail.com
MAIL_PASSWORD=your_app_password
MAIL_ENCRYPTION=tls
MAIL_FROM_ADDRESS=your@gmail.com
MAIL_FROM_NAME="laracoding.test EmailDemo"
Replace your@gmail.com with your own Gmail address and your_app_password with the password you’ve generated in Step 1.
Step 4: Create a Mail Class
Laravel Artisan can automatically create a dedicated class for your email by running:
php artisan make:mail WelcomeMailOpen the WelcomeMail.php file generated in the app/Mail directory. Customize the __construct to support passing in a $title and a $body. Also, customize the functions envelope() and content() to define the email’s content and subject. Alternatively can copy & paste the following code to achieve this:
<?php

namespace App\Mail;

use Illuminate\Bus\Queueable;
use Illuminate\Mail\Mailable;
use Illuminate\Mail\Mailables\Content;
use Illuminate\Mail\Mailables\Envelope;
use Illuminate\Queue\SerializesModels;

class WelcomeMail extends Mailable
{
    use Queueable, SerializesModels;

    /**
     * Create a new message instance.
     */
    public function __construct(private string $title, private string  $body)
    {
    }

    /**
     * Get the message envelope.
     */
    public function envelope(): Envelope
    {
        return new Envelope(
            subject: 'Welcome to laracoding.com EmailDemo',
        );
    }

    /**
     * Get the message content definition.
     */
    public function content(): Content
    {
        return new Content(
            view: 'emails.welcome',
            with: [
                'title' => $this->title,
                'body' => $this->body,
            ],
        );
    }

    /**
     * Get the attachments for the message.
     *
     * @return array<int, \Illuminate\Mail\Mailables\Attachment>
     */
    public function attachments(): array
    {
        return [];
    }
}
Step 5: Create a Controller
Next, let’s create a controller that will handle sending the welcome email. Use this artisan command to generate a controller:
php artisan make:controller EmailControllerOpen the EmailController.php file in the app/Http/Controllers directory and add the following code:
<?php

namespace App\Http\Controllers;

use App\Mail\WelcomeMail;
use Illuminate\Support\Facades\Mail;

class EmailController extends Controller
{
    public function sendWelcomeEmail()
    {
        $title = 'Welcome to the laracoding.com example email';
        $body = 'Thank you for participating!';

        Mail::to('your-recipient@domain.com')->send(new WelcomeMail($title, $body));

        return "Email sent successfully!";
    }
}
Note: in the code above replace “your-recipient@domain.com” with your email address on which you’ll receive the test email.
Step 6: Create a Route
In the routes/web.php file, add a route that maps to the sendWelcomeEmail method:
use App\Http\Controllers\EmailController;

Route::get('/send-welcome-email', [EmailController::class, 'sendWelcomeEmail']);
Step 7: Create an Email Template Using Blade
Create an email template using Blade. In the resources/views/emails directory, create a welcome.blade.php file and customize the email’s content using HTML and Blade syntax. Here’s a simple example:
<!DOCTYPE html>
<html>
<head>
    <title>{{ $title }}</title>
</head>
<body>
    <p>{{ $body }}</p>
</body>
</html>
Step 8: Run the Example to Send Email
You’re all set to send the welcome email! Start your Laravel application:
php artisan serveOpen your web browser and visit:
http://localhost:8000/send-welcome-email
The sendWelcomeEmail method will send the welcome email with the predefined title and body. Check your recipient email inbox to see the result.
Conclusion
Sending emails using Gmail and Laravel is a straightforward process thanks to Laravel’s built-in Mail facade.
By following the steps in this tutorial, you can easily configure your Gmail account, create a mail class add a template, and send emails with just a few lines of code.
Feel free to use this in your own application. Happy coding!
References
This entry is part 1 of 4 in the series Google Integration
- How to Send Email With Laravel Using Gmail
- How to Add Google reCAPTCHA v3 to Your Laravel Form
- How to Add Google Analytics 4 (GA4) Tracking Code to Laravel
- How to Use Google Authenticator 2FA in Laravel
Hello Mr Johan , first thanks for this great article because a lot of article are showing only the old way of integrating gmail with the option of less secure apps.
Your article is awesome , however your might rectify something : ” in the .env, the EMAIL_PASSWORD must be the one Gmail provide to you while you are creating an APP PASSWORD it is not you_gmail_password”
I’m glad you’ve found the post helpful. I’ve edited the part you’ve mentioned to clarify that the app password created in Step 1 should be used. Thanks a bunch for pointing it out!
google will disable send email using password and we should use google api, do you have a solution for that?
thanks
Using normal email password from a “less secure app” was removed but creating a specific app password works. Removal of this isn’t announced anywhere.
Hello Johan, thank you very much for this article, The view path should be: ‘mails.welcome’ with an s
You’re welcome and thanks for letting me know about that mistake. I’ve fixed the blog posts example code accordingly.
Hello Johan, thank you for this article, I followed this article on my laptop but I didn’t success.
Symfony \ Component \ ErrorHandler \ Error \ FatalError
PHP 8.2.12
10.43.0
Maximum execution time of 60 seconds exceeded
I got this error every time. Could you please let me know the why?
A few things you can do.
1. Check the log at storage/logs/laravel.log for a trace that shows where it spent all that time. See if it can be fixed.
2. Increase max_execution_time in php.ini
Thanks man, kept watching tutorial with that old method ,
You’re welcome, I’m glad this tutorial helped you. There sure are a lot of outdated guides around on the internet.
Hallo Johan, I’ve tried your tutorial but I got an error “Expected response code 220 but got an empty response”
I’d try and troubleshoot it using the logs in storage/laravel.log
Great, thank you.
I got this error
Connection could not be established with host “mailpit:1025”: stream_socket_client(): php_network_getaddresses: getaddrinfo for mailpit failed: Name or service not known
My guess is you have MAIL_HOST still set to ‘mailpit’. Review and edit your .env to fix this (see step 3).