TinyMCE is a popular WYSIWYG editor that allows users to format and edit content easily.
In this tutorial, I will show you how to build TinyMCE using Vite and integrate it into your Laravel application. As a demonstration, we will create a minimal Laravel application with a Blade view that renders a functional TinyMCE using only vanilla JavaScript.
Let’s get started!
Step 1: Set Up a New Laravel Project
Start by creating a new Laravel 10 project using the following command:
composer create-project laravel/laravel my-projectStep 2: Install TinyMCE
Next, install TinyMCE in your Laravel project by running the following command:
npm install tinymceStep 3: Import TinyMCE Files
In the resources/js/app.js file, add the following lines at the top to import the required JS and CSS files for TinyMCE:
import './bootstrap';
import 'tinymce/tinymce';
import 'tinymce/skins/ui/oxide/skin.min.css';
import 'tinymce/skins/content/default/content.min.css';
import 'tinymce/skins/content/default/content.css';
import 'tinymce/icons/default/icons';
import 'tinymce/themes/silver/theme';
import 'tinymce/models/dom/model';
Step 4: Add TinyMCE Init Code
Now add the following init code to the bottom of your app.js
// .. After imports init TinyMCE ..
window.addEventListener('DOMContentLoaded', () => {
    tinymce.init({
        selector: 'textarea',

        /* TinyMCE configuration options */
        skin: false,
        content_css: false
    });
});
Note that this adds it globally to all pages which include our app.js. You could also add this to a specific blade file instead.
Step 5: Build Your Assets Using Vite
Build the assets of your Laravel application using Vite by running the following command in your terminal:
npm run buildStep 6: Add TinyMCE to Blade by Using the @vite Directive
Now, in your Blade file, add the following line to use Vite for including the app.js file that was built using npm: @vite(['resources/js/app.js']).
A full example would be:
<!DOCTYPE html>
<html lang="en">
<head>
    <title>Laracoding.com TinyMCE Example</title>
    <meta charset="utf-8">
    <meta name="viewport" content="width=device-width, initial-scale=1">
    @vite(['resources/js/app.js'])
</head>
<body>
    <h2>Laracoding.com - TinyMCE Example</h2>
    <form action="" method="get">
        <div class="mb-3">
            <label for="pwd">TinyMCE input:</label>
            <textarea class="tinyMce" name="user-bio"></textarea>
        </div>
        <button type="submit" class="btn btn-primary">Submit</button>
    </form>
</body>
</html>
Step 7: Add a Route
Now, let’s add a simple route so that we can load the page in our browser and view the TinyMCE textarea. Add the following code to your routes/web.php file.
Route::get('/tinymce', function () {
    return view('tinymce');
});
Step 8: Run the Application
Finally you can run your Laravel application using the following command:
php artisan serveNow, when you access your application in your browser (e.g., using the local link http://127.0.0.1:8000/tinymce), you will notice that the TinyMCE editor is successfully loaded on the <textarea> element.
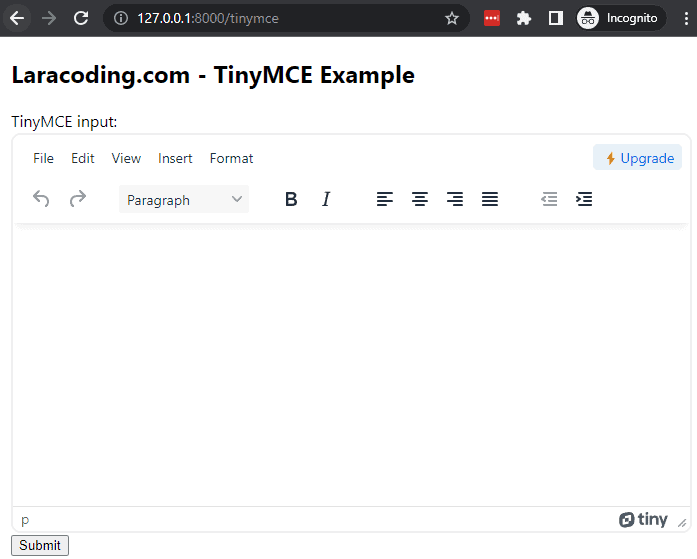
textareaConclusion
In this tutorial, we demonstrated a simple example of loading TinyMCE on every textarea in your application. By following the outlined steps, you can easily integrate TinyMCE into your Laravel 10 application using Vite as the build tool.
Remember to check out the TinyMCE documentation for more advanced configuration options and customization possibilities based on your specific needs.
Enjoy using TinyMCE to add rich editing to your Laravel application. Happy coding!
References
- TinyMCE Documentation
- Asset Bundling (Vite) (Laravel Documentation)
This entry is part 4 of 5 in the series Installing Laravel Assets Using Vite
- How to Install Font Awesome in Laravel With Vite
- How to Install jQuery in Laravel With Vite
- How to Install Bootstrap in Laravel With Vite
- How to Install TinyMCE in Laravel With Vite
- How to Add Custom JavaScript to Laravel With Vite
Thanks for manual, there is only one thing…
If I need to use plugins, e.g. lists, it is not working at all
tinymce.init({
selector: ‘textarea’,
plugins: [‘advlist lists link table’],
skin: false,
content_css: false,
menubar: false,
toolbar_mode: ‘floating’,
toolbar: ‘undo redo | styles | bold italic underline | alignleft aligncenter alignright alignjustify | bullist numlist | link table’,
}).then(() => {});
I’ve tried to import them manually in app.js, but also withou success:
import ‘tinymce/plugins/advlist/index’;
import ‘tinymce/plugins/lists/index’;
import ‘tinymce/plugins/link/index’;
import ‘tinymce/plugins/table/index’;
My wrong, on their documentation their type it as string with plugins separated by space, somewhere else I’ve found that whole sting was encapsulated by array, but right way is to make it as array of strings [‘advlist’, ‘lists’, ‘link’, ‘table’]
I’m glad you’ve resolved the issue you were having. Happy coding 🙂
tinymce.init({
selector: “textarea”,
skin: ‘oxide-dark’,
content_css: ‘dark’
});
isn’t working even i am adding
import ‘tinymce/skins/ui/oxide-dark/skin.min.css’;
import ‘tinymce/skins/ui/oxide-dark/content.min.css’;
import ‘tinymce/skins/content/dark/content.css’;
Thank you! Do you have a solution how to change English localization to French?
using bundle build , codesample plugin will not work.
when click the button, dialog is open, but if insert code, it doesn’t show correctly.
and also, prismjs not loaded.
don’t know how to do it.
in a downloaded version, prism.js is compiled inside
why i can’t add other menubar?
window.addEventListener(‘DOMContentLoaded’, () => {
tinymce.init({
selector: ‘textarea’,
menubar: ‘favs file edit view insert format tools table help’,
content_css: false,
skin: false,
});
});
Thanks for this. The only thing I changed was to import the CSS in the app.css file, as when it imported using the app.js it conflicted with the body styles, rather than applying to just the tinymce body styles.