The One-to-Many relationship is the most commonly used relationship in Laravel and ORM systems in general. In Laravel, this relationship is established through the hasMany and belongsTo methods, creating a direct connection between entities, and simplifying accessing related data.
In this tutorial, we’ll implement an example of this relationship using two entities: “Author” and “Book”. The relationship we’ll establish will allow an author to have multiple books while ensuring a book can only have one author.
Let’s first have a look at the ERD below, which shows the two related tables, “authors” and “books” that we will connect through an Eloquent relationship. Notice that a ‘book’ includes an author_id, which serves as a reference to its owner’s id in the ‘authors’ table.
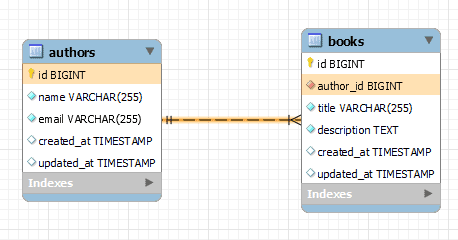
authors and booksNext, I’ll walk you through the steps to create the necessary migrations, define the relationships in the Eloquent models, and perform common operations on the related data. By the end of this tutorial, you’ll have a solid understanding of how to use one-to-many relationships in Laravel.
Let’s get started!
Step 1: Create the Migrations
First, let’s create the migrations for the “authors” and “books” tables. Run the following commands in your terminal:
php artisan make:migration create_authors_table --create=authors
php artisan make:migration create_books_table --create=books
Open the “create_authors_table” migration file and add the following code:
<?php

use Illuminate\Database\Migrations\Migration;
use Illuminate\Database\Schema\Blueprint;
use Illuminate\Support\Facades\Schema;

return new class extends Migration
{
    /**
     * Run the migrations.
     */
    public function up(): void
    {
        Schema::create('authors', function (Blueprint $table) {
            $table->id();
            $table->string('name');
            $table->string('email');
            $table->timestamps();
        });
    }

    /**
     * Reverse the migrations.
     */
    public function down(): void
    {
        Schema::dropIfExists('authors');
    }
};
Similarly, open the “create_books_table” migration file and add the following code:
<?php

use Illuminate\Database\Migrations\Migration;
use Illuminate\Database\Schema\Blueprint;
use Illuminate\Support\Facades\Schema;

return new class extends Migration
{
    /**
     * Run the migrations.
     */
    public function up(): void
    {
        Schema::create('books', function (Blueprint $table) {
            $table->id();
            $table->string('title');
            $table->text('description');
            $table->foreignIdFor(\App\Models\Author::class)->constrained();
            $table->timestamps();
        });
    }

    /**
     * Reverse the migrations.
     */
    public function down(): void
    {
        Schema::dropIfExists('books');
    }
};
On Laravel versions older than Laravel 8 you may use the following instead:
Schema::create('books', function (Blueprint $table) {
    $table->id();
    $table->string('title');
    $table->text('description');
    $table->unsignedBigInteger('author_id');
    $table->foreign('author_id')->references('id')->on('authors');
    $table->timestamps();
});
To create the “authors” and “books” tables in your database run the following artisan command:
php artisan migrateStep 2: Define the Models
Next, let’s create the models for the “Author” and “Book” entities. Run the following commands:
php artisan make:model Author
php artisan make:model Book
Open the “Author” model and define the one-to-many relationship with the “Book” model:
<?php

namespace App\Models;

use Illuminate\Database\Eloquent\Model;

class Author extends Model
{
    public function books()
    {
        return $this->hasMany(Book::class);
    }
}
Open the “Book” model and define the inverse of the one-to-many relationship:
<?php

namespace App\Models;

use Illuminate\Database\Eloquent\Model;

class Book extends Model
{
    public function author()
    {
        return $this->belongsTo(Author::class);
    }
}
Step 3: Perform Queries
Now that we have set up the migrations and models, let’s perform some queries to retrieve and manipulate data using the one-to-many relationship.
use App\Models\Author;
use App\Models\Book;
use Illuminate\Support\Facades\Route;

Route::get('/hasmany', function () {
    // Create an author
    $author = new Author();
    $author->name = 'John Doe';
    $author->email = 'john@example.com';
    $author->save();

    // Create books and associate with author
    $book1 = new Book();
    $book1->title = 'Book 1';
    $book1->description = 'Description for Book 1';
    $author->books()->save($book1);

    $book2 = new Book();
    $book2->title = 'Book 2';
    $book2->description = 'Description for Book 2';
    $author->books()->save($book2);

    // Retrieve books by a specific author (via hasMany)
    $author = Author::first();
    $books = $author->books;
    dump($books);

    // Retrieve author of a book (via belongsTo)
    $book = Book::first();
    $author = $book->author;
    dump($author);
});
Further One-to-Many Examples
In addition to the “Author” and “Book”, we have used in this tutorial, there are numerous other use cases where the One-to-Many relationship can be applied. Here are a few more examples:
| Example | Parent Model | Child Model |
| 1 | User | Post |
| 2 | Country | City |
| 3 | Department | Employee |
| 4 | School | Student |
| 5 | Category | Product |
| 6 | Customer | Order |
By using the One-to-Many relationship in Laravel, you can effectively manage relationships between entities where one entity can have multiple related entities. This allows for easy retrieval of data from the related models.
Conclusion
In this tutorial, we have explored how to use a One-to-Many relationship in Laravel. By defining the relationships, creating migrations, models, and performing queries, we have successfully established a connection between two entities and effectively retrieved related data.
Using these techniques in your own projects will help you leverage Eloquent’s features and write more concise and readable code. Happy coding!
References:
This entry is part 2 of 9 in the series Laravel Eloquent Relationships
- How to Use a One-to-One Relationship in Laravel
- How to Use a One-to-Many Relationship in Laravel
- How to Use a Many-to-Many Relationship in Laravel
- Using Extra Fields in Pivot Table With Laravel belongsToMany
- How to Use Has-Many-Through Relationships in Laravel
- How to use One-to-Many Polymorphic Relationship in Laravel
- How to use Many-to-Many Polymorphic Relationship in Laravel
- How to Paginate a Model with Relationship in Laravel
- How to Use `with()` to Eager Load Relationship in Laravel

Thank you for your comment! I’m glad you found the post on one-to-many relationships helpful. With your 5 years of experience in Laravel and 3 years with Vue, you have a strong skill set that many employers value. I’m confident you’ll find opportunities and I wish you the best of luck in your job search.