Laravel provides a built-in pagination system that fully supports Eloquent Models as a source. This includes data retrieved from relationships, such as a one-to-many relationship between a Book and its Category, for example.
The syntax to paginate a model and its relationship in Laravel looks like:
$paginated = Book::with('category')->paginate(4);In this tutorial, we’ll build a complete example demonstrating how to paginate these Models in a user-friendly manner. We’ll cover everything from setting up migrations and models to creating controllers, views, and populating data using Laravel’s artisan commands.
Let’s get started!
Step 1: Create Laravel Project
Begin by creating a new Laravel project named Bookstore using the following artisan command:
composer create-project --prefer-dist laravel/laravel BookstoreStep 2: Generate Model and Migration
Next, let’s create migrations and models for the Book and Category entities. Run the following commands in your terminal:
php artisan make:model Category -mPause a bit, then run the command below.
The pause is needed because the migration for books contains a foreign key that requires the categories table to exist. Laravel will run the oldest migration first and a pause ensures it has a later timestamp in the filename (Laravel will run the oldest first.)
php artisan make:model Book -mStep 3: Add Migration Code
Open the migration files created in the database/migrations directory. Define the schema for the books and categories tables in the up() method and the drop schema in the down() method.
For the table categories, use:
<?php

use Illuminate\Database\Migrations\Migration;
use Illuminate\Database\Schema\Blueprint;
use Illuminate\Support\Facades\Schema;

return new class extends Migration
{
    public function up(): void
    {
        Schema::create('categories', function (Blueprint $table) {
            $table->id();
            $table->string('name');
            $table->timestamps();
        });
    }

    public function down(): void
    {
        Schema::dropIfExists('categories');
    }
};
For the table books, use:
<?php

use Illuminate\Database\Migrations\Migration;
use Illuminate\Database\Schema\Blueprint;
use Illuminate\Support\Facades\Schema;

return new class extends Migration
{
    public function up(): void
    {
        Schema::create('books', function (Blueprint $table) {
            $table->id();
            $table->string('title');
            $table->decimal('price', 6, 2);
            $table->foreignId('category_id')->constrained()->onDelete('cascade');
            $table->timestamps();
        });
    }

    public function down(): void
    {
        Schema::dropIfExists('books');
    }
};
Step 4: Run Migrations
Now, create the tables in the database by running the following artisan command:
php artisan migrateStep 5: Add Model Code
In this step we’ll add code to the models Book and Category to define the relationships between them, and set $fillable to specify which properties should allow mass assignment. This will make it easier for us to use Eloquent’s create() method to fill multiple values at once.
Now open the respective model files (app/Models/Book.php and app/Models/Category.php and add the code shown below.
For the Book model, use:
<?php

namespace App\Models;

use Illuminate\Database\Eloquent\Model;
use Illuminate\Database\Eloquent\Relations\BelongsTo;

class Book extends Model
{
    protected $fillable = ['title', 'price', 'category_id'];

    public function category(): BelongsTo
    {
        return $this->belongsTo(Category::class);
    }
}
For the Category model, use:
<?php

namespace App\Models;

use Illuminate\Database\Eloquent\Model;
use Illuminate\Database\Eloquent\Relations\HasMany;

class Category extends Model
{
    protected $fillable = ['name'];

    public function books(): HasMany
    {
        return $this->hasMany(Book::class);
    }
}
Step 6: Create Controller and Views
Now use the following artisan command to generate a controller named BookController:
php artisan make:controller BookControllerStep 7: Add Controller Code
Now open the generated controller at app/Http/Controllers/BookController.php and add:
<?php

namespace App\Http\Controllers;

use App\Models\Book;

class BookController extends Controller
{
    public function index()
    {
        $books = Book::with('category')->paginate(4);
        return view('books.index', compact('books'));
    }
}
Step 8: Create a View
The Blade code provided below presents all books in a paginated view, applying Tailwind CSS styling, which is Laravel’s default.
Alternatively, if you prefer to use Bootstrap styles for your pagination, you can refer to my other article: How to Use Bootstrap Pagination in Laravel Blade.
To create the blade view file, navigate to resources/views/books/index.blade.php and add the following code:
<!DOCTYPE html>
<html lang="en">
<head>
    <meta charset="UTF-8">
    <meta name="viewport" content="width=device-width, initial-scale=1.0">
    <title>Books</title>
    <link href="https://cdn.jsdelivr.net/npm/tailwindcss@2.2.19/dist/tailwind.min.css" rel="stylesheet">
</head>
<body>
<div class="container mt-5 ml-5 mr-5">
    <h1 class="text-3xl font-bold mb-5">Welcome to Book Store!</h1>
    <div class="grid grid-cols-1 sm:grid-cols-2 md:grid-cols-3 gap-4">
        @foreach($books as $book)
            <div class="flex justify-center">
                <div class="max-w-xs w-full bg-white shadow-md rounded-lg overflow-hidden mx-auto">
                    <div class="px-4 py-2">
                        <h3 class="font-bold text-xl mb-2">{{ $book->title }}</h3>
                        <p class="text-gray-600 text-sm">Author: {{ $book->author }}</p>
                        <p class="text-gray-600 text-sm">Price: ${{ $book->price }}</p>
                    </div>
                </div>
            </div>
        @endforeach
    </div>
    <div class="d-flex justify-content-center mt-3">
        {{ $books->links() }}
    </div>
</div>
</body>
</html>
Step 9: Create a Route
Now open routes/web.php and add the code shown below. This will define a route that will call the index() method of our BookController.
<?php

use Illuminate\Support\Facades\Route;
use App\Http\Controllers\BookController;

// Route to display paginated books
Route::get('/books', [BookController::class, 'index'])->name('books.index');
Step 10: Populate Sample Data
Now let’s populate the ‘categories’ and ‘books’ tables with some sample data. We’re going to use Laravel Tinker to manually insert data.
Run the following command to open Tinker:
php artisan tinkerPaste the following code and press enter:
use App\Models\Category;

// Create 2 categories
$fantasy = Category::create(['name' => 'Fantasy']);
$programming = Category::create(['name' => 'Programming']);

// Create 3 books in the `Fantasy` Category
$fantasy->books()->createMany([
    ['title' => 'Dune', 'author' => 'Frank Herbert', 'price' => 20.99],
    ['title' => 'The Lord of the Rings', 'author' => 'J.R.R. Tolkien', 'price' => 25.99],
    ['title' => 'Harry Potter', 'author' => 'J.K. Rowling', 'price' => 18.99],
]);

// Create 3 books in the `Programming` Category
$programming->books()->createMany([
    ['title' => 'Laravel Up and Running', 'author' => 'Matt Stauffer', 'price' => 30.99],
    ['title' => 'MySQL Essentials', 'author' => 'Tech Academy', 'price' => 22.99],
    ['title' => 'PHP Programming', 'author' => 'Larry Ullman', 'price' => 28.99],
]);
After running the code the database should look like:
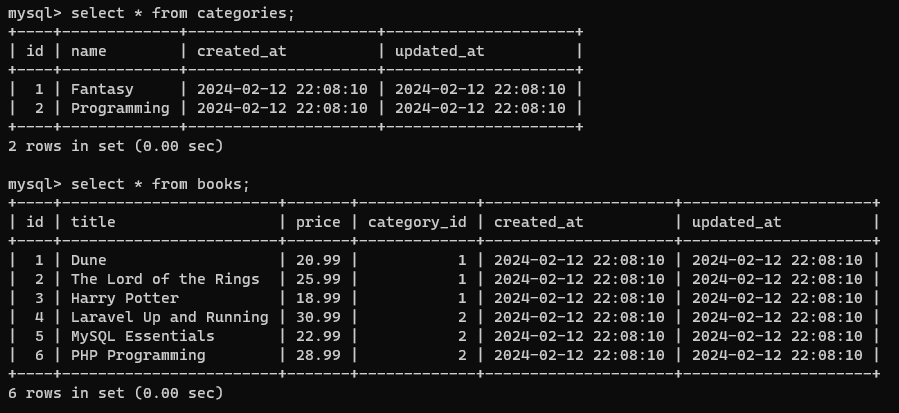
categories and books Tables After Inserting the Sample DataStep 11: Test the Application
Now let’s start the application by running the following Artisan command:
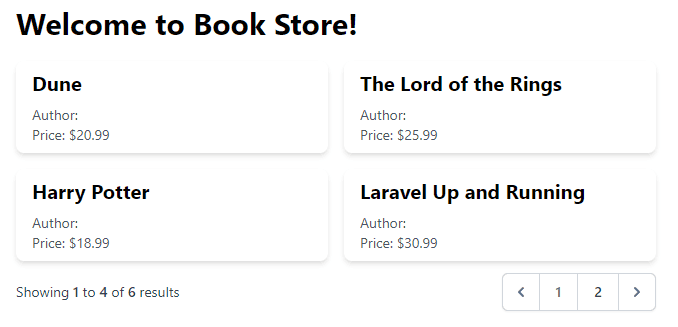
php artisan serveAfterwards you can visit http://127.0.0.1:8000/books in your browser to view our books table. It should look like this:
Conclusion
By following the steps outlined in this tutorial, you’ve built a Laravel application that presents paginated data from a Model and its relationship.
In this guide we only retrieved a small amount of records. To ensure the application’s performance holds up with much larger datasets, I’d recommend testing with larger amounts of data. To do this, one typically uses factories and seeders to fill your tables with arbitrary amounts of dummy data. This process is explained in more detail in my other post: How to Use Bootstrap Pagination in Laravel Blade (Tutorial).
Now go ahead and apply pagination using your own custom Model and its relation.
Happy coding!
References
- Eloquent: Relationships (Laravel Documentation)
- Database: Migrations (Laravel Documentation)
This entry is part 8 of 9 in the series Laravel Eloquent Relationships
- How to Use a One-to-One Relationship in Laravel
- How to Use a One-to-Many Relationship in Laravel
- How to Use a Many-to-Many Relationship in Laravel
- Using Extra Fields in Pivot Table With Laravel belongsToMany
- How to Use Has-Many-Through Relationships in Laravel
- How to use One-to-Many Polymorphic Relationship in Laravel
- How to use Many-to-Many Polymorphic Relationship in Laravel
- How to Paginate a Model with Relationship in Laravel
- How to Use `with()` to Eager Load Relationship in Laravel