In this tutorial, we will explore how to implement a one-to-one relationship using Laravel Eloquent. The process is straightforward and involves adding a single line of code to each of the two related classes.
To establish a one-to-one relationship in Laravel Eloquent, we use the hasOne method in one class and the corresponding belongsTo method in the other class. This creates a direct association between the entities, allowing seamless access to related data.
To begin, let’s have a look at the database diagram below. It shows the two tables involved: “users” and “profiles”, that we will connect through an Eloquent relationship. As you can see, a profile has a user_id field which points to the id of its owner in the users table. As we will see later on, it requires very little code to support this relationship in Eloquent objects.
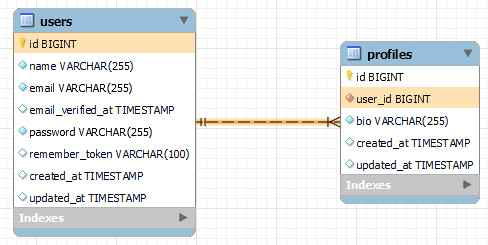
profiles and users in ERD (Entity Relationship Diagram)Next, we will walk through the required steps for creating the essential migrations and models, establishing their relationships, and executing queries to retrieve and manipulate related data. By the end of this tutorial, you will have a solid understanding of how to use a one-to-one relationship in Laravel.
Let’s get started!
Step 1: Create a User Migration
To begin, let’s make sure we have the correct a migration for the “users” table. This migration is the same as the Laravel default users migration. Check if you already have it. If you do, you can skip this step. Otherwise you may simply run:
php artisan make:migration usersCopy the up() and down() methods, as shown below, into your users migration:
<?php

use Illuminate\Database\Migrations\Migration;
use Illuminate\Database\Schema\Blueprint;
use Illuminate\Support\Facades\Schema;

return new class extends Migration
{
    /**
     * Run the migrations.
     */
    public function up(): void
    {
        Schema::create('users', function (Blueprint $table) {
            $table->id();
            $table->string('name');
            $table->string('email')->unique();
            $table->timestamp('email_verified_at')->nullable();
            $table->string('password');
            $table->rememberToken();
            $table->timestamps();
        });
    }

    /**
     * Reverse the migrations.
     */
    public function down(): void
    {
        Schema::dropIfExists('users');
    }
};
Step 2: Create a User Model With a hasOne Relation
Next, let’s edit Laravel’s default Models\User.php. If it doesn’t exists yet use the following command to create it:
php artisan make:model UserNext, we will add a profile() function to our class User, this defines a hasOne relationship with the Profile model, indicating that a user has one profile associated with them. Here’s an example of how the User model should look:
use Illuminate\Database\Eloquent\Model;

class User extends Model
{
    public function profile()
    {
        return $this->hasOne(Profile::class);
    }
}
Step 3: Create a Profile Migration
Now, let’s create a migration for the “profiles” table. This table will contain additional information specific to the user’s profile, like in our example, a column “bio” where a user’s biography can be added. Here’s an example of the “up” and “down” methods for the Profile migration:
<?php

use Illuminate\Database\Migrations\Migration;
use Illuminate\Database\Schema\Blueprint;
use Illuminate\Support\Facades\Schema;

return new class extends Migration {
    /**
     * Run the migrations.
     */
    public function up(): void
    {
        Schema::create('profiles', function (Blueprint $table) {
            $table->id();
            $table->string('bio');
            $table->foreignIdFor(\App\Models\User::class)->constrained();
            $table->timestamps();
        });
    }

    /**
     * Reverse the migrations.
     */
    public function down(): void
    {
        Schema::dropIfExists('profiles');
    }
};
Should you use a version older then Laravel 8 replace the up() with this version, slightly longer syntax, version:
Schema::create('profiles', function (Blueprint $table) {
    $table->id();
    $table->string('bio');
    $table->bigInteger('user_id')->unsigned();
    $table->foreign('user_id')->references('id')->on('users');
    $table->timestamps();
});
Step 4: Create a Profile Model With a belongsTo Relation
Next, let’s create a Profile model that corresponds to the “profiles” table by running:
php artisan make:model ProfileWe will define a belongsTo relationship with the User model, indicating that a profile belongs to a user. Here’s an example of how the Profile model should look:
use Illuminate\Database\Eloquent\Model;

class Profile extends Model
{
    public function user()
    {
        return $this->belongsTo(User::class);
    }
}
Step 5: Perform Queries
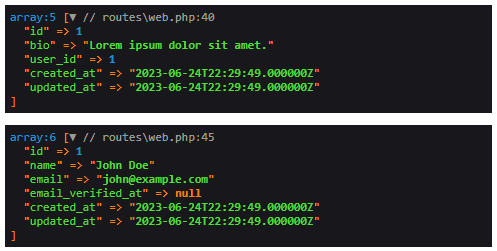
Now that we have set up the migrations and models, we can perform queries to retrieve and manipulate data using the one-to-one relationship. Here are a few examples of how you can use the relationship:
Route::get('/hasone', function () {
    // Create a user
    $user = new User();
    $user->name = 'John Doe';
    $user->email = 'john@example.com';
    $user->password = bcrypt('password');
    $user->save();

    // Create a profile
    $profile = new \App\Models\Profile();
    $profile->bio = 'Lorem ipsum dolor sit amet.';
    $user->profile()->save($profile); // save it using the hasOne

    // Retrieve a user's profile (provided by hasOne)
    $user = User::find(1);
    $profile = $user->profile;
    dump($profile->attributesToArray());

    // Inverse: Retrieve a profile's user (provided by belongsTo)
    $profile = \App\Models\Profile::find(1);
    $user = $profile->user;
    dump($user->attributesToArray());
});
The result shows the relation works properly
Conclusion
In this tutorial, we have explored how to use a one-to-one relationship in Laravel. We covered the steps required to set up the necessary migrations, create models with the appropriate relationships, and perform queries to retrieve and manipulate related data.
Now that you have a solid understanding of one-to-one relationships in Laravel, you can start exploring where this relationship type might be applicable in your own projects. Consider scenarios where you need to associate a single record from one table to another, such as user profiles, settings, or preferences. Happy coding!
References:
This entry is part 1 of 9 in the series Laravel Eloquent Relationships
- How to Use a One-to-One Relationship in Laravel
- How to Use a One-to-Many Relationship in Laravel
- How to Use a Many-to-Many Relationship in Laravel
- Using Extra Fields in Pivot Table With Laravel belongsToMany
- How to Use Has-Many-Through Relationships in Laravel
- How to use One-to-Many Polymorphic Relationship in Laravel
- How to use Many-to-Many Polymorphic Relationship in Laravel
- How to Paginate a Model with Relationship in Laravel
- How to Use `with()` to Eager Load Relationship in Laravel