When creating forms for your Laravel applications, at some point, you’ll probably need to use select pulldowns where your users can pick from some predefined options. This helps the user to quickly fill the desired value and helps you ensure that only valid data will be submitted.
The following example code adds a select input in a form and makes sure it’s populated with predefined values. The Laravel helper function “old()” is used to make sure the previously picked value is remembered and repopulated when the form is shown again with its validation error messages:
<select class="form-select" id="category" name="category">
    <option value="">Select Category</option>
    @foreach($categories as $category)
		<option value="{{ $category }}" {{ old('category') == $category ? 'selected' : '' }}>
        {{ $category }}
		</option>
    @endforeach
</select>
In this tutorial, I’ll walk you through the process of creating a simple to-do list example application where users can use the select shown above to add new tasks with a title, description, and category select option. We’ll cover everything from setting up the Laravel project to displaying validation errors and populating select options with dynamic data.
Let’s get started!
Step 1: Set Up Laravel Project
First, ensure you have Laravel installed. If not, you can quickly set up a new Laravel project using Composer:
composer create-project --prefer-dist laravel/laravel todo-category-select-demoThen change into your project folder by running:
cd posts-demoStep 2: Setup Database
For simplicity I recommend using an SQLite Database on your local computer. If you’ve installed Laravel 11 or newer it will use SQLite out of the box. Otherwise you can use it by simply editing the .env file in your Laravel root folder to:
DB_CONNECTION=sqlite
# DB_HOST=127.0.0.1
# DB_PORT=3306
# DB_DATABASE=laravel
# DB_USERNAME=root
# DB_PASSWORD=
Step 3: Create a Model and Migration
For our example, let’s create a table to store blog posts. To do this create a model “Post” and migration for this model:
php artisan make:model Todo -mStep 4: Add Model code
Make sure you can mass assign properties of the model Todo by editing app/Models/Todo.php:
<?php

namespace App\Models;

use Illuminate\Database\Eloquent\Model;

class Todo extends Model
{
    protected $fillable = [
        'title',
        'description',
        'category',
    ];
}
Step 5: Add Migration code
Edit the migration in database/migrations/yyyy_mm_dd_tttttt_create_todos_table.php to match:
<?php

use Illuminate\Database\Migrations\Migration;
use Illuminate\Database\Schema\Blueprint;
use Illuminate\Support\Facades\Schema;

return new class extends Migration
{
    public function up(): void
    {
        Schema::create('todos', function (Blueprint $table) {
            $table->id();
            $table->string('title');
            $table->text('description')->nullable();
            $table->string('category');
            $table->timestamps();
        });
    }

    public function down(): void
    {
        Schema::dropIfExists('todos');
    }
};
Step 6: Run Migrations
Next, create the table by running the migration by running the following artisan command:
php artisan migrateStep 7: Create Controller
Next, create a controller named TodoController with store and index methods:
php artisan make:controller TodoControllerStep 8: Add Controller code
Open the generated TodoController.php file located in the app/Http/Controllers directory. Update the controller code as follows:
<?php

namespace App\Http\Controllers;

use App\Models\Todo;
use Illuminate\Http\RedirectResponse;
use Illuminate\Http\Request;
use Illuminate\Routing\Redirector;
use Illuminate\View\View;

class TodoController extends Controller
{
    /**
     * Display a listing of the todos.
     *
     * @return View
     */
    public function index(): View
    {
        // Fetch all todos
        $todos = Todo::all();

        // Sample categories (replace with your actual categories)
        $categories = ['Work', 'Personal', 'Errands'];

        // Pass todos and categories to the view
        return view('todos', compact('todos', 'categories'));
    }

    /**
     * Store a newly created todo in storage.
     *
     * @param Request $request
     * @return RedirectResponse|Redirector
     */
    public function store(Request $request): RedirectResponse|Redirector
    {
        // Validate request data
        $request->validate([
            'title' => 'required|string|max:255',
            'description' => 'nullable|string',

            // Validate that only supported options will be accepted
            'category' => 'required|string|in:Work,Personal,Errands',
        ]);

        // Create new To-Do item
        $todo = Todo::create([
            'title' => $request->input('title'),
            'description' => $request->input('description'),
            'category' => $request->input('category'),
        ]);

        // Redirect back with success message
        return redirect()->back()->with('success', 'Todo created successfully!');
    }
}
In the index() method, we fetch all todos and define a sample array of categories. This array is then passed to the todos.blade.php view along with the todos using the compact() function.
Ensure to replace the sample categories with your actual categories in your application.
Step 9: Create Blade View
Create a new Blade view named todos.blade.php within the resources/views directory. This view will contain the form to create new todos and display the list of existing todos. Below is the complete code sample for the todos.blade.php file:
<!DOCTYPE html>
<html lang="en">
<head>
    <meta charset="UTF-8">
    <meta name="viewport" content="width=device-width, initial-scale=1.0">
    <title>Todo App</title>
    <!-- Bootstrap CSS -->
    <link href="https://cdn.jsdelivr.net/npm/bootstrap@5.3.3/dist/css/bootstrap.min.css" rel="stylesheet">
</head>
<body>
<div class="container mt-5">
    <h1 class="mb-4">Todo App</h1>

    <!-- Todo Form -->
    <form action="{{ route('todos.store') }}" method="POST">
        @csrf
        <div class="mb-3">
            <label for="title" class="form-label">Title</label>
            <input type="text" class="form-control" id="title" name="title" value="{{ old('title') }}">
            @error('title')
            <div class="text-danger">{{ $message }}</div>
            @enderror
        </div>
        <div class="mb-3">
            <label for="description" class="form-label">Description</label>
            <textarea class="form-control" id="description" name="description" rows="3">{{ old('description') }}</textarea>
            @error('description')
            <div class="text-danger">{{ $message }}</div>
            @enderror
        </div>
        <div class="mb-3">
            <label for="category" class="form-label">Category</label>
            <select class="form-select" id="category" name="category">
                <option value="">Select Category</option>
                @foreach($categories as $category)
                    <option value="{{ $category }}" {{ old('category') == $category ? 'selected' : '' }}>{{ $category }}</option>
                @endforeach
            </select>
            @error('category')
            <div class="text-danger">{{ $message }}</div>
            @enderror
        </div>
        <button type="submit" class="btn btn-primary">Add Todo</button>
    </form>

    <hr>

    <!-- Todo List -->
    <h2 class="mt-4">Todo List</h2>
    <ul class="list-group-numbered">
        @foreach($todos as $todo)
            <li class="list-group-item">
                <b>{{ $todo->title }}</b><br>
                <i>{{ $todo->description }}</i>
            </li>
        @endforeach
    </ul>
</div>

</body>
</html>
Step 10: Create Routes
Define routes for the TodoController‘s index and store methods in the routes/web.php file:
<?php

use App\Http\Controllers\TodoController;
use Illuminate\Support\Facades\Route;

Route::get('/todos', [TodoController::class, 'index'])->name('todos.index');
Route::post('/todos', [TodoController::class, 'store'])->name('todos.store');
Step 11: Test the Application
Start the development server by running:
php artisan serveThen open your browser and navigate to http://127.0.0.1:8000/todos.
Test the functionality by adding new to-do items and ensuring validation errors are displayed correctly. It should look somewhat like this
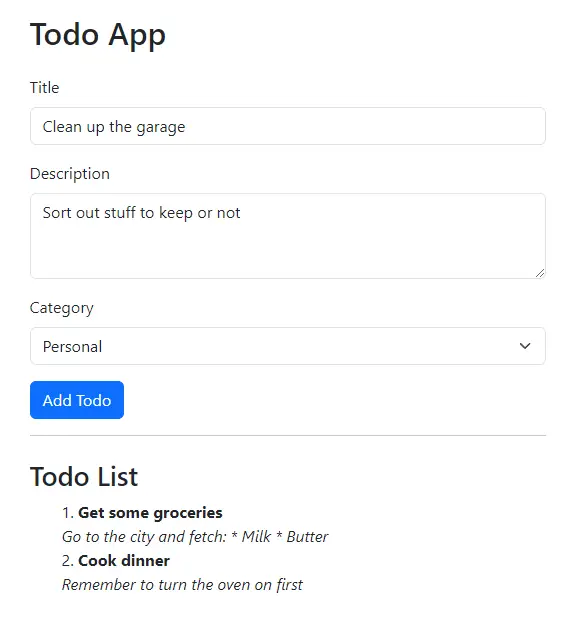
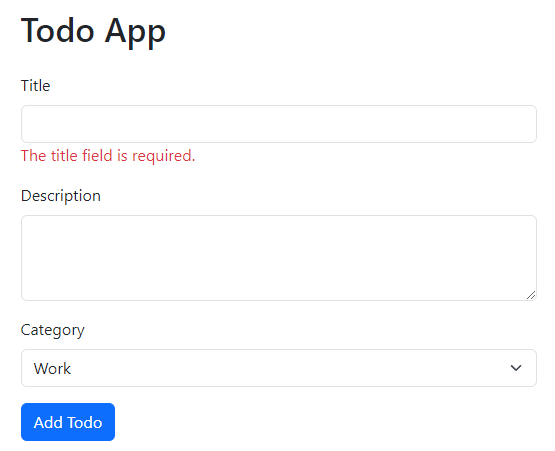
Note that old values are kept even if there is a validation error. For example our description is not lost when we forgot the fields that are required by our validation rules:
Congratulations! You’ve successfully learned how to use a form select in Laravel Blade to create a simple to-do list application.
Frequently Asked Questions
Can I validate values picked in the select to exist in a database table instead of comparing with hardcoded values
It is perfectly fine to validate that the values exist in a prefilled table. This is often more flexible then hardcoding them in your PHP code. You can achieve it by using the validation rule exists:
$request->validate([
    'title' => 'required|string|max:255',
    'description' => 'nullable|string',

    // Validate that only supported options will be accepted
    'category' => 'required|exists:categories,name',
]);
Note: This requires you have a table called “categories” and fill the column “name” with values you want to allow in the select (For example: “Work”, “Personal”, “Errands”)
Can I validate options from a form select using a FormRequest instead?
While our example used inline validation rules in the controller, the select and other inputs can easily be validated in a FormRequest instead. In fact, in most cases I’d recommend placing all your form validation rules in a FormRequest class.
To do this you’d first create a TodoRequest:
php artisan make:request TodoRequestThen edit the TodoRequest to make it look like the following code:
<?php

namespace App\Http\Requests;

use Illuminate\Foundation\Http\FormRequest;

class TodoRequest extends FormRequest
{
    public function authorize(): bool
    {
        return true;
    }

    public function rules(): array
    {
        return [
            'title' => 'required|string|max:255',
            'description' => 'nullable|string',
            'category' => 'required|in:Work,Personal,Errands',
        ];
    }
}
Then changing the TodoController method store to receive a TodoRequest and make it call validated() to retrieve the values that should be stored by using:
    public function store(TodoRequest $request): RedirectResponse|Redirector
    {
        // Create new To-Do item
        $todo = Todo::create($request->validated());

        // Redirect back with success message
        return redirect()->back()->with('success', 'Todo created successfully!');
    }
Conclusion
By following the steps outlined in this tutorial, you’ve learned setting up a Laravel project, models, controllers, views, and routes, handling form submissions, populating select options and keeping the entered values, even when a previous form submission contained validation errors.
Furthermore, in the FAQ part, we’ve covered how one could validate options against predefined values in a custom table instead of a hardcoded array as well as how one could move the validation rules from the TodoController into a TodoRequest.
Now, you’re equipped to populate, validate and repopulate submitted form select values in your Laravel applications with ease. I hope this will be useful in your future projects. Try it out and let me know in the comments how it went!
Happy coding!
References
- Manually Creating Validators (Laravel Documentation)
- Repopulating Forms (Laravel Documentation)
- Form Request Validation (Laravel Documentation)
- Displaying Validation Errors using @error (Laravel Documentation)
This entry is part 7 of 9 in the series Working With Forms
- Sending a Form to a PUT Route in Laravel (With Example)
- Sending a Form to a DELETE Route in Laravel (With Example)
- Why Use Laravel Form Request and How? (BIG Code improvement)
- Making a File Upload Form in Laravel: a Step-by-Step Guide
- How to Insert Form Array Values Into the Database in Laravel
- Using Form Checkboxes in Laravel Blade (keep old value)
- Using Form Select in Laravel Blade (keep old value)
- Using Form Radio Buttons in Laravel Blade (keep old value)
- Using Text and Textarea in Laravel Blade (keep old value)
