You might have encountered a route before that supports only requests that use the DELETE method. Let’s look into this and learn how to create forms that work with DELETE routes properly.
In Laravel defining a route that uses the DELETE method is straightforward, for example:
Route::delete('/products/{products}', 'ProductController@destroy')->name('products.destroy');A DELETE route is also added when using a resource controller like:
Route::resource('products', ProductController::class);Natively, an HTML form sent by a browser doesn’t support using the DELETE method. Therefore, you need to add some markup to your form to ensure it works properly.
Fortunately, Laravel provides an easy solution for this!
By adding @method('DELETE') into your form, Laravel will know to handle incoming form submissions as DELETE requests. For example, your form should look somewhat like this:
<form action="{{ route('products.destroy', $product) }}" method="POST">
    @csrf
    @method('DELETE')
    <button type="submit">Delete</button>
</form>
That’s it! Under the hood, Laravel will automatically replace the @method directive with a hidden field. When receiving a form with this hidden field Laravel knows that the form data should be handled as if it were sent as a DELETE (this is called “Method spoofing”). You can see this hidden input when viewing the page source code:
<input type="hidden" name="_method" value="DELETE">In this guide, we’ll build an example that shows a list of products and provides a form that deletes a product using a DELETE-based route.
Step 1: Create a Laravel Project
Note: in the previous post we showed how to use PUT Routes with forms, if you followed along with that guide you can reuse the code and skip steps 1,2,3 and 4
Begin by creating a new Laravel project if you haven’t done so already. Open your terminal and run:
composer create-project laravel/laravel productsapp
cd productsapp
Step 2: Creating a Model and Migration
Generate a ‘Product’ model and a migration file to create a ‘products’ table by running the following artisan command:
php artisan make:model Product -mThis adds a model in app/Models/Product.php which we can keep unchanged for this guide.
Now we’ll edit the migration file in the folder database/migrations. In that file, we will define the database columns we will need by adding:
<?php

use Illuminate\Database\Migrations\Migration;
use Illuminate\Database\Schema\Blueprint;
use Illuminate\Support\Facades\Schema;

return new class extends Migration
{
    /**
     * Run the migrations.
     */
    public function up(): void
    {
        Schema::create('products', function (Blueprint $table) {
            $table->id();
            $table->string('name');
            $table->string('category');
            $table->decimal('price', 8, 2);
            // Add other product fields here.
            $table->timestamps();
        });
    }

    /**
     * Reverse the migrations.
     */
    public function down(): void
    {
        Schema::dropIfExists('products');
    }
};
Step 3: Create a Seeder
Now we’ll create and run a seeder to fill the products table with some test data.
Create a seeder called ProductSeeder by running:
php artisan make:seeder ProductSeederNow open the generated ProductSeeder.php file located in the database/seeders directory and add:
<?php

namespace Database\Seeders;

use App\Models\Product;
use Illuminate\Database\Seeder;

class ProductSeeder extends Seeder
{
    /**
     * Run the database seeds.
     */
    public function run(): void
    {
        Product::create([
            'name' => 'The Lord of the Rings: The Fellowship of the Ring',
            'price' => 9.95,
            'category' => 'Fantasy Movies',
        ]);

        Product::create([
            'name' => 'Pirates of the Caribbean: The Curse of the Black Pearl',
            'price' => 9.95,
            'category' => 'Fantasy Movies',
        ]);

        Product::create([
            'name' => 'Pan\'s Labyrinth',
            'price' => 9.95,
             'category' => 'Fantasy Movies',
        ]);
    }
}
Now run the seeder using Artisan:
php artisan db:seed --class=ProductSeederStep 4: Create a ProductController
Create a controller for managing products:
php artisan make:controller ProductControllerIn the next step, we’ll add the necessary code.
Step 5: Add Code to ProductController
Next, add the following methods to the ProductController: ‘index’ to display a list of products and ‘destroy’ to delete a product:
<?php

namespace App\Http\Controllers;

use App\Models\Product;
use Illuminate\Http\Request;

class ProductController extends Controller
{
    public function index()
    {
        $products = Product::all();

        return view('products.index', compact('products'));
    }

    public function destroy(Request $request, Product $product)
    {
        $product->delete();

        return redirect()->route('products.index');
    }

    // Other methods ...
}
Step 6: Setting Up Routes
Now let’s add routes to routes/web.php to show all products (index), edit a product, and update a product.
<?php

use App\Http\Controllers\ProductController;
use Illuminate\Support\Facades\Route;

Route::get('/products', [ProductController::class, 'index'])->name('products.index');
Route::delete('/products/{product}', [ProductController::class, 'destroy'])->name('products.destroy');

// other routes ...
Step 7: Creating a View to Show Products
Now let’s create a file at views/products/index.blade.php with blade code to display a list of all products along with a link to delete a product:
Note that this is also where we’ll need to add a form with @method(‘DELETE’) to ensure it works nicely with the delete-based route we’ve defined in the previous step. We’ll make the submit button red and add the text “Delete Product” to it:
<html>
<head>
    <!-- Include Bootstrap to make it the example look better -->
    <link href="https://cdn.jsdelivr.net/npm/bootstrap@5.3.2/dist/css/bootstrap.min.css" rel="stylesheet"
          integrity="sha384-T3c6CoIi6uLrA9TneNEoa7RxnatzjcDSCmG1MXxSR1GAsXEV/Dwwykc2MPK8M2HN" crossorigin="anonymous">
    <script src="https://cdn.jsdelivr.net/npm/bootstrap@5.3.2/dist/js/bootstrap.bundle.min.js"
            integrity="sha384-C6RzsynM9kWDrMNeT87bh95OGNyZPhcTNXj1NW7RuBCsyN/o0jlpcV8Qyq46cDfL"
            crossorigin="anonymous"></script>
</head>
<body>
<div class="container">

    <h1 class="mt-4 mb-4">All Products</h1>

    <!-- Product List -->
    <div class="row">
        @foreach($products as $product)
            <div class="col-md-4 mb-3">
                <div class="card">
                    <div class="card-body">
                        <h5 class="card-title">{{ $product->name }}</h5>
                        <p class="card-text">
                            Price: ${{ $product->price }}<br>
                            Category: {{ $product->category }}
                        </p>

                        <form action="{{ route('products.destroy', $product) }}" method="POST">
                            @method('DELETE')
                            @csrf
                            <input type="submit" class="btn btn-danger mt-3" value="Delete" />
                        </form>
                    </div>
                </div>
            </div>
        @endforeach
    </div>

    <!-- Footer -->
    <footer class="mt-5 text-center">
        <p>Created with ♥ by Laracoding</p>
    </footer>
</div>
</body>
</html>
In case you forget to add
@method('DELETE')to your form you will receive this error:“The POST method is not supported for route products/3. Supported methods: DELETE.”
To fix this simply add
@method('DELETE')and try again
Step 8: Test the Application
Launch the application by running:
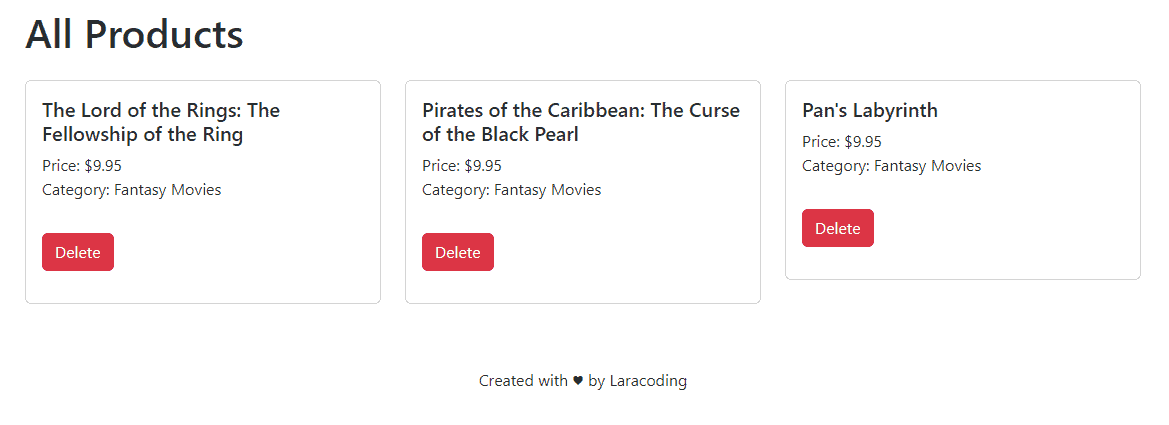
php artisan serveNow navigate to http://127.0.0.1:8000/products in your browser. You should see the products listed, each with a link to delete:
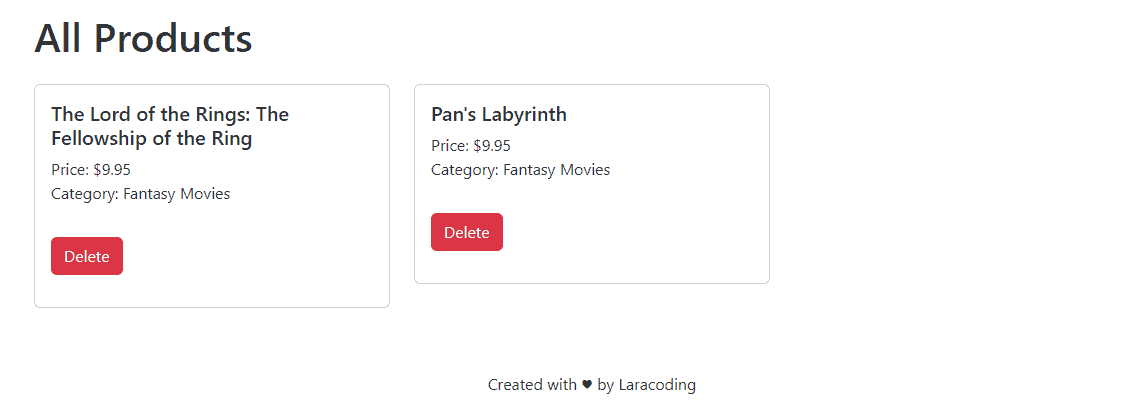
Now after deleting one of the products, the application will redirect us back to the index page where we can see that it is removed as expected:
Conclusion
Congratulations on learning how to use DELETE routes using a form in Laravel. Using simple blade directives like @method is part of what makes the developer experience with Laravel so great.
As an exercise try to add a form that updates a product using the PUT method. You may use the guide Sending a Form to a PUT Route in Laravel to see how it can be done.
Now go ahead and make something cool using these techniques. Happy coding!
References:
- Form Method Spoofing (Laravel Documentation)
- Database: Seeding (Laravel Documentation)
This entry is part 2 of 9 in the series Working With Forms
- Sending a Form to a PUT Route in Laravel (With Example)
- Sending a Form to a DELETE Route in Laravel (With Example)
- Why Use Laravel Form Request and How? (BIG Code improvement)
- Making a File Upload Form in Laravel: a Step-by-Step Guide
- How to Insert Form Array Values Into the Database in Laravel
- Using Form Checkboxes in Laravel Blade (keep old value)
- Using Form Select in Laravel Blade (keep old value)
- Using Form Radio Buttons in Laravel Blade (keep old value)
- Using Text and Textarea in Laravel Blade (keep old value)
