In this guide, you’ll learn how to make a form to upload files to the storage folder and how to show a list of the uploaded files with their download links.
By following each of the steps, you can easily implement a file upload feature with database integration in your own Laravel application.
Let’s get started!
Step 1: Set Up the Routes
Open the route file in /routes/web.php and copy and paste the following code:
<?php

use Illuminate\Support\Facades\Route;

Route::get('uploads/', [UploadController::class, 'index'])->name('uploads.index');
Route::post('uploads/create', [UploadController::class, 'create'])->name('uploads.create');
Route::post('uploads/store', [UploadController::class, 'store'])->name('uploads.store');
The code above will add 3 named routes we will be using:
uploads.indexwill show a list of all our uploadsuploads.createwill show the form by which the user can upload a fileuploads.storewe will validate the incoming file upload and save it.
Step 2: Create a Model and Migration
Now let’s generate and run a migration to create a table “uploaded_files” in your database which we’ll use to store information about the uploaded files.
First, create a model for the uploaded file data by running:
php artisan make:model UploadedFileThen run the following command to generate the migration file:
php artisan make:migration create_uploaded_files_table --create=uploaded_filesNow, edit the generated migration file using the code below:
<?php

use Illuminate\Database\Migrations\Migration;
use Illuminate\Database\Schema\Blueprint;
use Illuminate\Support\Facades\Schema;

return new class extends Migration
{
    /**
     * Run the migrations.
     *
     * @return void
     */
    public function up()
    {
        Schema::create('uploaded_files', function (Blueprint $table) {
            $table->id();
            $table->text('filename');
            $table->text('original_name');
            $table->text('file_path');
            $table->timestamps();
        });
    }

    /**
     * Reverse the migrations.
     *
     * @return void
     */
    public function down()
    {
        Schema::dropIfExists('uploaded_files');
    }
};
To create the table run the artisan command below:
php artisan migrateStep 3: Create the UploadController
Now let’s add a Controller using the following artisan command:
php artisan make:controller UploadControllerIn the next step, we will add code to this controller to load our “index”, “create” and “store” pages.
Step 4: Add UploadController Code
Now edit the UploadController and add the code below:
<?php

namespace App\Http\Controllers;

use Illuminate\Http\RedirectResponse;
use Illuminate\Http\Request;
use Illuminate\Http\UploadedFile;

class UploadController extends Controller
{
    // stores the upload
    public function store(Request $request): RedirectResponse
    {
        // Validate the incoming file. Refuses anything bigger than 2048 kilobyes (=2MB)
        $request->validate([
            'file_upload' => 'required|mimes:pdf,jpg,png|max:2048',
        ]);

        // Store the file in storage\app\public folder
        $file = $request->file('file_upload');
        $fileName = $file->getClientOriginalName();
        $filePath = $file->store('uploads', 'public');

        // Store file information in the database
        $uploadedFile = new UploadedFile();
        $uploadedFile->filename = $fileName;
        $uploadedFile->original_name = $file->getClientOriginalName();
        $uploadedFile->file_path = $filePath;
        $uploadedFile->save();

        // Redirect back to the index page with a success message
        return redirect()->route('uploads.index')
            ->with('success', "File `{$uploadedFile->original_name}` uploaded successfully.");
    }

    // shows the create form
    public function create()
    {
        return view('uploads.create');
    }

    // shows the uploads index
    public function index()
    {
        $uploadedFiles = UploadedFile::all();
        return view('uploads.index', compact('uploadedFiles'));
    }
}
The function store as shown above, validates the uploaded file, stores it in the storage folder, and adds information about it into the database. Our validation rule ensures only jpg or png images or pdf documents can be uploaded and that the file can not be bigger than 2048kb.
Note: It is always a good idea to add validation when processing any kind of input sent by a user which is why we added some validation rules using: $request->validate(...). You should alter these rules to your requirements.
Step 5: Add the Upload Form Code
Now let’s add the following code which contains the HTML form using Laravel Blade syntax
<h1 class="title">Upload file</h1>
@if ($errors->any())
<div class="notification is-danger is-light">
<ul>
@foreach ($errors->all() as $error)
<li>{{ $error }}</li>
@endforeach
</ul>
</div>
@endif
<form action="{{ route('uploads.store') }}" method="POST" enctype="multipart/form-data">
@csrf
<input type="file" name="file_upload">
<button type="submit">Upload</button>
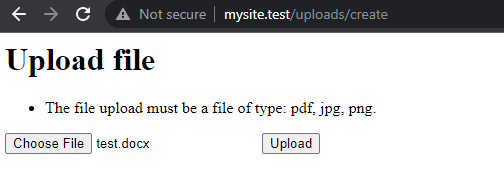
</form>Note that the form above uses the route uploads.store, specifies that data should be sent as POST and includes a CSRF token that Laravel requires for securing our forms. Lastly, note that it uses an input field of type “file” and sets the “enctype” attribute to “multipart/form-data”, which allows the browser to send file uploads properly.
When validations fail a user should easily see which input was wrong so he may correct it. We can easily show the validation errors using the $errors variable provided by Laravel. This is an object that allows us to check whether there are validation errors by calling $errors->any() and if there are we can easily retrieve them using $errors->all()
The code will upload a file just fine and behave well by showing validation errors. However, it looks quite plain.
As you can see the code gives us a working upload form that behaves well by showing validation errors when needed. However, it looks quite plain. Later in this post, we will learn how to Improve the Look and Feel with CSS.
Step 6: Create an Uploads Index Page
Now we create our index page which fetches the files from the database and displays them along with their download link.
To achieve this we open the uploads/index.blade.php file and add the following code to iterate over the list of uploaded files and display their file names and download links:
<h1>Uploaded files</h1>
<table>
<tr>
<th>Filename</th>
<th>Uploaded at</th>
<th>Download</th>
</tr>
@forelse($uploadedFiles as $uploadedFile)
<tr>
<td>
{{ $uploadedFile->original_name }}
</td>
<td>
{{ $uploadedFile->created_at }}
</td>
<td>
<a href="{{ \Illuminate\Support\Facades\Storage::url($uploadedFile) }}" download>
download
</a>
</td>
</tr>
@empty
<tr>
<td>No uploads found</td>
</tr>
@endforelse
</table>
<a href="{{ route('uploads.create') }}">
Upload a file
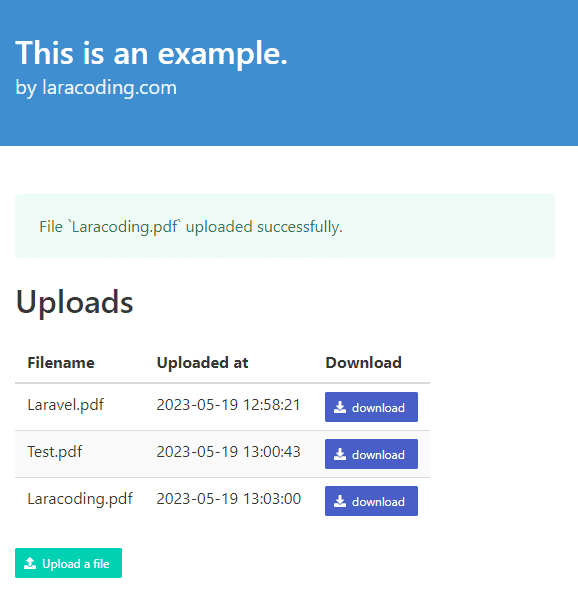
</a>When viewed in the browser, this code will show you a list of all the files that were uploaded to the site:

The look & feel can easily be improved to look a lot better than this. Read on about how this can be done in the next section: Improve the Look and Feel with CSS.
Step 7: Improve the Look and Feel with CSS (Bonus Step)
In this section, we will make the view more user-friendly and pretty by adding Bulma CSS Framework for layout and Font Awesome for icons. For this to work, we will also make a few additions to our HTML structure.
To add Bulma and Font Awesome to our blade we add them to our <head> section
<link rel="stylesheet" href="https://cdnjs.cloudflare.com/ajax/libs/bulma/0.9.3/css/bulma.min.css">
<script defer src="https://use.fontawesome.com/releases/v5.3.1/js/all.js"></script>- Styling the Index Page
First, we will finish the user interface of the index page to make it look like the image below:
To reproduce the output shown above use the following blade code:
<!DOCTYPE html>
<html>
<head>
    <meta charset="utf-8">
    <title>File Upload Example</title>
    <meta name="viewport" content="width=device-width, initial-scale=1">
    <link rel="stylesheet" href="https://cdnjs.cloudflare.com/ajax/libs/bulma/0.9.3/css/bulma.min.css">
    <script defer src="https://use.fontawesome.com/releases/v5.3.1/js/all.js"></script>
</head>
<body>
<header class="hero is-info">
    <div class="hero-body">
        <div class="container">
            <h1 class="title">
                This is an example.
            </h1>
            <h2 class="subtitle">
                by laracoding.com
            </h2>
        </div>
    </div>
</header>
<section class="section">
    <div class="container">
        <div class="columns">
            @if(session()->has('success'))
            <div class="column">
                <div class="alert alert-success">
                    <div class="notification is-success is-light">
                        {{ session()->get('success') }}
                    </div>
                </div>
            </div>
            @endif
        </div>

        <div class="columns">

            <div class="column">
                <h2 class="title">
                    Uploads
                </h2>
                <table class="table is-striped">
                    <thead>
                    <tr>
                        <th>Filename</th>
                        <th>Uploaded at</th>
                        <th>Download</th>
                    </tr>
                    </thead>
                    <tbody>
                    @forelse($uploadedFiles as $uploadedFile)
                        <tr>
                            <td>
                                {{ $uploadedFile->original_name }}
                            </td>
                            <td>
                                {{ $uploadedFile->created_at }}
                            </td>
                            <td>
                                <a href="{{ \Illuminate\Support\Facades\Storage::url($uploadedFile->file_path) }}" target="_blank" class="button is-link is-small">
                                    <span class="icon is-small">
                                        <i class="fa fa-download" aria-hidden="true"></i>
                                    </span>
                                    <span>download</span>
                                </a>
                            </td>
                        </tr>
                    @empty
                        <tr>
                            <td>No uploads found</td>
                        </tr>
                    @endforelse

                    </tbody>
                </table>
                <a href="{{ route('uploads.create') }}" class="button is-primary is-small">
                    <span class="icon is-small">
                        <i class="fa fa-upload" aria-hidden="true"></i>
                    </span>
                    <span>Upload a file</span>
                </a>
            </div>
        </div>
    </div>
</section>

<footer class="footer">
    <div class="content has-text-centered is-flex-align-items-flex-end mt-auto">
        <p>
            Made with ❤ by laracoding.com
        </p>
    </div>
</footer>

</body>
</html>- Styling the upload form
Lastly, we will finish the user interface of the upload page. We add some general layout, and styled validation messages and we’ll add a cancel button so the user can easily return to the Index Page. It will make it look like the image below:
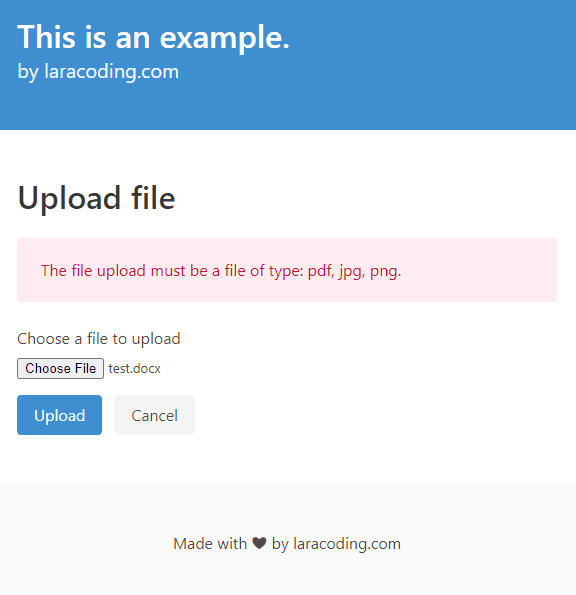
To match the result of the image above, use the following blade code:
<!DOCTYPE html>
<html>
<head>
    <meta charset="utf-8">
    <title>File Upload Example</title>
    <meta name="viewport" content="width=device-width, initial-scale=1">
    <link rel="stylesheet" href="https://cdnjs.cloudflare.com/ajax/libs/bulma/0.9.3/css/bulma.min.css">
    <script defer src="https://use.fontawesome.com/releases/v5.3.1/js/all.js"></script>
</head>
<body>
<header class="hero is-info">
    <div class="hero-body">
        <div class="container">
            <h1 class="title">
                This is an example.
            </h1>
            <h2 class="subtitle">
                by laracoding.com
            </h2>
        </div>
    </div>
</header>
<section class="section">
    <div class="container">
        <div class="columns">
            <div class="column">
                <h1 class="title">Upload file</h1>
                @if ($errors->any())
                    <div class="notification is-danger is-light">
                        <ul>
                            @foreach ($errors->all() as $error)
                                <li>{{ $error }}</li>
                            @endforeach
                        </ul>
                    </div>
                @endif
                <form action="{{ route('uploads.store') }}" method="POST" enctype="multipart/form-data">
                    @csrf
                    <label class="is-block mb-4">
                        <span class="is-block mb-2">Choose a file to upload</span>
                        <span class="file has-name is-fullwidth">
                            <label class="file-label">
                                <input type="file" name="file_upload"/>
                            </label>
                        </span>
                    </label>
                    <div class="field is-grouped mt-3">
                        <div class="control">
                            <button type="submit" class="button is-info">Upload</button>
                        </div>
                        <div class="control">
                            <a href="{{ route('uploads.index') }}" class="button is-light">Cancel</a>
                        </div>
                    </div>
                </form>
            </div>
        </div>
    </div>
</section>

<footer class="footer">
    <div class="content has-text-centered is-flex-align-items-flex-end mt-auto">
        <p>
            Made with ❤ by laracoding.com
        </p>
    </div>
</footer>

</body>
</html>
Conclusion
In this step-by-step guide, we’ve explored implementing file upload functionality with database integration in Laravel. We’ve covered setting up required routes, generating a model, creating a database table, and adding a controller to manage file uploads.
Additionally, we’ve learned to create an upload form and an index page for displaying uploaded files. Furthermore, we discussed enhancing the application’s appearance by incorporating CSS styling using the Bulma CSS Framework and some Font Awesome icons.
Enjoy integrating file upload forms into your Laravel application. Happy coding!
This entry is part 4 of 9 in the series Working With Forms
- Sending a Form to a PUT Route in Laravel (With Example)
- Sending a Form to a DELETE Route in Laravel (With Example)
- Why Use Laravel Form Request and How? (BIG Code improvement)
- Making a File Upload Form in Laravel: a Step-by-Step Guide
- How to Insert Form Array Values Into the Database in Laravel
- Using Form Checkboxes in Laravel Blade (keep old value)
- Using Form Select in Laravel Blade (keep old value)
- Using Form Radio Buttons in Laravel Blade (keep old value)
- Using Text and Textarea in Laravel Blade (keep old value)
