In Laravel, handling form submissions and inserting array values into the database is a common task, especially when dealing with dynamic or repeated input fields.
In this tutorial, we’ll explore how to insert form array values into the database effectively using Laravel. We’ll cover creating migrations, models, controllers, and views to achieve this goal.
Let’s get started!
Step 1: Create a Laravel Project
Begin by creating a new Laravel project using the following commands in your terminal:
composer create-project laravel/laravel switch-example
cd switch-example
Step 2: Create Model and Migration
Now lets generate the migration and model files we’ll use to store an array of answers. To do this, open your terminal and run the following commands:
php artisan make:model Answer
php artisan make:migration create_answers_table --create=answers
Step 3: Add Migration Code
Now lets open the generated migration file and in the up() method define the columns needed for the answers table:
<?php

use Illuminate\Database\Migrations\Migration;
use Illuminate\Database\Schema\Blueprint;
use Illuminate\Support\Facades\Schema;

return new class extends Migration
{
    /**
     * Run the migrations.
     */
    public function up(): void
    {
        Schema::create('answers', function (Blueprint $table) {
            $table->id();
            $table->unsignedBigInteger('question_id');
            $table->string('answer');
            $table->timestamps();
        });
    }

    /**
     * Reverse the migrations.
     */
    public function down(): void
    {
        Schema::dropIfExists('answers');
    }
};
Step 4: Run the Migrations
Create the table in the database by running the following artisan command:
php artisan migrateStep 5: Add Model Code
Now, go to app/Models and open Answer.php and add the code below. This will make the properties question_id and answer mass assignable:
<?php

namespace App\Models;

use Illuminate\Database\Eloquent\Model;

class Answer extends Model
{
    protected $fillable = [
        'question_id',
        'answer'
    ];
}
Step 6: Create a Controller
Now, let’s create a controller to handle the questionnaire form by running the following artisan command:
php artisan make:controller QuestionnaireControllerStep 7: Add Controller Code
As an example, we’ll create questions related to customer satisfaction during a hotel stay. We will use a controller to present the form, validate and store it and show a thank you message.
In the index() method, we’ll define a hardcoded array $questions containing the question IDs and their corresponding content.
The store() method will handle the form submission, perform basic validation, and insert the answers into the database. Normally this would validate that the question_id is known in a questions table but for simplicity’s sake we’ll allow any positive integer.
Finally, the thankYou() method will render a view with a thank you message for the user.
To implement these open the generated Controller at app/Http/Controllers/QuestionnaireController.php and add the following code:
<?php

namespace App\Http\Controllers;

use App\Models\Answer;
use Illuminate\Http\Request;

class QuestionnaireController extends Controller
{
    public function index()
    {
        // For simplicity we define a harcoded array with questions here.
        // A real-world app would typically read these from a table instead
        $questions = [
            1 => 'Describe your overall experience during your stay:',
            2 => 'Please provide feedback on the cleanliness of the room:',
            3 => 'Share your thoughts on the helpfulness and courtesy of the staff:',
            // Add more questions as needed
        ];
        return view('questionnaire', compact('questions'));
    }

    public function store(Request $request)
    {
        // Validate the form
        $validatedData = $request->validate([
            // question_id must be an integer greater than 0
            'answers.*.question_id' => 'required|integer|gt:0',
            // answer can contain any string up to 255 characters
            'answers.*.answer' => 'required|string|max:255',
        ]);
        // Loop through submitted answers and store each into the database
        foreach ($validatedData['answers'] as $answerData) {
            // Use Eloquent Model `Answer` to store each answer
            Answer::create([
                'question_id' => $answerData['question_id'],
                'answer' => $answerData['answer']
            ]);
        }

        return redirect()->route('questionnaire.thankYou');
    }

    public function thankYou()
    {
        return view('thankYou');
    }
}
Step 8: Create a View
Now, we’ll create two views: one to display the questionnaire with our questions, and another for the thank you page.
- First create a new file at
resources/views/questionnaire.blade.phpfor our questionnaire form and add the following code:
<!DOCTYPE html>
<html lang="en">
<head>
    <meta charset="UTF-8">
    <meta name="viewport" content="width=device-width, initial-scale=1.0">
    <title>Questionnaire</title>
    <link href="https://cdn.jsdelivr.net/npm/bootstrap@5.3.2/dist/css/bootstrap.min.css" rel="stylesheet">
</head>
<body>
<div class="container mt-5">
    <h1>Hotel Stay Questionnaire</h1>
    <form action="{{ route('questionnaire.store') }}" method="POST">
        @csrf
        @foreach($questions as $id => $question)
            <div class="mb-3">
                <label for="question{{ $id }}" class="form-label">{{ $question }}</label>
                <input type="text" class="form-control" id="question{{ $id }}" name="answers[{{ $id }}][answer]">
                <input type="hidden" name="answers[{{ $id }}][question_id]" value="{{ $id }}">
                @error('answers.' . $id . '.answer')
                <div class="alert alert-danger">{{ $message }}</div>
                @enderror
            </div>
        @endforeach
        <button type="submit" class="btn btn-primary">Submit</button>
    </form>
</div>
</body>
</html>
The code above loops through the array of questions, displaying each question with an input field for the user’s answer. It also adds code to show validation errors of each field, should they occur.
- Then create a new file at
resources/views/thankyou.blade.phpand add:
<!DOCTYPE html>
<html lang="en">
<head>
    <meta charset="UTF-8">
    <meta name="viewport" content="width=device-width, initial-scale=1.0">
    <title>Thank You!</title>
    <link href="https://cdn.jsdelivr.net/npm/bootstrap@5.3.2/dist/css/bootstrap.min.css" rel="stylesheet">
</head>
<body>
    <div class="container mt-5">
        <h1>Thank You for Your Feedback!</h1>
        <p>We appreciate you taking the time to complete the questionnaire.</p>
    </div>
</body>
</html>
Step 9: Add Routes
Open the file at routes/web.php in your Laravel project. Add the code below to add routes for displaying the questionnaire form and for showing the trankyou page.
<?php

use Illuminate\Support\Facades\Route;
use App\Http\Controllers\QuestionnaireController;

Route::get('/questionnaire', [QuestionnaireController::class, 'index'])->name('questionnaire.index');
Route::post('/submit', [QuestionnaireController::class, 'store'])->name('questionnaire.store');
Step 10: Start the Application
To run the application, use the following Artisan command:
php artisan serveVisit http://127.0.0.1:8000/questionnaire in your browser to access the questionnaire form, fill in some answers and submit:
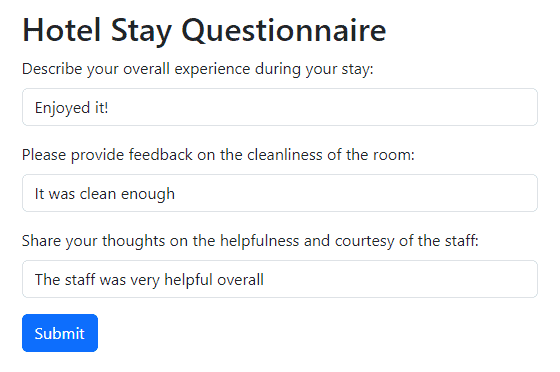
When we’ve filled in the form it will either show validation error or redirect to the thank you page. It should look like this:

Afterwards our database contains all the answers given by the user. It should look like the following:
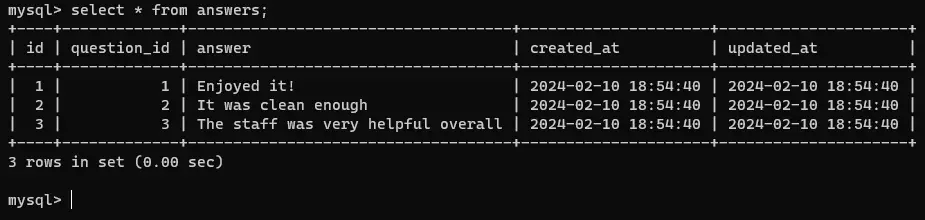
answers Table After Inserting the Sample DataConclusion
And there you have it! We’ve successfully set up a Laravel project complete with migrations, models, controllers, and views, allowing us to effortlessly capture form array values and store them in the database
Feel free to customize the form further by adding a questions table to replace the hardcoded array. Also it would be interesting to add support for different input types like checkboxes or radio buttons.
So, go ahead, dive into your project, customize the features to your liking and start gathering valuable insights from your users. Happy coding!
References
- Database: Migrations (Laravel Documentation)
- Writing Controllers (Laravel Documentation)
- Inserting and Updating Models (Laravel Documentation)
- Routing (Laravel Documentation)
This entry is part 5 of 9 in the series Working With Forms
- Sending a Form to a PUT Route in Laravel (With Example)
- Sending a Form to a DELETE Route in Laravel (With Example)
- Why Use Laravel Form Request and How? (BIG Code improvement)
- Making a File Upload Form in Laravel: a Step-by-Step Guide
- How to Insert Form Array Values Into the Database in Laravel
- Using Form Checkboxes in Laravel Blade (keep old value)
- Using Form Select in Laravel Blade (keep old value)
- Using Form Radio Buttons in Laravel Blade (keep old value)
- Using Text and Textarea in Laravel Blade (keep old value)